Managing Account Settings and User Environment
Account management involves tasks, such as copying, moving, disabling, enabling, modifying, deleting, and renaming an account. It also includes searching for an account or contact, and resetting the password.
The network administrator tracks changes in the user account details, and updates the user account environment accordingly. The user account environment includes components, such as the user profile, log on script, and home directory. The network administrator can modify the user profile, write and set the log on script, and assign the home directory to a user account. The system environment variables you commonly use to manage user accounts are:
-
%SystemRoot%: Stores the base directory name of the operating system.
-
%UserName%: Stores the user account name.
-
%HomeDrive%: Stores the drive letter of the account user home directory.
-
%HomePath%: Stores the full pathname of the account user home directory.
-
%Processor_Architecture%: Stores the processor architecture of a computer.
Managing User Profiles and Users
The user profile stores the environment settings of Windows Server 2003, which the computer loads when an end user logs on. The environment settings include screen colors, printer or network connections, and mouse settings. An end user cannot log on to Windows Server 2003, if the user profile of the user account is not loaded successfully. The advantages of using user profiles are:
-
Multiple desktop settings: Enables multiple end users to work on the same computer because each end user is provided a separate desktop setting.
-
Storing environment settings: Preserves desktop settings. As a result, the same environment is applied each time end users log on to a computer.
-
Securing desktop settings: Ensures that an end user does not modify the desktop settings of another end user.
-
Sharing desktop settings: Provides the same desktop environment to an end user across multiple computers on a network.
You can configure various types of user profiles, such as local, roaming, and mandatory.
Windows Server 2003 creates and stores the local user profile on the local hard disk of a computer. Windows Server 2003 creates the local user profile the first time an end user logs on to the computer. The changes you make to a local user profile are restricted to the local computer only.
| Note | Where you store the local user profile depends on version of Windows Server 2003 you use. In earlier versions, the local user profile was stored in the Documents and Settings folder on the system drive. In the latest version, the local user profile is stored in the Profiles folder of the system root directory. |
The roaming user profile is stored on a network server. This profile enables domain users to log on from any computer in a network. The changes you make to a roaming user profile are updated on the network server, and are accessible to the domain user from all network computers.
| Note | The roaming user profile is necessary for end users who use files that contain encrypted data. The user profile stores the mechanism to decrypt data. |
To create a roaming user profile:
-
Create the MyProfile folder on the network server hard disk and grant Full Control permission to the Everyone user account.
-
Select Start -> Programs -> Administrative Tools -> Active Directory Users and Computers to display the Active Directory Users and Computer window.
-
Select Users in the left pane of the Active Directory Users and Computer window to display a list of users in the right pane.
-
Double-click the John JW. Williams user icon in the right pane to display the Properties dialog box for this user account.
-
Click the Profile tab to configure the roaming user profile.
-
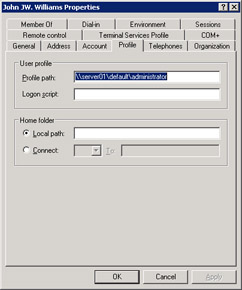
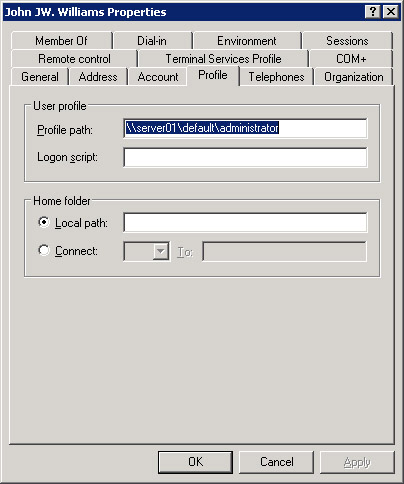
Enter \\server name \user profile name \user name, to specify the location of the shared directory, in the Profile path text box, as shown in Figure 14-6-21:
-
Click OK to close the Properties dialog box.
Tip You can use the %Username% system variable to refer to the user name in the Profile path and Local path text boxes.
You can create a mandatory user profile for domain users who need to work in similar environment settings. The network administrator can change the mandatory user profile, the end user cannot.
| Note | You cannot create a mandatory user profile for user accounts that do not have a roaming user profile. |
To create a mandatory user profile:
-
Create the MyProfile directory on Windows Server 2003 and grant Full Control permission to the Everyone user account.
-
Select Start -> Programs -> Administrative Tools -> Active Directory Users and Computers, and access the John Williams user account.
-
Double-click the John JW. Williams user account icon to display the John JW. Williams Properties dialog box.
-
Enter \\server name \user profile name \user name, to specify the location of the shared directory. Windows Server 2003 creates the Ntuser.dat profile file, and stores the user account profile in it.
-
Rename this file as Ntuser.man, to apply the mandatory profile to the end user on subsequent log ons.
Configuring Environment Settings
You can configure the log on script settings to store the commands that execute whenever a user logs on. The log on script can contain commands to set the system date and time, and specify the location of system resources, such as network drives and printers. Multiple users can share the same log on script.
You can use the Profile tab of the user Properties dialog box to specify the location of the log on script for the user account.
You can also configure the home directory for the user accounts to store their files and folders that are commonly in use. Various applications use the home directory as the default directory for storing files. The command prompt for a user account displays the home directory as the default directory. If the home directory is not assigned, Windows Server 2003 uses the root directory or \Users \Default as the home directory.
You can assign the home directory on either the local or the network drive. If you assign the home directory on the local drive, the end user can access it only from the computer where the directory is created. If the home directory is assigned on the network drive, the end user can access it from any computer on the network.
To assign the home directory on the local drive:
-
Select Start -> Programs -> Administrative Tools -> Active Directory Users and Computers to display the Active Directory Users and Computer window.
-
Select the Users folder in the left pane of the Active Directory Users and Computer window to display a list of user accounts in the right pane.
-
Double-click the John JW. Williams user account icon in the right pane of the Active Directory Users and Computer window to open the John JW. Williams Properties dialog box.
-
Click the Profile tab to configure the user account profile.
-
Select the Local path option in the Home folder section to specify the local drive as the home directory for the John JW. Williams user account.
-
Enter C:\Users \%UserName% in the Local path text box to specify the location of the home directory for the John JW. Williams user account.
-
Click OK to close the John JW. Williams Properties dialog box.
To assign a home directory on the shared network drive:
-
Open the John JW. Williams Properties dialog box.
-
Click the Profile tab to configure the user account profile.
-
Select the Connect option in the Home folder group to specify the network drive as the home directory for the John JW. Williams user account.
-
Select the drive letter you want to use for mapping the network drive.
-
Enter \\thegreatdomain\Users \%UserName% in the To text box, to specify the location of the home directory for the John JW. Williams user account.
-
Click OK to close the John JW. Williams Properties dialog box.
Managing User Information
Windows Server 2003 uses an active directory to store data on user accounts. This data is called contact information, and is available to all users of the domain or forest. To manage the contact information of a user account:
-
Open the Properties dialog box for an end user.
-
Click the General, Address, Telephone, and Organization tabs and enter information in the relevant fields.
-
Click OK to close the Properties dialog box.
Configuring log on Hours and Setting Security Options
You can regulate network access by configuring the log on hours for the end user. Beyond the specified log on hours, the end user is denied access to network resources. To enforce this restriction, you can create a policy to disconnect the end user from the computer after the log on hours expire.
To configure the log on hours:
-
Open the Properties dialog box for the end user.
-
Click the Account tab to configure the log on hours.
-
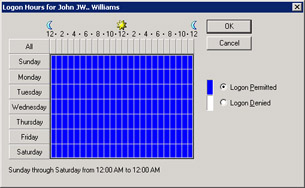
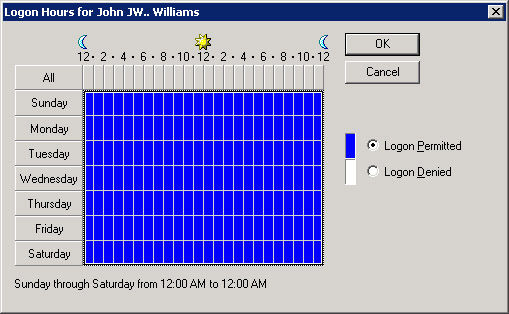
Click log on Hours to display the log on Hours dialog box, as shown in Figure 14-6-22:
-
Select the log on Permitted option to set the log on hours.
-
Select cells from 8 to 8 for Monday to Friday.
-
Click OK to apply the log on hours.
-
Click OK to close the log on Hours dialog box.
To enforce the log on hours:
-
Open the Group Policy Object Editor window.
-
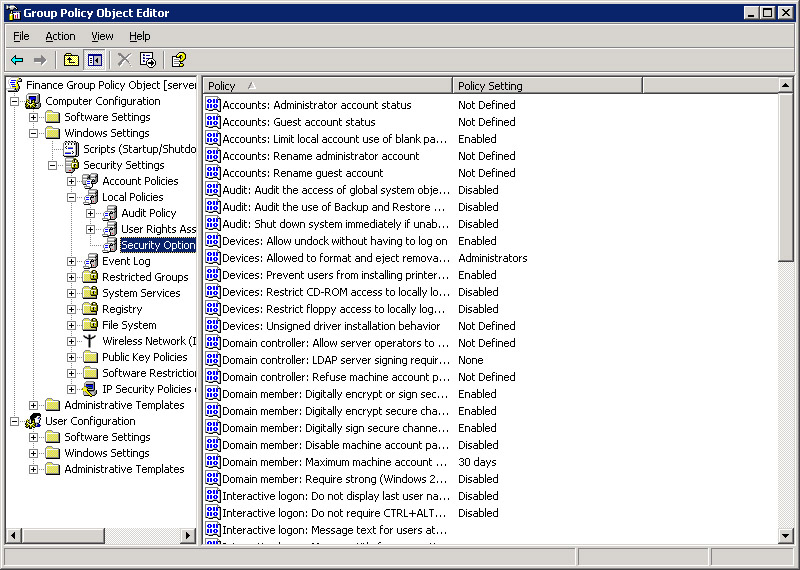
Select Computer Configuration -> Windows Settings -> Security Settings -> Local Policies -> Security Options to display the list of security policies in the right pane, as shown in Figure 14-6-23:
-
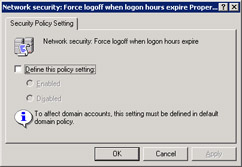
Double-click the Network Security: Force Logoff When log on Hours Expire policy icon in the right pane to display the Network security: Force logoff when log on hours expire Properties dialog box, as shown in Figure 14-6-24:
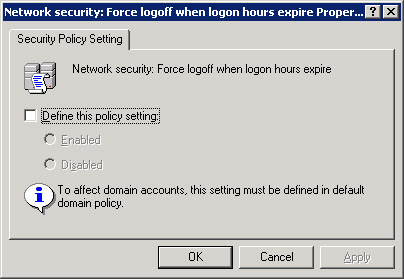
Figure 14-6-24: The Network security: Force logoff when log on hours expire Properties Dialog Box -
Select the Define these policy settings option to configure the Network Security: Force Logoff When log on Hours Expire policy.
-
Select the Enabled option to enable the Network Security: Force Logoff When log on Hours Expire policy.
-
Click OK to close the Network security: Force logoff when log on hours expire Properties dialog box.
You can use security options, such as group policies, user rights policies, and restricted log on hours, to implement security on Windows Server 2003. In addition, you can use the Account tab to secure the user account. To set security options for the John JW. Williams user account:
-
Open the John JW. Williams Properties dialog box.
-
Click the Account tab to set the account security information.
The options in the Account tab page of the user Properties dialog box are:
-
Account Is Disabled: Prevents the end user from accessing network resources.
-
Smart Card Is Required For Interactive log on: Enforces the use of a smart card to log on to the network.
-
Account Is Trusted For Delegation: Allows the end user to work with Active Directory objects.
-
Account Is Sensitive And Cannot Be Delegated: Implements high security by restricting end user access to network resources.
-
Use DES Encryption Types For This Account: Enforces the use of Data Encryption Standard (DES) for encrypting data.
-
Do Not Require Kerberos Pre-authentication: Ignores user account authorization performed using Kerberos V5 protocol.
-
Modifying User and Group Accounts
Windows Server 2003 uses the Active Directory service to modify user and group accounts. You can change the user or group account information, add or remove members from a group account, and rename or delete user and group accounts.
Managing User Accounts
To disable a user account:
-
Select Start -> Programs -> Administrative Tools -> Active Directory Users and Computers to open the John JW. Williams Properties dialog box.
-
Click the Account tab to configure the user account.
-
Select the Account is Disabled option to disable the user account.
Tip To enable a user account, you need to deselect the Account is Disabled option.
Renaming a User Account
You can rename a user account without affecting the permissions and rights assigned to the end user. This is because each user account has a unique Security Identifier (SID) associated with it. The SID does not change when you rename a user account. To rename a user account:
-
Select Start -> Programs -> Administrative Tools -> Active Directory Users and Computers to open the Active Directory Users and Computers window.
-
Select the Users folder in the left pane of the Active Directory Users and Computers window.
-
Right-click the John JW. Williams user account icon in the right pane of the Active Directory Users and Computers window to display a shortcut menu.
-
Select Rename to change the name of the user account.
-
Enter John Williams as the new name of the user account. The Rename User dialog box appears.
-
Click OK to confirm the changes in the Rename User dialog box.
Changing the Password of a User Account
You can change the password of a user account. After you do this, you need to reset all the services that authenticate the password. To change the password of a user account:
-
Select Start -> Programs -> Administrative Tools -> Active Directory Users and Computers to open the Active Directory Users and Computers window.
-
Select the Users folder in the left pane of the Active Directory Users and Computers window.
-
Right-click the John Williams user account icon in the right pane of the Active Directory Users and Computers window, to display a shortcut menu.
-
Select Reset Password to display the Reset Password dialog box.
-
Enter the new password of the user account in the New password text box.
-
Re-enter the new password of the user account in the Confirm password text box.
-
Click OK to confirm the changes in the Reset Password dialog box.
Deleting a User Account
You can delete user accounts that are not required. When you delete a user account, its permissions and rights are revoked from the Active Directory. To delete a user account:
-
Select Start -> Programs -> Administrative Tools -> Active Directory Users and Computers to open the Active Directory Users and Computers window.
-
Select the Users folder in the left pane of the Active Directory Users and Computers window.
-
Right-click the John Williams user account in the right pane of the Active Directory Users and Computers window, to display a shortcut menu.
-
Click Delete to delete the user account.
-
Click Yes on the Warning dialog box.
Maintaining Group Accounts
The Active Directory service allows you to manage global group accounts. To manage local group accounts, you need to use the Local users and groups utility. Any change you make to a group account affects all the members of the group. You can add or delete members from a group account, delete or rename a group, change the type or scope of the group, and modify the group properties.
Adding a Member to the Group
To add a member to a global group:
-
Select Start -> Programs -> Administrative Tools -> Active Directory Users and Computers to open the Active Directory Users and Computers window.
-
Select the Users folder in the left pane of the Active Directory Users and Computers window to display user and group accounts in the right pane.
-
Double-click the Finance_Group group account icon in the right pane of the Active Directory Users and Computers window to display the Finance_Group Properties dialog box.
-
Click the Members tab to display the members of the group account.
-
Click Add to display the Select Users, Contacts, Computers, or Groups dialog box.
-
Click Advanced to expand the Select Users, Computers, or Groups dialog box.
-
Click Find Now to display the list of user accounts.
-
Select the John Williams user account.
-
Click OK to add the user account in the Select Users, Computers, or Groups dialog box.
-
Click OK to close the Select Users, Computers, or Groups dialog box. The John Williams user account appears in the Finance_Group Properties dialog box.
-
Click OK to close the Finance_Group Properties dialog box.
To add a member to a local group:
-
Select Start -> Programs -> Administrative Tools -> Computer Management to display the Computer Management window.
-
Expand the Local Users and Groups folder on the left pane of the Computer Management window.
-
Select the Groups folder in the left pane of the Computer Management window to display a list of groups.
-
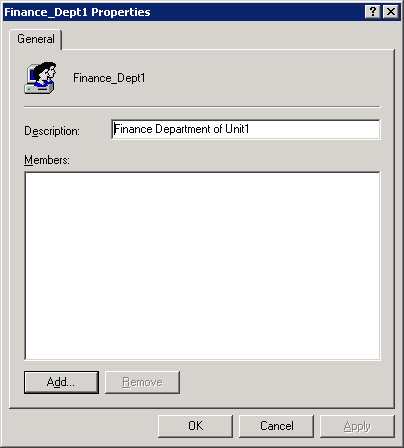
Select the Finance_Dept1 group icon in the right pane of the Computer Management window to display the shortcut menu that contains options to manage the Finance_Dept1 group account.
-
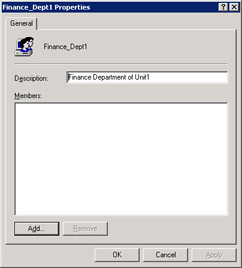
Select the Add to Group option from the shortcut menu, to display the Finance_Dept1 Properties dialog box, as shown in Figure 14-6-25:
-
Click Add to display the Select Users, Computers, or Groups dialog box.
-
Click Advanced to expand the Select Users dialog box.
-
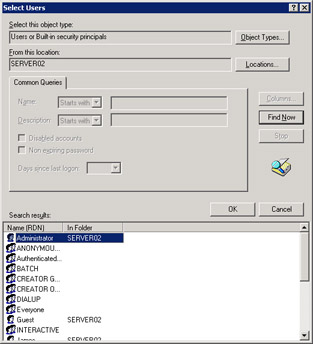
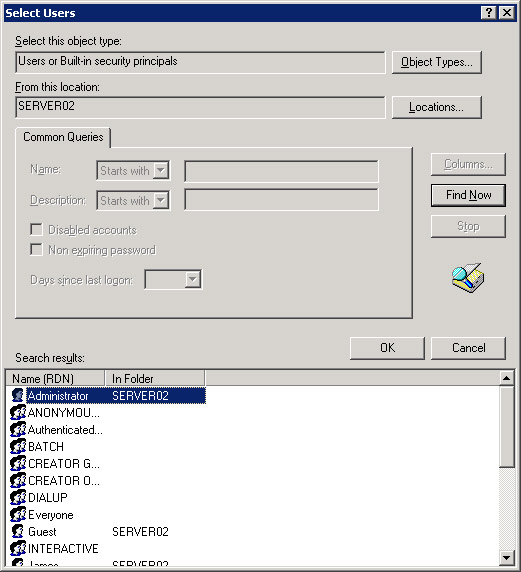
Click Find Now to display a list of user accounts on Windows Server 2003, as shown in Figure 14-6-26:
-
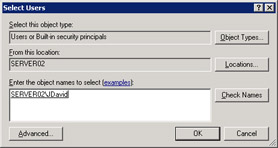
Select the JDavid user account in the Name (RDN) column and click OK to add the user account to the Finance_Dept1 group. The Select Users dialog box reappears, which displays the JDavid user account, as shown in Figure 14-6-27:
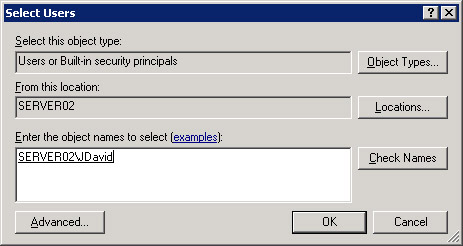
Figure 14-6-27: The Select Users Dialog Box with the JDavid User Account -
Click OK to redisplay the Finance_Dept1 Properties dialog box, with the JDavid user account added.
-
Click OK to redisplay the Computer Management window.
Changing the Group Type and Group Scope
Groups are categorized into various types, depending on their scope. To change the group scope you need to change the group type. To change the group type:
-
Select Start -> Programs -> Administrative Tools -> Active Directory Users and Computers to open the Active Directory Users and Computers window.
-
Select the Users folder in the left pane of the Active Directory Users and Computers window to display user and group accounts in the right pane.
-
Double-click the Finance_Group group account icon in the right pane of the Active Directory Users and Computers window to display the Finance_Group Properties dialog box.
-
Select the Distribution option in the General tab of the Finance_Group Properties dialog box to specify the Distribution group type.
-
Click OK to close the Finance_Group Properties dialog box.
-
Click Yes on the Warning dialog box that appears, for converting the group type.
| Note | You cannot change the group type and group scope of a local group. |
Removing a Member from the Group
To remove a member from a global group:
-
Select Start -> Programs -> Administrative Tools -> Active Directory Users and Computers to open the Active Directory Users and Computers window.
-
Select the Users folder in the left pane of the Active Directory Users and Computers window to display user and group accounts in the right pane.
-
Double-click the Finance_Group group account icon in the right pane of the Active Directory Users and Computers window to display the Finance_Group Properties dialog box.
-
Click the Member tab to display the user accounts added to the Finance_Group group account.
-
Select the James Williams user account and click Remove to remove it from the Finance_Group group account.
Renaming groups
You can modify the name of a group, depending on the change in the group’s functionality. To rename a group:
-
Select Start -> Programs -> Administrative Tools -> Active Directory Users and Computers to open the Active Directory Users and Computers window.
-
Select the Users folder in the left pane of the Active Directory Users and Computers window.
-
Right-click the user account in the right pane of the Active Directory Users and Computers window to display a shortcut menu.
-
Select Rename to change the name of the user account.
-
Enter the new name of the user account. The Rename User dialog box appears.
-
Click OK to confirm the changes in the Rename User dialog box.

