Backing up data is the process of creating duplicate copies of data and saving it on storage media. It enables you to prevent data loss due to database corruption, hardware failures, and natural disasters. Data recovery is the process of restoring data from backed up files. A data recovery agent or an administrator secures data by making data backups.
This ReferencePoint explains the data backup and recovery features in Windows Server 2003. It explains how to back up data using the Backup wizard and recover data using the Restore wizard, and describes how to back up and restore encrypted certificates. It also explains how to manage media pools, work queues, and operator requests.
Backing up Data
The Backup utility is a system in Windows Server 2003 to back up and restore data, and enables you to archive and restore files and folders on your computer. You can schedule backups and creation of emergency repair disks using the Backup utility. This utility also enables you to customize the default backup options.
| Note | An emergency repair disk is a storage device that contains the backup files that you can use to restore data. |
Identifying Types of Backup
There are several techniques to back up your files. The technique you select depends on the type of data you are backing up and the restoration process that you use for recovering the backed up data. You can specify the type of backup for a file using the archive attribute of the file. You can also determine whether or not you need to make the backup of a file, using the archive attribute of the file. The archive attribute is a property, which if enabled for a file, specifies that the file needs to be backed up.
Different types of backups are:
-
Full backup: Enables you to back up all the selected files regardless of the archive attribute. The backup system clears the archive attribute after performing backup. Full backup is also known as normal backup. If you modify a file after making full backup, the archive attribute is automatically enabled to indicate that you need to back up the file.
-
Copy backup: Enables you to back up all the selected files regardless of the archive attribute. The backup system does not clear the archive attribute after creating a backup of a file. The archive attribute property, which is retained after creating the copy backup, enables you to make other types of backup of the file.
-
Differential backup: Enables you to back up all the files that are modified after making full backup. If a file is modified after making full backup, the archive attribute is automatically enabled, which indicates that the file can be backed up using differential backup. The backup system does not clear the archive attribute after you backup a file using differential backup.
-
Incremental backup: Enables you to back up the files that have been modified after full backup. The archive attribute of the file indicates that the file has been modified after full backup, and can be backed up using incremental backup. The backup system clears the archive attribute after backing up a files using incremental backup.
-
Daily backup: Enables you to back up the files that are modified on the date when the data is backed up. In Daily Backup, the modification date of a file determines whether or not the backup system will back up the file. The system does not clear the archive attribute after daily backup.
Identifying Backup Devices
You can select a backup device based on several factors, such as capacity, reliability, and cost of the backup devices. Backup devices that you use to backup files are:
-
Tape drive: Is an inexpensive medium of backing up data. A tape drive uses magnetic tapes to back up data. The drawback of this device is that magnetic tapes can be damaged, causing loss of backed up data.
-
Digital Audio Tape (DAT) drive: Is a backup device that is available in several backup storage media types, such as Digital Linear Tape (DLT) and Linear Tape Open (LTO). Digital audio tapes have higher capacity and are replacing magnetic tapes because they provide more storage space than other backup devices.
Note DLT is a magnetic tape and drive device that you can use to store data. DLT has increased data transfer rate and highest storage capacity among computer tape drives. LTO is an open standard for backup tape devices.
-
Autoloader tape system: Is a collection of several tapes that you can use to store backed up data. Autoloader tape system is a backup device that uses tapes in the DAT format.
-
Optical jukebox: Is a backup device that uses a set of magnetic optical disks to store backed up data. Optical jukebox has a high storage capacity but it is an expensive medium to back up data.
-
Removable disk: Is a portable backup device where you can store files that you access regularly. Removable disks are fast and easy to use for making backups on single drive computers. Backup devices, such as Iomega 100MB and Iomega 250MB zip drives, are examples of removable disks. Removable disks are expensive in comparison to magnetic tapes.
-
Disk drive: Is a storage device used for storing and retrieving information. In a disk drive, data is stored in tracks, which are in the form of concentric rings. Disk drives are expensive in comparison to tape drives.
Exploring the Backup Utility
You run the Backup utility in Microsoft Windows Server 2003 to back up data. The two methods to run the Backup utility are:
-
Select Start -> Programs -> Accessories -> Backup
-
Select Start -> Run and type ntbackup in the Run dialog box
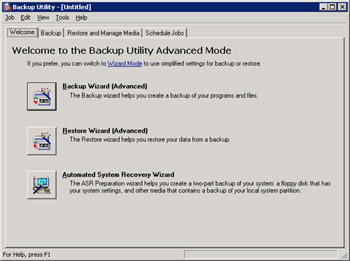
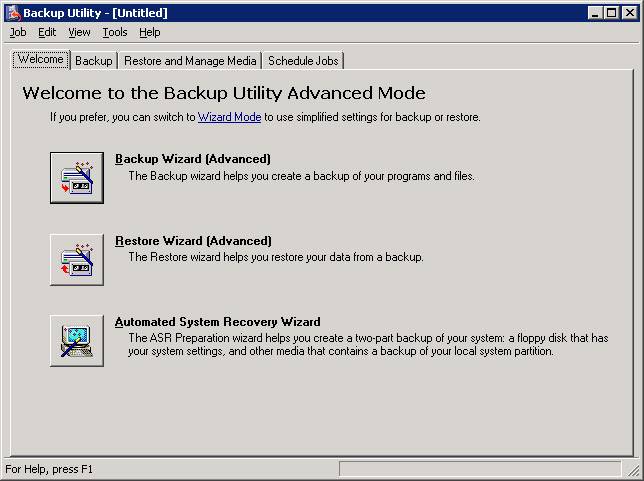
The Backup utility runs in the Backup wizard mode when you run the utility for the first time. The Backup or Restore wizard page appears when the Backup utility runs in the Backup wizard mode. Click the Advanced Mode hyperlink in the Backup or Restore wizard page to run the Backup utility in the advanced mode. The Backup Utility page appears when you run the Backup utility in the advanced mode.
Figure 14-8-1 shows the Welcome tab of the Backup Utility page:
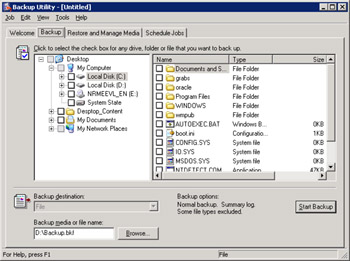
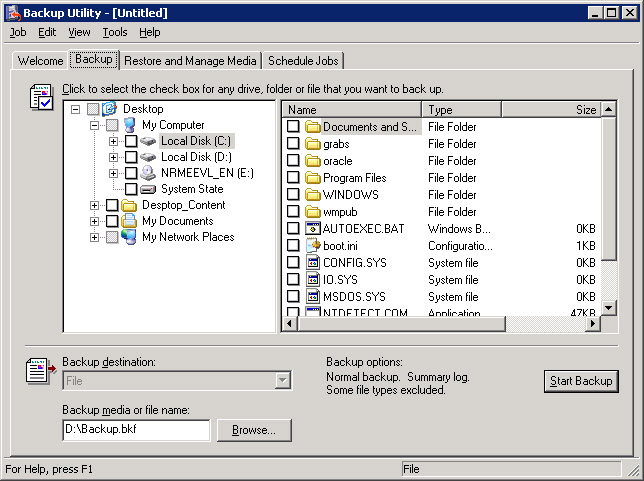
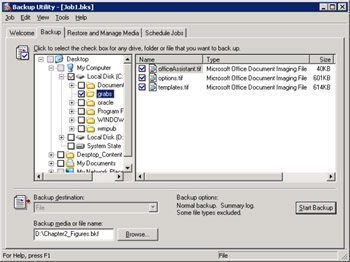
The Backup tab in the Backup Utility page enables you to back up data on your computer.
Figure 14-8-2 shows the Backup tab in the Backup Utility page:
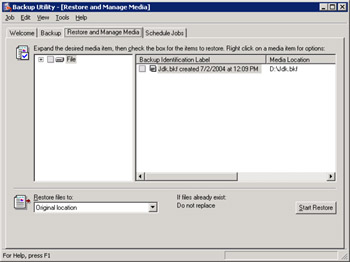
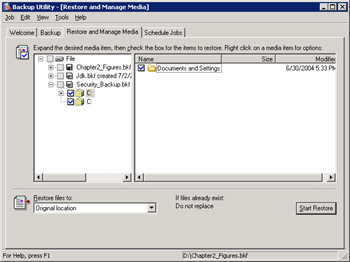
The Restore and Manage Media tab in the Backup Utility page helps you to restore the backed up data to the original location on a computer.
Figure 14-8-3 shows the Restore and Manage Media tab:
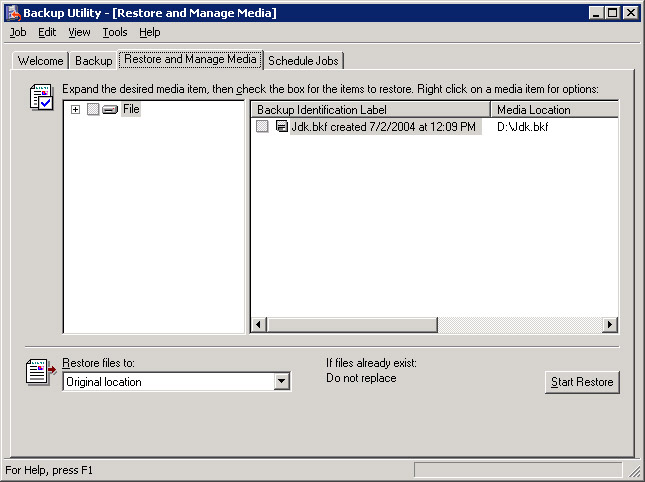
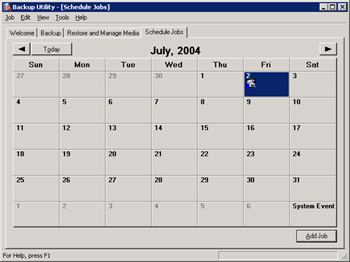
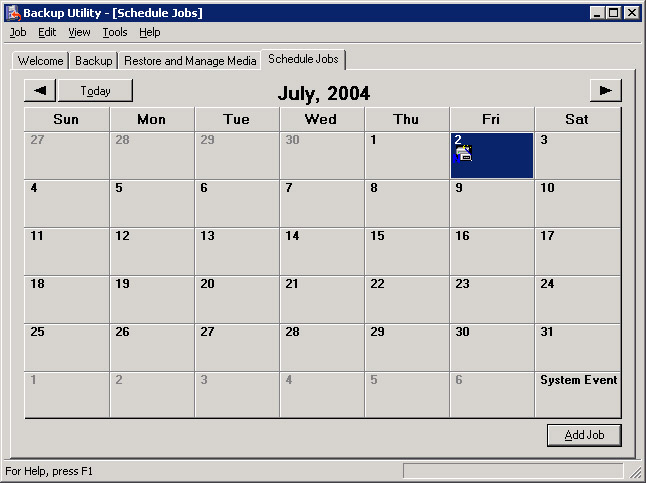
You can click the Schedule Jobs tab to view the job schedules for making backups according to the days of a month. You can also schedule jobs to back up data on future dates using the Schedule Jobs tab.
Figure 14-8-4 shows the Schedule Jobs tab:
Using the Backup Utility to Back Up Data
The Backup tab in the Backup Utility page enables you to back up data when you are running the Backup utility in the advanced mode. To back up data using the Backup utility:
-
Click the Backup tab in the Backup Utility page to open the Backup tab page.
-
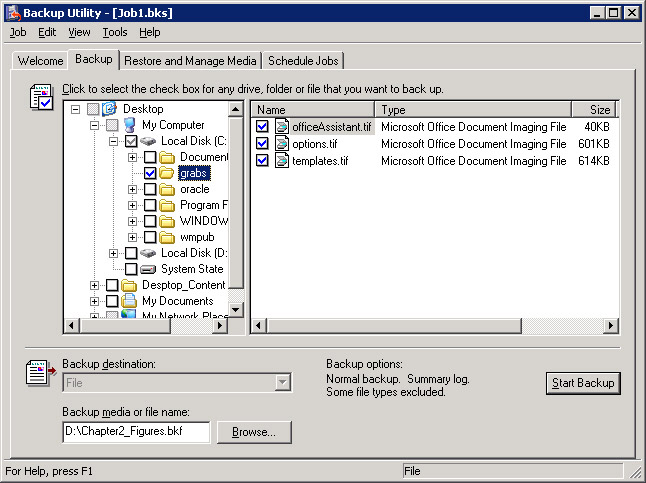
Select the checkboxes of the files, folders, and drives that you want to back up from the list box in the Backup tab, as shown in Figure 14-8-5:
-
Click the Browse button and select the location where you want to store the backed up data.
-
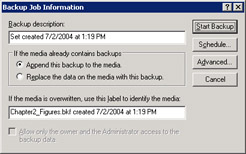
Click the Start Backup button to open the Backup Job Information dialog box, as shown in Figure 14-8-6:
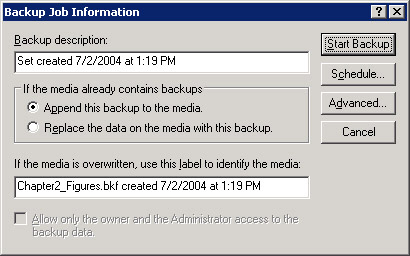
Figure 14-8-6: The Backup Job Information Dialog BoxNote The extension of a backup file is .bkf.
-
Select the Append this backup to the media radio button, if it is not already selected, to specify that the backed up data should be appended to the existing files in the storage media. Alternatively, you can also select the Replace the data on the media with this backup radio button to replace the existing backup files in the storage media with the current backup files.
-
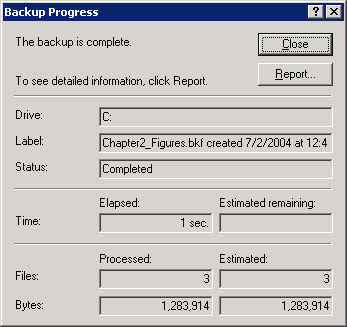
Click the Start Backup button to display the Backup Progress dialog box, as shown in Figure 14-8-7:
-
Click the Close button to close the Backup Progress dialog box.
Note You can click the Report button on the Backup Progress dialog box to view the detailed report of the backup process that contains information, such as the start and completion time of backup.
Using the Backup Wizard to Back Up Data
You can also use the Backup wizard, provided by Microsoft Windows Server 2003, to back up your files. The Backup wizard is a step-by-step guide to make data backup on your computer. To back up data using the Backup wizard:
-
Click the Backup Wizard (Advanced) button in the Welcome tab to run the Backup wizard. The Welcome page of the Backup wizard is displayed.
-
Click the Next button to display the What to Back Up page of the Backup wizard.
-
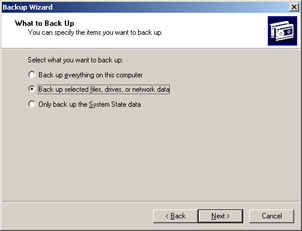
Select the Back up selected files, drives, or network data radio button to back up the selected files. Alternatively, you can select the Back up everything on this computer radio button to back up all the files on the computer. Another option is to select the Only back up the System State data radio button to back up system state data, such as registry files and system boot files.
Figure 14-8-8 shows the What to Back Up page:
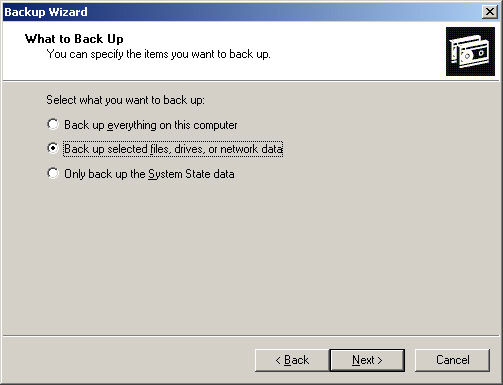
Figure 14-8-8: The What to Back Up Page of the Backup Wizard -
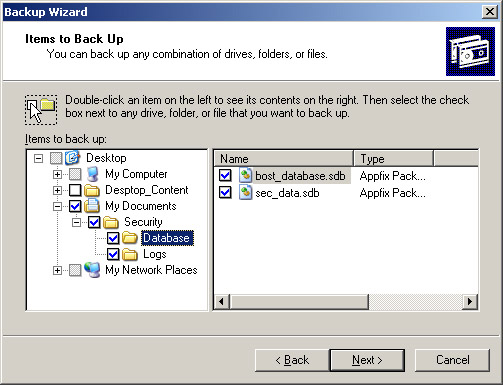
Click the Next button to display the Items to Back Up page. Select the files, folders, and drives that you want to back up from this page, as shown in Figure 14-8-9:
-
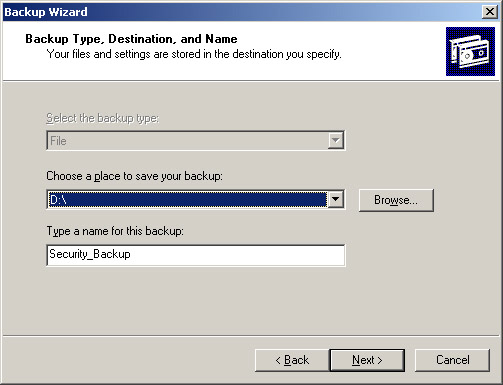
Click the Next button to open the Backup Type, Destination, and Name page. Click the Browse button to select the location where you want to save your backup file. Enter the name of the backup file in the Type a name for this backup textbox.
Figure 14-8-10 shows the Backup Type, Destination, and Name Page:
-
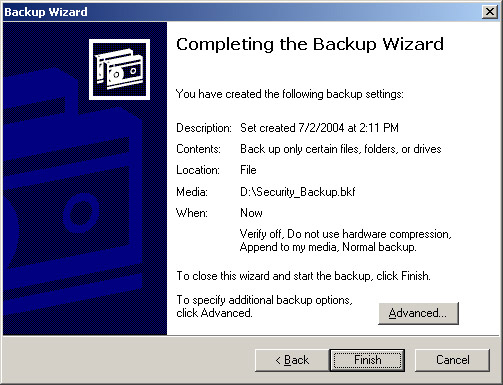
Click the Next button to open the Completing the Backup wizard page. You can click the Advanced button to apply advanced settings, such as Type of Backup, How to Back Up, Backup Options, and When to Back Up.
Figure 14-8-11 shows the Completing the Backup wizard page:
-
Click the Finish button to back up data. The Backup Progress dialog box appears, which displays the status of the backup in progress.
-
Click the Close button to close the Backup Progress dialog box after the backup is complete.
Customizing Backup Options
In Windows Server 2003, you can customize options to back up data, such as backup type and media devices. To customize the backup options:
-
Select Tools -> Options to open the Options dialog box.
-
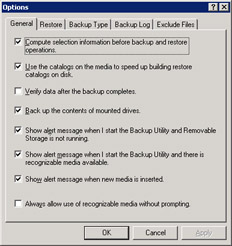
Click the General tab if it is not already activated. You can check and uncheck the checkboxes in the General tab to set the backup options, as shown in Figure 14-8-12:
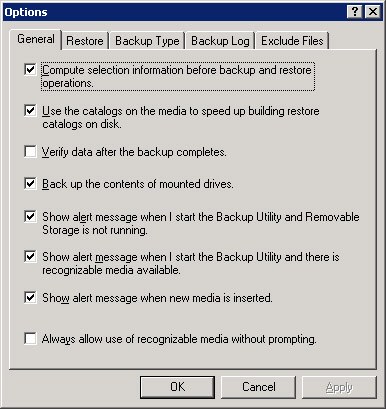
Figure 14-8-12: The General TabThe options in the General tab are:
-
Compute selection information before backup and restore operations: Calculates and displays the number of selected files, and the size of the files that are being backed up or restored.
-
Use the catalogs on the media to speed up building restore catalogs on disk: Enables the use of archive log files on the storage media to indicate the files that are being backed up.
-
Verify data after backup completes: Verifies the backed up data with the original data to ensure that both are same.
-
Back up the contents of mounted drives: Enables backing up data on mounted drives.
-
Show alert message when I start the Backup Utility and Removable Storage is not running: Displays an alert message if the removable storage service is not working when you start the Backup utility.
-
Show alert message when I start the Backup Utility and there is recognizable media available: Displays an alert message if a new medium is available when you start the backup process.
-
Show alert message when new media is inserted: Displays an alert message when new media is detected.
-
Always allow use of recognizable media without prompting: Enables you to add new media to back up media pool automatically without displaying a dialog box that prompts to select new media.
-
-
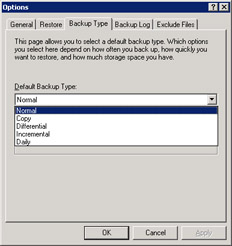
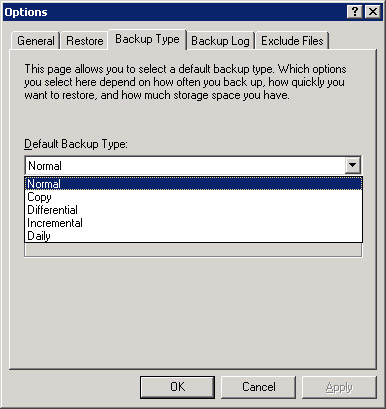
Click the Backup Type tab in the Options dialog box to display the backup type options. The Normal option appears selected as the default backup type.
Figure 14-8-13 shows the backup type options:
-
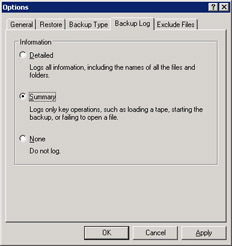
Click the Backup Log tab to display the log options for backup, as shown in Figure 14-8-14:
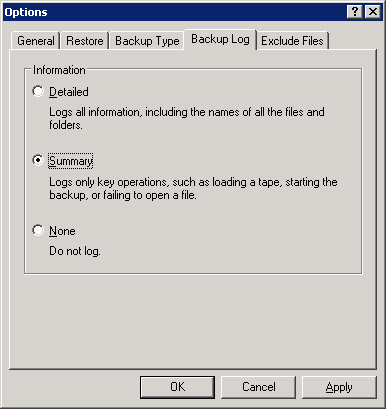
Figure 14-8-14: The Backup Log TabThe options in the Backup Log Tab are:
-
Detailed: Creates a log file with all the backup information, such as names of the files and folders that are being backed up.
-
Summary: Creates a log file with important information, such as loading media and status of backup.
-
None: Indicates that a log file with backup information is not created.
-
-
Click the OK button to assign the backup options for the Backup utility and close the Options dialog box.
Recovering Data
Recovering is the process of restoring data from backed up files on storage media. You can recover backed up files using the Restore wizard or the Restore tab in the Backup utility. While restoring files, you can customize the options for recovering data in the Backup utility.
Recovering Data Using the Backup Utility
The Backup utility in Windows Server 2003 provides the Restore and Manage Media tab that enables you to restore files. You can restore the files that you back up and save to storage media using the Backup utility. To restore files using the Backup utility:
-
Click the Restore and Manage Media tab in the Backup Utility page. Select the files that you want to restore from the Restore and Manage Media tab, as shown in Figure 14-8-15:
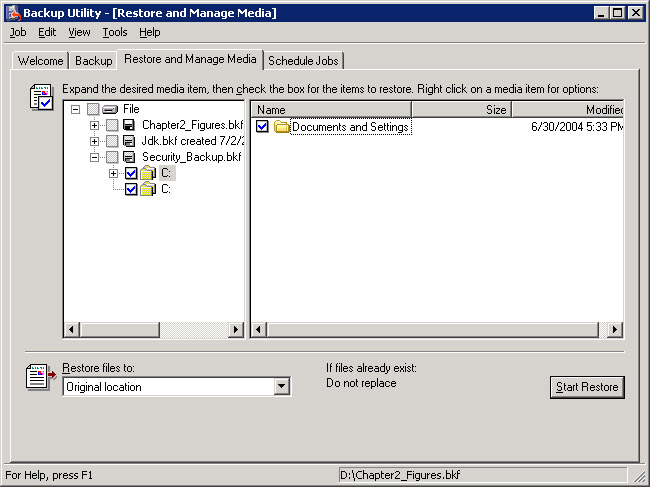
Figure 14-8-15: Selecting Files in the Restore and Manage Media Tab -
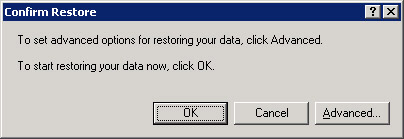
Click the Start Restore button to display the Confirm Restore message box, as shown in Figure 14-8-16:
-
Click the OK button to open the Check Backup File Location dialog box.
-
Click the Browse button to indicate the name and location of the backup file that you want to restore.
-
Click the OK button to display the Restore Progress dialog box and start the restoration process. This dialog box displays the status of the restore process.
Using the Restore Wizard to Recover Data
The Backup utility in Windows Server 2003 enables you to run the Restore wizard, which is a step-by-step guide to restore files that you have backed up. To run the Restore wizard:
-
Click the Restore Wizard (Advanced) button in the Welcome tab to run the Restore wizard. The Welcome page of the Backup wizard is displayed.
-
Click the Next button to display the What to Restore page of the Backup wizard.
-
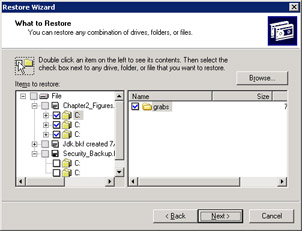
Select the files and folders that you want to restore from the Items to Restore list box. The checkbox preceding the names of the files to restore appears checked.
Figure 14-8-17 shows the What to Restore page:
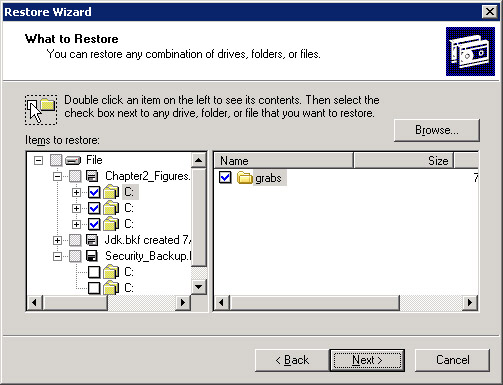
Figure 14-8-17: The What to Restore Page of the Restore Wizard -
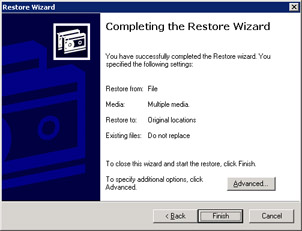
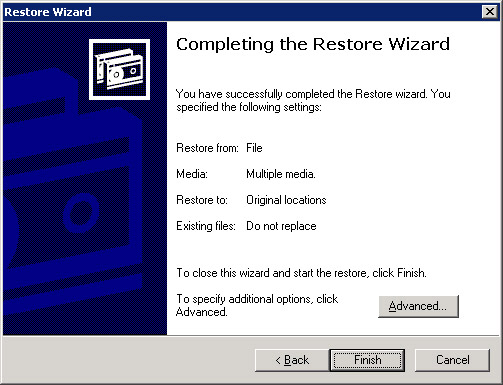
Click the Next button to display the Completing the Restore wizard page. This page contains the Advanced button that you can click to specify the advanced options, such as Where to Restore, How to Restore, and Advanced Restore Options.
-
Click the Advanced button to display the Where to Restore page. The options that you can select for specifying the location to restore files are Original location, Alternate location, and Single folder.
Figure 14-8-18 shows the Where to Restore page:
-
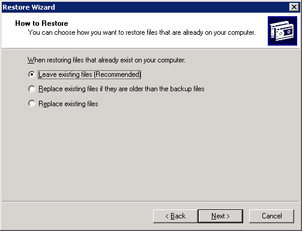
Select the Original location option and click the Next button to open the How to Restore page of the Restore wizard. The Leave existing files (Recommended) radio button appears selected by default.
Figure 14-8-19 shows the How to Restore page:
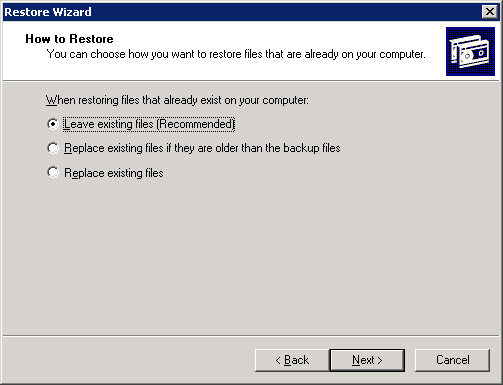
Figure 14-8-19: The How to Restore Page of Restore WizardThe options in the How to Restore page are:
-
Leave existing files (Recommended): Restores files without replacing the existing files.
-
Replace existing files if they are older than the backup files: Restores files after replacing the older version of the restored files with the new versions.
-
Replace existing files: Restores the backed up files and replaces the existing files with the restored files.
-
-
Ensure that the Leave existing files (Recommended) radio button is selected, and click the Next button to open the Advanced Restore Options page. This page displays the options that you can select to restore the security files or special system files, such as registry files.
-
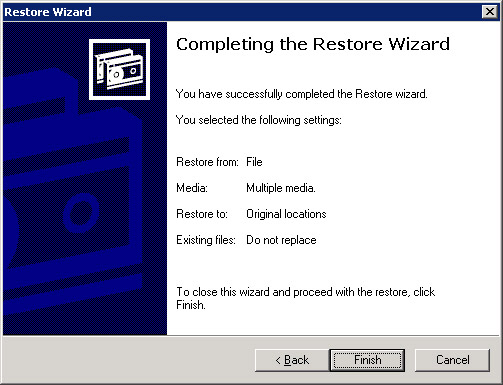
Click the Next button to display the Completing the Restore wizard page, as shown in Figure 14-8-20:
-
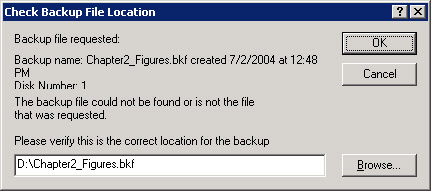
Click the Finish button to display the Check Backup File Location dialog box. The dialog box displays the location where the backup file exists. You can click the Browse button to modify the name and location of the backup file.
Figure 14-8-21 shows the Check Backup File Location dialog box:
-
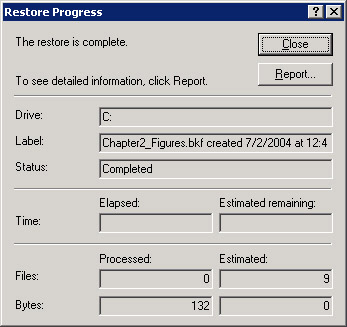
Click the OK button to display the Restore Progress dialog box, which displays the status of the restoration process. You can click the Close button to close the dialog box after viewing the status. The Browse button enables you to select the location of the backup file that you are restoring.
Figure 14-8-22 shows the Restore Progress dialog box:
-
Click the Close button to close the Report Progress dialog box.
Customizing Recover Options
You can preset the options for recovering data on your computer using the Options dialog box in the Backup utility. To customize the recover options:
-
Select Tools -> Options from the Backup Utility page to open the Options dialog box.
-
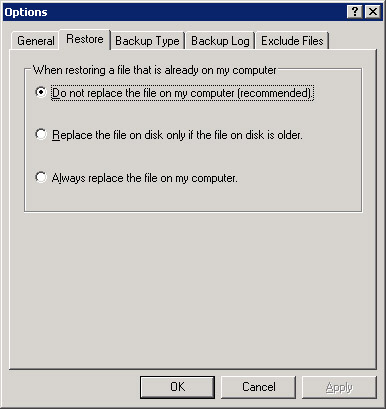
Click the Restore tab to display the restore options that you can customize.
Figure 14-8-23 shows the Restore tab in the Options dialog box:
Backing Up and Restoring Encryption Certificates
Encryption certificates enable you to encrypt and decrypt files. Backing up of encryption certificates is useful if the private key of the encrypted data gets corrupted or destroyed. A private key is a unique code used to encrypt and decrypt data. Backing up the encryption certificate, helps recover the private key from the backed up encryption certificate. Data recovery from encryption certificates is performed with the help of a security process called Encrypting File System (EFS). For example, if the file encryption certificate is corrupted and the private key of an encrypted file is lost due to disk failure, a designated recovery agent can recover the data in the encryption certificate.
| Note | A recovery agent is an end user authorized to decrypt files encrypted by other end users. |
Understanding Encryption Certificates
An encrypted file is an encoded file that can be deciphered using a unique encryption key. There are two types of encryption keys that you can use to encrypt files, public key and private key. A public key is an encryption key that is publicly available. A private key is an encryption key that is only accessible to the end user who encrypts a file. You can read an encrypted file if you have access to the encryption key for that file. Windows Server 2003 encrypts a file when you place the file in a folder marked for encryption. EFS is the process that handles encryption and decryption of files. EFS creates an encryption certificate for a file when you encrypt the file. You need an encryption certificate to decrypt an encrypted file. When you encrypt a file on a computer, you can decrypt it on the same computer if the public-key certificate of the file is available.
The encryption certificate of an encrypted file is stored as a part of the data in the user-profiles. Windows Server 2003 assigns a roaming profile to the encrypted data if you want to access an encrypted file on several computers. The roaming profile ensures that the public-key certificate of encrypted data is accessible on multiple computers. Instead of using a roaming profile, you can also copy the public-key certificate of an encrypted file to the computer where you want to read the encrypted file.
| Note | The Certification Authority (CA) issues the certificates that are used by EFS for decrypting the encrypted files. |
Backing Up Encryption Certificates
You can back up the encryption certificates in Microsoft Windows Server 2003 and recover the backed up encrypted files on other computers. To back up encrypted data on Windows Server 2003:
-
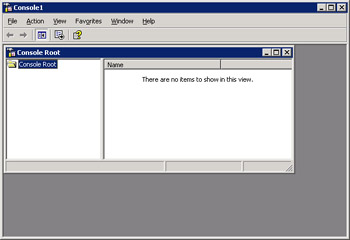
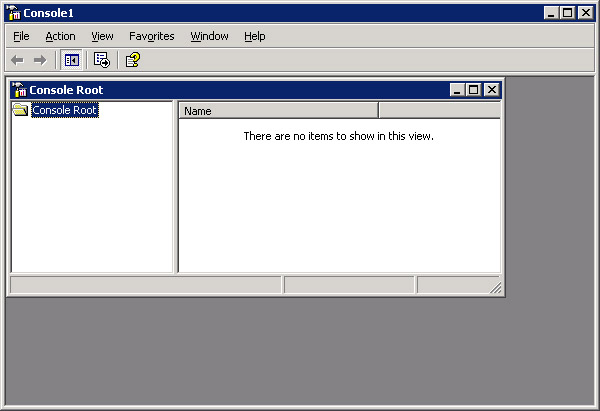
Select Start -> Run and type mmc in the Run dialog box to open the Microsoft Management Console (MMC) window, as shown in Figure 14-8-24:
-
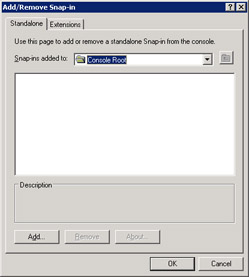
Select File -> Add/Remove Snap-in to open the Add/Remove Snap-in dialog box, as shown in Figure 14-8-25:
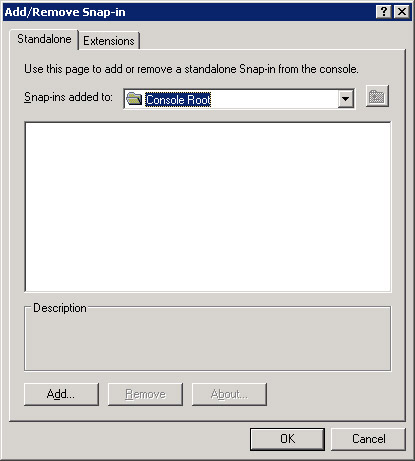
Figure 14-8-25: The Add/Remove Snap-in Dialog BoxNote A snap-in is a component in MMC that you can add to the console window to manage the MMC environment. Snap-ins are management tools that are already installed on a computer and you add them to the console to manage the MMC environment.
-
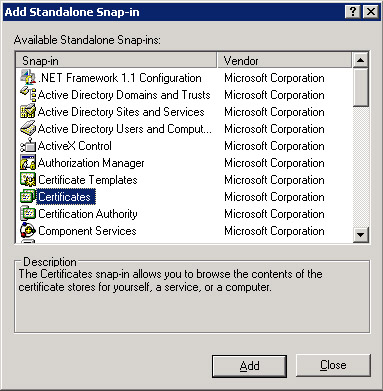
Click the Add button to open the Add Standalone Snap-in dialog box and select the Certificates option from the Available Standalone Snap-ins list box.
Figure 14-8-26 shows the Add Standalone Snap-in dialog box:
-
Click the Add button to display the Certificates snap-in dialog box. Select the My user account radio button from the dialog box and click the Finish button to close the Certificates snap-in dialog box.
-
Click the Close button and then click the OK button to return to the Microsoft Management Console window.
-
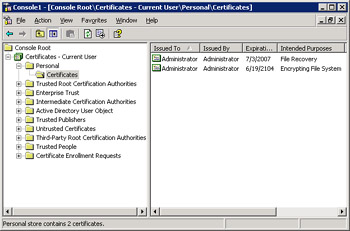
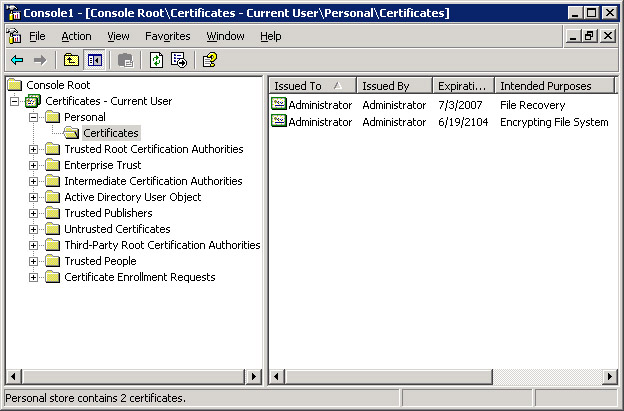
Expand the options, Console Root -> Certificates -Current User -> Personal -> Certificates, in the left pane of the Microsoft Management Console window. The encryption certificates are displayed in the right pane.
Figure 14-8-27 shows the expanded Console Root node in the console window:
-
Right-click the encryption certificate option that you want to back up, to open a shortcut menu. Select All Tasks -> Export from the shortcut menu to start the Certificate Export wizard.
-
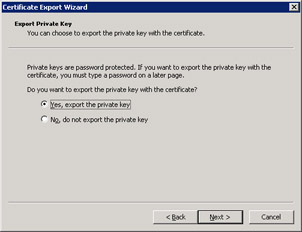
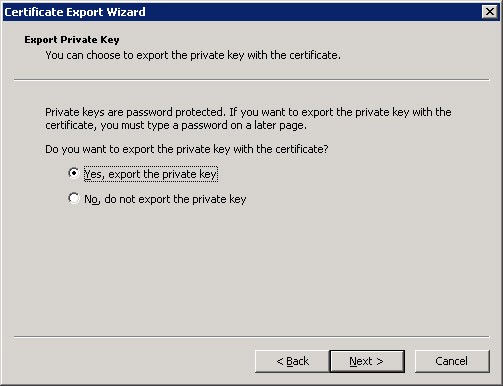
Click the Next button on the Welcome page of the Certificate Export wizard to display the Export Private Key page of the wizard. Select the Yes, export the private key radio button.
Figure 14-8-28 shows the Export Private Key page:
-
Click the Next button to display the Export File Format page. Retain the default settings and click the Next button to display the Password page of the Certificate Export wizard.
-
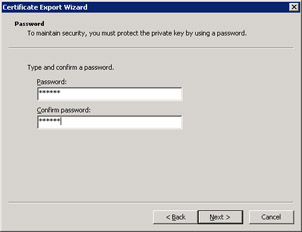
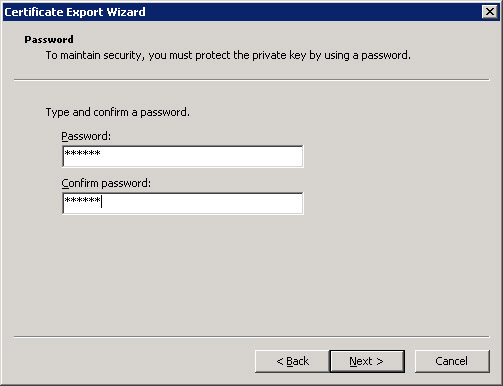
Type a password in the Password textbox to password-protect the backup of the encrypted file. Enter the same password in the Confirm password textbox to confirm the password.
Figure 14-8-29 shows the process of specifying password in the Password page:
-
Click the Next button to open the File to Export page. Browse the location where you want to save the backed up encrypted file and provide a name for the file.
-
Click the Next button to display the Completing the Certificate Export wizard page. This page displays the status of the backed up encryption certificate. Click the Finish button to display a message indicating the successful completion of the backup process. Click the OK button to close the message box.
Restoring Encryption Certificates
You can restore the backed up encryption certificates on your computer or any other computer on the network. If you want to use an encrypted file on another computer, copy the backed up encrypted certificate of the file to the computer where you want to restore it. To restore encryption certificates:
-
Log on to the computer with the same user name and password as on the computer where you backed up the encryption certificate.
-
Copy the backed up encryption certificate to your computer.
-
Add the Certificates snap-in to the Microsoft Management Console window.
-
Navigate to the Personal folder and right-click the Personal node to open a shortcut menu. Select the All Tasks -> Import option to run the Certificate Import wizard. The Welcome page is displayed.
-
Click the Next button to open the File to Import page of the Certificate Import wizard.
-
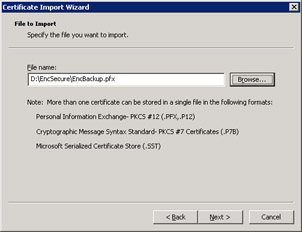
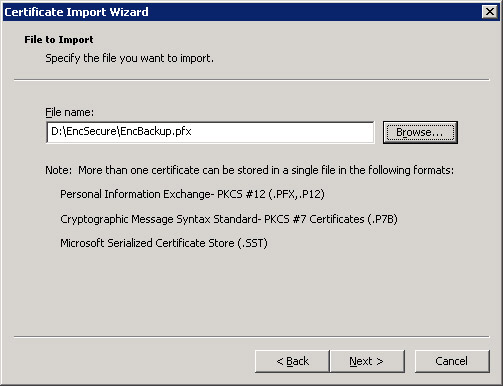
Click the Browse button and specify the location of the backed up file that you want to import.
Figure 14-8-30 shows the location of the backed up file in the File to Import page:
-
Click the Next button to display the Password page. In the Password textbox, enter the password that you had specified to secure the backed up encryption certificate.
-
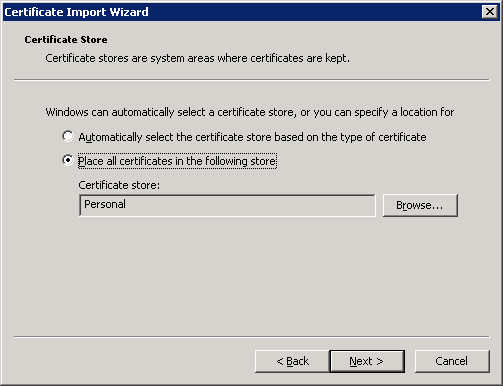
Click the Next button to display the Certificate Store page. Select the Place all certificates in the following store radio button and click the Browse button to specify the folder where you want to restore the encryption certificate.
Figure 14-8-31 shows the Certificate Store page:
-
Click the Next button to display the Completing the Certificate Import wizard page. This page displays the status of the restoration process. Click the Finish button to display a message confirming the successful completion of the import process.
-
Click the OK button to close the message box.
Managing Media Pools
A media pool is a collection of tapes that store information. Media pools are used to store backup files on your computer. You can select the Computer Management option from the Administrative tools to open the Computer Management window and use it to manage media pools. Media pools are categorized under the Removable Storage node in the Computer Management window, according to their availability. You can also modify the properties of media pools by specifying their allocating and deallocating policies. The allocating and deallocating policies determine how media are allocated and deallocated to the media pools.
Identifying Types of Media Pools
The Removable Media node in the Computer Management window enables you to manage media, such as categorize media into media pools. To view the categories of media pools that are available:
-
Click the Start -> All Programs -> Administrative Tools -> Computer Management option to open the Computer Management window.
-
Double-click the Storage node in the left pane of the Computer Management window to expand the node.
-
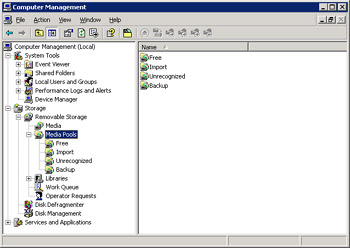
Double-click the Media Pools node to expand it. The types of media pools are listed under the Media Pools node.
Figure 14-8-32 shows the types of media pools available under the Media Pools node:
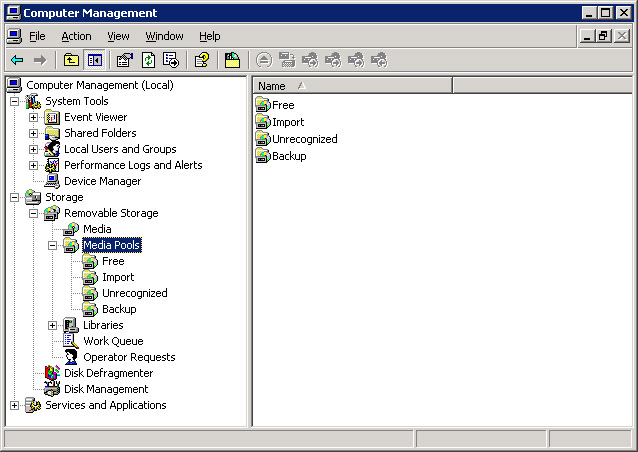
Figure 14-8-32: Types of Media PoolsThe different types of media pools are:
-
Unrecognized: Contains media that removable storage does not support. To allocate a storage media such as a tape or disc, available to applications, you must move the storage media option to the Free media pool from an Unrecognized media pool. After being removed from a library, Unrecognized media are automatically deleted.
-
Free: Contains media that are not being used by any application and do not contain any useful data. Media in the Free media pools are available for use by applications.
-
Import: Contains media that have not been used in any removable storage system but can be identified by removal storage systems.
-
Application: Determines the media that an application can access. Media in this media pool are controlled by the application such as the Backup utility or by an administrator. More than one application can share a single media pool or one application can use more than one media pool.
-
Preparing Media
Preparing media is the process of moving storage media, which are not in use, to the Free media pool. You can prepare an existing media to make the prepared media available in the Fee media pool. All information in media is deleted when you prepare media. To prepare a media pool:
-
Select Start -> All Programs -> Administrative Tools -> Computer Management to open the Computer Management window.
-
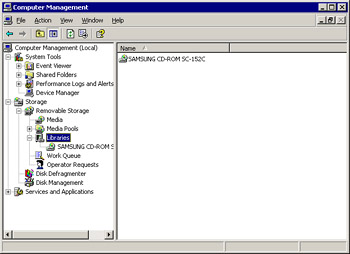
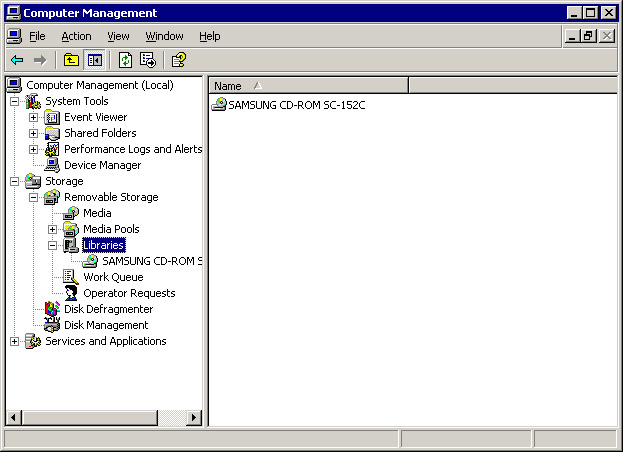
Double-click the Removable Storage node to expand it. The Libraries node is displayed, as shown in Figure 14-8-33:
-
Double-click the Libraries node under the Removable Storage node to display a list of all media that you can prepare.
-
Right-click the storage media option that you want to prepare to open a shortcut menu.
-
Select the Prepare option from the shortcut menu to prepare the selected media.
Creating Media Pools
Application media pools are media pools that contain storage media that are allocated to a specific application, such as the Backup utility. You can create Application media pools using the options available in the Computer Management window. You specify type of media, such as Removable media, when you create an Application media pool. To create an Application media pool:
-
Open the Computer Management window and expand the Removable Storage node.
-
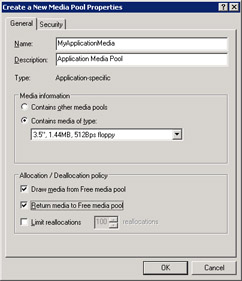
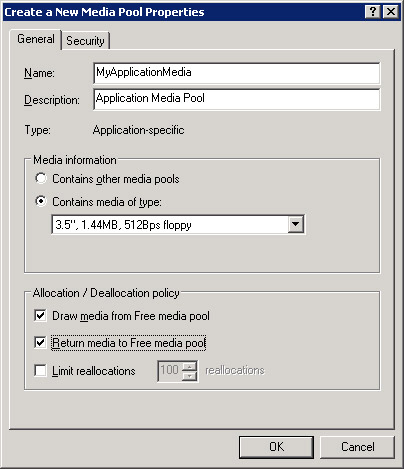
Right-click the Media Pools node and select the Create Media Pool option to open the Create a New Media Pool Properties dialog box.
-
Enter the Name of the Application media pool in the Name textbox. Enter the description of the media pool in the Description textbox.
-
Select the Contains media of type radio button and select a type of media from the corresponding combo box to specify the type of media you want the media pool to store. Alternatively, you can also select the Contains other media pools radio button to specify that the Application media pool will contain other media pools.
-
Select the checkbox options, which specify the allocation and deallocation polices, from the Allocation/Deallocation policy frame.
-
Click the OK button to close the Create a New Media Pool Properties dialog box. The Application media pool that you create appears as a node under the Media Pools node.
Assigning Allocation and Deallocation Properties
You can modify the media properties, and also allocate and deallocate policies of the media types. To modify the property of a type of media:
-
Open the Computer Management window and expand the Media Pools node.
-
Right-click the media pool node for which you want to modify the properties. A shortcut menu appears.
-
Select the Properties option from the shortcut menu to open the Properties dialog box for the selected media pool option, as shown in Figure 14-8-34:
-
You can check or uncheck the options that are available in the Allocation/Deallocation policy frame.
The options available in the Allocation/Deallocation policy frame are:
-
Draw media from Free media pool: Retrieves media from the Free media pool automatically, when needed.
-
Return Media to Free media pool: Allocates the media to the Free media pool automatically when the media are not needed.
-
Limit reallocations: Restricts the use of the media for a specific number of times. The media are allocated for the number of times specified in the reallocations spin-box in the Properties dialog box.
-
-
Click the OK button from the Properties dialog box to assign properties to a selected medium.
Managing Work Queues
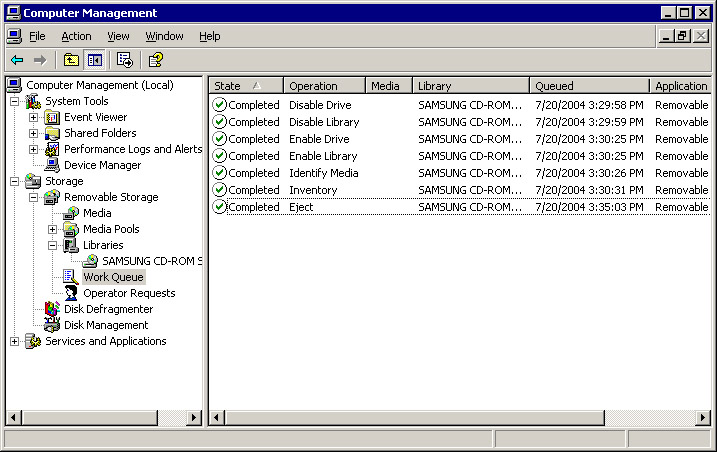
A work queue is a list of all library requests, such as requests for backup operations made to storage media in media pools. An application or an end user having administrative rights makes the requests that are stored in a work queue. The Work Queue node in the Computer Management window of Windows Server 2003 displays all the requests listed in the work queue. The list of library requests performed by the administrator is called an operation. Each operation displays a state, which indicates the status of the operation. When a request needs immediate attention of the administrator or backup operators, the task is displayed in the Operator Requests node in the Computer Management window.
Using Work Queues
You can display the operations listed in the work queue using the Work Queue node available in the Computer Management window. To display the operations in the Work Queue:
-
Open the Computer Management window and expand the Storage node.
-
Double-click the Removable Storage node to expand it. The Work Queue node is displayed under the Removable Storage node.
-
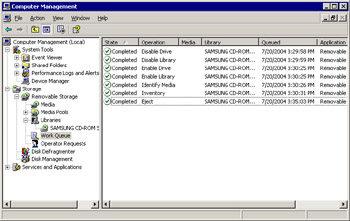
Double-click the Work Queue node to view all the operations listed in the Work Queue node, as shown in Figure 14-8-35:
The State description indicates the status of the operation in the Work Queue node. The different states of an operation in the Work Queue node are:
-
Waiting: Indicates that the operation is in the waiting state because the resources required for the operation are not available.
-
In Progress: Indicates that the operation is in progress.
-
Completed: Indicates that the operation has been completed successfully.
-
Cancelled: Indicates that the operation has been cancelled.
-
Failed: Indicates that the operation failed to complete.
Managing Operations
You can modify the properties of the operations that display the status, Waiting. An operation displays a Waiting status when it cannot be completed because of unavailability of resources. An example when an operation displays a Waiting status is when a resource is not mounted. Mounting is the process of making a storage device accessible to the end user. You can modify the mount properties of the operations displaying the Waiting status. To change the mount properties of operations:
-
Right-click the waiting operation option that you want to modify. A shortcut menu appears.
-
Select the Re-Order Mounts option from the shortcut menu to display the Change Mount Order dialog box.
-
Select a radio button to specify the modification in the order of the mount operation. The options that you can select are:
-
Move to the front of the queue: Moves the mount operation to the beginning of the work queue.
-
Move to the end of the queue: Moves the mount operation to the end of the work queue.
-
Make it number: Moves the mount operation to the location specified by the operation.
-
-
Click the OK button to close the Change Mount Order dialog box.
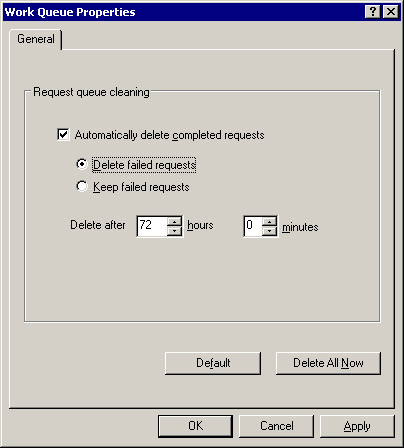
All operations listed in the Work Queue node are deleted after 72 hours by default. You can modify the property of the Work Queue node to control the automatic deletion time. To modify the automatic deletion time:
-
Expand the Removable Storage node in the Computer Management window.
-
Right-click the Work Queue node and select the Properties option to open the Work Queue Properties dialog box, as shown in Figure 14-8-36:
-
In the Delete after hours spin box, enter the number of hours to specify the time duration for which you want the operations to exist in the Work Queue node.
-
Uncheck the Automatically delete completed requests checkbox to store the operations in the Work Queue node until you delete the operations manually.
-
Click the Delete All Now button to delete all the operations from the Work Queue node.
-
Click the OK button to apply the properties and close the Work Queue Properties dialog box.
Understanding the Operator Requests Queue
The Operator Requests node in the Computer Management window lists the tasks that need the attention of the administrator or backup operators. You can view the operator requests by expanding the Removable Storage node and clicking the Operator Requests node in the Computer Management window. The operator requests queue represents all the tasks that an operator performs. These requests are issued by removable storage media or by a compliant application for operations that are performed manually. Servicing a library, inserting a clean cartridge, or inserting offline tapes are examples of operations performed manually.
The status displayed in the right pane of the Computer Management window, indicates the request state of a request. You can respond to requests by either completing or refusing the request. Completed or refused requests stay in the queue for 72 hours, by default. The Operator Request node lists all requests according to their current state. This enables you to track the status of the requests. The states of requests listed in the Operator Request node are:
-
Submitted: Represents the request that is submitted by removal storage or a compliant application, and is waiting for an operator to handle it.
-
Completed: Represents the request that has been completed as specified by an operator, or detected by removal storage.
-
Refused: Represents the request that has been refused by an operator and has not been performed. To refuse a request, right-click the request option and select the Refuse option.

