Using Samba, you can share data and resources in a network that has both Windows-based and Unix-based computers. The Windows platform uses the Server Message Block (SMB) protocol for sharing resources. Samba implements this protocol on Unix and Linux-based computers to enable sharing of resources.
This ReferencePoint explains the installation and configuration of Samba on Linux. It also describes how to access data and resources on Linux from a Windows-based computer on a network.
1. Installing Samba
You can install Samba from a precompiled binary code as well as from a source code. Both these forms are available at http://www.samba.org/. The installation that uses the precompiled code is faster and easier while the installation from the source code is more flexible.
Installing from Precompiled Code
The precompiled code is usually present in the installation CD of the Operating System (OS). The file can also be downloaded from the Web site, http://us4.samba.org/samba/ftp/Binary_Packages/. At the site, select the file according to the OS that you are using and download the .rpm file.
To install Samba, use the command:
rpm –ivh
Installing After Compiling the Source Code
Before compiling the source code, run the configure command:
# ./configure --
Table 3-1-1 lists the parameters that can be used with the configure command:
| Parameter | Description |
|---|---|
| with-ssl | Enables the Secured Sockets Layer (SSL) protocol. The SSL protocol encrypts data transferred over the Internet. |
| with-smbwrapper | Enables the SMB wrapper support. This enables the Unix system to use the SMB protocol to access the executable files in a way similar to the native Unix executable files. |
| with-afs | Enables the Andrew File System support to facilitate efficient sharing of data and resources across Local Area Network (LAN) and Wide Area Network (WAN). |
| with-dfs | Enables support for Distributed File System (DFS), which is the next version of AFS. |
| with-krb4=BaseDir | Enables support for Kerberos 4.0, which is a network security protocol. |
| with-krb5=BaseDir | Enables support for Kerberos 5.0, which is the standard for authentication on Microsoft Windows 2000. |
| with-pam | Enables support for Pluggable Authentication module (PAM), which is an authentication feature in Linux. |
| with-ldap | Enables Lightweight Access Directory Protocol (LDAP) support. LDAP is a client-server directory protocol provided by Microsoft. |
| with-nis | Enables support to obtain the password files from Network Information Services (NIS) or the network yellow pages. |
| with-nisplus | Enables support to obtain the password files from NIS+, which is the later version of NIS. |
| with-nisplus-home | Connects the client computer to the home directory of the user. |
| with-syslog | Enables support for the SYSLOG utility, which logs the information generated by the Samba server. |
| with-netatalk | Includes support for Macintosh’s Netatalk, a package that enables Unix and Macintosh to share resources. |
When the configure command is executed, it creates a makefile that contains the instructions on how to install the components.
The configure command should be executed with the required parameters before the source code is compiled. You can compile the source code by navigating to the directory where the Samba source files are stored and typing the make command. This automatically compiles the programs that are part of the Samba package.
| Note | You must have the Superuser permission to install and execute Samba. |
The compiled binary code needs be installed after the files are compiled. To install the binary code, use the command:
make install
This installs the Samba server. If you are upgrading from the earlier version of Samba, the files installed by the previous version are renamed with a .old extension. By default, Samba is installed in the /usr/local/samba directory. This directory is also called the Main tree.
Starting and Testing the Samba Daemons
To use Samba, you need to start the Samba services also called daemons. To start a daemon, browse to the bin directory in the Samba installation directory and run these commands:
smbd -D
nmbd –D
| Note | You should have the Superuser rights to start and stop the daemons. |
To test the working of Samba, execute the command:
smbclient –U% -L localhost
This shows the list of workgroups that exist on the network.
Making a Configuration File Using the smb.conf file
The configuration information for Samba is stored in the smb.conf file. To share a directory, you need to add the information pertaining to sharing to this file. The smb.conf file is usually stored in the /usr/local/samba/lib directory. This file is divided into sections, with each section name specified in square parentheses ([]).
To share a directory, add this code in the respective sections of the smb.conf file:
[global]
workgroup = MDKGROUP
[test]
comment = Shared using Samba
path = /usr/mysamba/share
read only = no
guest ok = yes
In this code, test is the name that appears on the network. The value of the path parameter specifies the path of the directory that is to be shared. The value of the read only option, when set to no, gives full access to the directory. When the value of the read only option is set to yes, it provides a read-only permission. The value of the guest ok option specifies whether or not end users with guest logins can access the directory.
Making a Configuration File Using the Samba Web Administration Tool
The Samba Web Administration Tool (SWAT) is a Graphical User Interface (GUI) tool used to create shared directories, configure shared printers, and change values in the global section of the smb.conf file. You need to download and install SWAT because it is not installed with Samba.
To configure SWAT:
-
Open the Web browser.
-
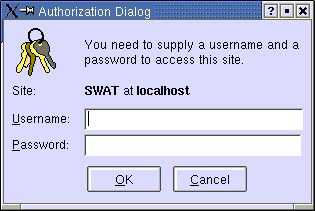
In the Address bar, type http://NameofComputer:901/, where NameofComputer is the name of the Linux computer. The Authorization dialog box appears, as shown in Figure 3-1-1:
-
In the Username text box, enter root.
-
In the Password text box, enter the password for the root, and click OK. The SWAT home page appears.
-
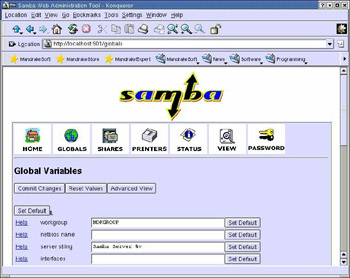
On this page, click Globals. The Globals page of SWAT appears, as shown in Figure 3-1-2:
-
Enter MDKGROUP in the workgroup text box.
-
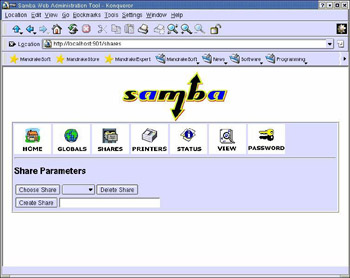
Click the Shares button. The Shares page appears, as shown in Figure 3-1-3:
To create a new shared directory:
-
In the text box next to the Create Share button, specify the name of the shared directory.
-
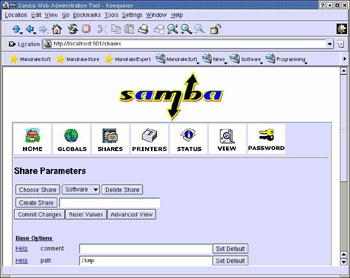
Click Create Share. The base options appear, as shown in Figure 3-1-4:
-
In the path text box, specify the path of the directory that is to be shared.
-
In the comment text box, type the description of the shared directory.
-
Click Commit Changes.
2. The Configuration for Windows
To access the shares on a Linux computer, you need to configure the user accounts and the Transmission Control Protocol/Internet Protocol (TCP/IP). Create a separate profile for every end user.
Creating Profiles
To create a profile for an end user:
-
Click Start ->Settings -> Control Panel.
-
Double-click Passwords. This opens the Passwords Properties dialog box.
-
Select the User Profiles tab. The User Profiles page of the Passwords Properties dialog box appears, as shown in Figure 3-1-5:
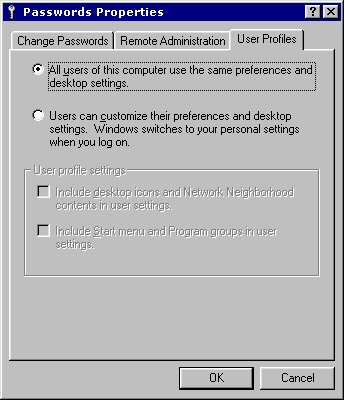
Figure 3-1-5: The User Profiles Page of Passwords Properties Dialog Box -
Click the Users can customize their preferences and desktop settings option button.
-
Check the Include desktop icons and Network Neighborhood contents in user settings and Include Start menu and Program groups in the user settings check boxes.
-
Click the Change Passwords tab. Figure 3-1-6 shows the Change Passwords page of the Passwords Properties dialog box:
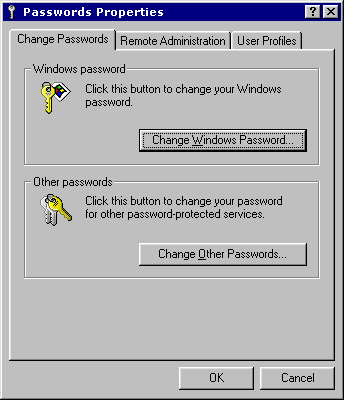
Figure 3-1-6: The Change Passwords Page of the Passwords Properties Dialog Box -
Click Change Windows Password to change the Windows password for the user. The Change Windows Password dialog box appears, as shown in Figure 3-1-7:
-
Specify the old password, if any. Otherwise keep the field blank.
-
Specify the new password in the New password and the Confirm new password text boxes.
-
Click OK.
-
Restart the computer.
-
Log on using the new password.
Note The user name and password for Windows and the Unix-based OS must be the same.
-
A message box appears, which prompts you to create an individual profile. Click the Yes button to create the profile.
Installing and Configuring TCP/IP
You need to configure TCP/IP after the individual profile is set up. To configure TCP/IP:
-
Click Start ->Settings -> Control Panel.
-
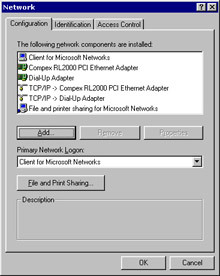
Double-click Network. The Network dialog box appears, as shown in Figure 3-1-8:
-
Verify that the list of available components contains TCP/IP ->
or TCP/IP -> Dial-Up Adapter, as shown in Figure 3-1-8.
| Note | If the list in your computer shows TCP/IP, you can omit this section and continue with the Configuring Network section. |
Installing TCP/IP
The TCP/IP installation files are available on the installation CD of Windows OS. To install TCP/IP:
-
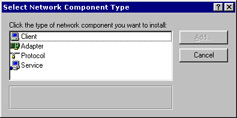
Click Add in the Configuration page of the Network dialog box. The Select Network Component Type dialog box appears, as shown in Figure 3-1-9:
-
Click the Protocol option.
-
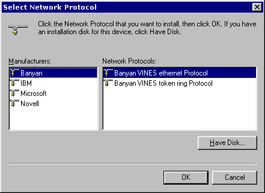
Click Add. The Select Network Protocol dialog box appears, as shown in Figure 3-1-10:
-
Select Microsoft in the Manufacturers list box.
-
Select TCP/IP in the Network Protocols list box.
-
Click OK to install the TCP/IP protocol.
Configuring TCP/IP
To configure TCP/IP:
-
In the Configuration tab of the Network dialog box, click the TCP/IP option in the list of network components installed.
-
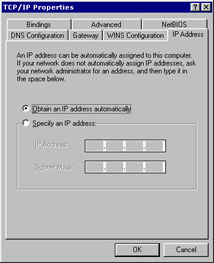
Click the Properties button. The TCP/IP Properties dialog box appears, as shown in Figure 3-1-11:
Configuring IP Address
You need to specify the IP address of the computer on the network in the IP Address page. If your computer uses the Dynamic Host Configuration Protocol (DHCP) to provide IP addresses, select the Obtain an IP address automatically option. If you do not use DHCP, you need to configure the IP address. The IP address will be the same as selected for the computer when the network was set up. For example, if the IP address of the server is 172.17.128.212, the IP address of a Windows-based computer will be 172.17.128.156. The Samba server and the computer that connects to the Samba server should be in the same subnet, for example, 255.255.255.0.
Configuring Domain Name Service
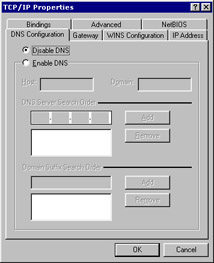
Domain Name Service (DNS ) converts the names in alphabetical order into system readable IP addresses. For example, DNS converts http://www.xyz.com/ into the IP address 202.156.242.12. An alternative is to maintain a list of host names and their IP addresses. The list is used to convert the host name to the associated IP address and is stored in the /etc/hosts file on the local computer. Open the file resolv.conf in /etc/ directory to check whether a DNS server is available. If a DNS server is available, the file will contain the IP address of the server. Click the DNS Configuration tab. Figure 3-1-12 shows the DNS Configuration page of the TCP/IP properties dialog box:
Windows Internet Naming Service Configuration
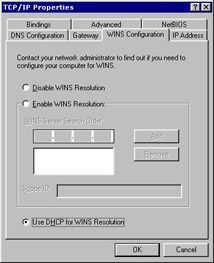
Windows Internet Name Service (WINS) is used to communicate with Network Basic Input/Output System (NetBIOS). Figure 3-1-13 shows the WINS Configuration page of the TCP/IP Properties dialog box:
If you use DHCP, it automatically configures WINS. If you do not use DHCP, to configure WINS:
-
Select the Enable WINS Resolution option.
-
Specify the IP address of the WINS server in the WINS Server Search Order text box.
-
Click OK.
Other Settings
The Bindings page of the TCP/IP Properties dialog box contains two check boxes, Client for Microsoft Networks and File and printer sharing for Microsoft Networks. Both these options need to be selected to share printer and resources.
If the number of computers on the network is between 20 and 30, you do not need to configure the IP address, DNS and WINS. The Linux system has the hosts file in the etc directory. Open the file and enter the IP address and the host name in the following format:
#127.0.0.1 localhost
172.17.128.212 files.xyz.com files
172.17.128.259 downloads.xyz.com downloads
172.17.128.283 images.xyz.com images
| Caution | The hosts file should be used to configure IP addresses only if necessary. |
Configuring Network
To share resources on a network, you need to create a workgroup and add all the computers to the workgroup. To create a workgroup:
-
Open the Control Panel.
-
Double-click Network.
-
Click the Identification tab of the Network dialog box. Figure 3-1-14 shows the Identification page of the Network dialog box:
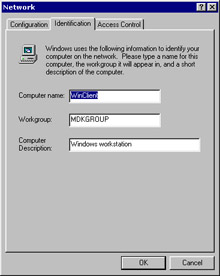
Figure 3-1-14: The Identification Page of the Network Dialog Box -
In the Computer name text box, specify the name of the computer. In the Workgroup text box, specify the name of the workgroup as in the smb.conf file, in the [global] heading. In the Computer Description text box, specify the description of the computer.
-
Click OK. You will be prompted to restart the system.
-
Click Yes to restart.
-
After the computer restarts, double-click the Network Neighborhood icon on the Windows desktop. The network Neighborhood window appears, as shown in Figure 3-1-15:
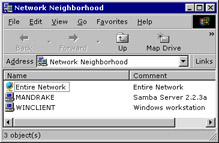
Figure 3-1-15: The Network Neighborhood WindowNote Mandrake is the computer that uses Linux as the OS. Winclient is a Windows-based computer.
-
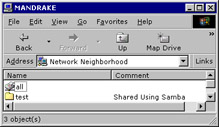
Double-click the Mandrake icon. The contents of Mandrake appear, as shown in Figure 3-1-16:
The Samba Configuration File
The configuration information of Samba is available in the smb.conf file. The file contains three basic sections: global, homes, and printers. You can also create custom sections according to your requirements.
The global section contains information about the available disk space and shared printers. The homes section contains a map that specifies the location of the shared directory. The printers section contains information about the printers available on the network. Custom sections contain information about shared directories and the permissions set on these directories. One custom section can contain information on only one shared directory.
global
Listing 3-1-1 shows the global section:
[global]

 workgroup = MDKGROUP
 server string = Samba Server %v
 printcap name = lpstat
 load printers = yes
 log file = /var/log/samba/log.%m
 security = user
 smb passwd file = /etc/samba/smbpasswd
In Listing 3-1-1:
-
workgroup: Specifies the name of the workgroup to which the Linux computer belongs.
-
server string: Specifies the comment that appears with the name of the computer.
-
printcap name and load printers: Load the printers on the network automatically.
-
log file: Specifies the path where the log file is stored.
-
Security: Sets the level of access security for the computer.
-
smb passwd file: Specifies the location of the Samba password file where Samba maintains the list of usernames and their passwords.
homes
The homes section contains the code:
[homes]
 comment = Home Directories
 browseable = yes
 writable = yes
In the above code:
-
[homes]: Specifies the name that will be visible on the network.
-
browseable: Determines whether the end user can browse through the shared directory.
-
writable: Determines whether the end user has read and write permissions. If set to yes, the end user can write data on the directory, otherwise the end user can only read the contents of the directory.
printers
The code for the printers section is:
[printers]
 comment = All Printers
 path = /var/spool/samba
 browseable = yes
 guest ok = yes
 writable = no
 printable = yes
In the above code:
-
The printers section specifies that it contains information about the configuration for printers.
-
comment: specifies the description shown on the network against Printers.
-
path: specifies the location where the printers are installed.
-
browseable: specifies whether the end user can browse through the various printers.
-
guest ok: specifies whether the end users with guest permissions can access the printers. If it is set to yes, the end users with guest login can access the printers.
-
writable: specifies whether or not the end users can change the content of the printers. If set to yes, the end users can change the content of the printers.
-
printable: specifies whether or not the end users can give the print command. If set to yes, they can give the print command.
custom
Any number of directories on the Linux computer can be shared with other computers on the network. All the directories shared are visible under the name of Linux computer. To share a directory, use the following code:
[dir]
comment=For test only, please
path=/usr/unix/share
read only=no
guest ok=Yes
In the above code:
-
comment: specifies the description shown in the description column of the Network Neighborhood window.
-
path: specifies the path of the directory that is to be shared.
-
read only: specifies whether the end users have read-only or read and write permissions. If set to yes, the end users have the read-only permission, otherwise, they have the read and write permission.
-
guest ok: specifies whether the end users with guest login can access the directory. If set to yes, the guest users can access the directory.
| Tip | You can use the valid users command to enable only the specified end users to access the printer. |
Configuring the Server
The smb.conf file provides you with a number of options that help you configure the Samba server according to your requirements.
The configuration options for the Samba server are available in the global section of the smb.conf file.
[global]
  netbios name = UnixComp
  server string = Unix computer having Samba %v
  workgroup = unxgroup
netbios name
This option specifies the name of the Linux computer. By default, the name is the hostname of the DNS server. For example, if the DNS name is us1.downloads.xyz.com, the default name is us1. If there are two or more computers with the same hostname us1, you should keep the name of the computer with the combination of the domain name and the host name. In this example, such a combination will be us1downloads. You can also change the NetBIOS name when a computer is down for maintenance or is permanently removed from the network.
server string
The server string provides the description of the computer. The text can have values with other Samba variables. Table 3-1-2 shows the list of Samba variables:
| Variable | Description |
|---|---|
| %a | Shows the architecture of the client computer. For example: Samba, Windows 98, Windows 2000. |
| %I | Shows the IP address of the client computer. |
| %M | |
| %m | Shows the NetBIOS name of the client computer. |
| %u | Shows the username with which you have logged on to the Unix computer. |
| %H | Shows the home directory for the current username. |
| %h | |
| %L | |
| %v | |
| %T | Shows the current date and time. |
The default server string is Samba %v.
Managing Samba
You need to continuously monitor and manage the Samba server. Managing the server primarily involves managing users and security. The smb.conf file is used for this purpose.
Managing Users
A shared directory can be made accessible to a single end user by adding the valid users option. For example:
[John]
path = %H
comment = John’s share
read only = no
valid users = John
In the above code, only the person with username John can access the shared directory. The path is the home directory of the end user with the username, John. To create a shared permission for more than one username, you need to create a group. The group consists of all the users who need to access the shared directory. To create a group, use the command:
groupadd –g 7477 software
In the above command:
-
groupadd: Adds group to the file, /etc/group.
-
–g: Is the parameter that specifies the group IS, 7477.
-
Software: Is the name for the group.
To add users to the group, you need to add the assigned group ID to the username. For example, if you assign the group ID as 7477, then in the /etc/passwd file, specify this group ID against the username that you need to add to the group using the following command:
john:x:7477
In the above command:
-
john: Is the username.
-
7477: Is the group ID to which the user belongs.
-
x: Forms a part of the format followed in the file.
In the smb.conf file, the valid users option does not specify the username, but specifies the name of the group, preceded by an @ symbol:
valid users = @software
To make a directory shared so that only a specified group is able to access the directory, use the following commands:
chgrp software /usr/home/groups/software
chmod 770 /usr/home/groups/software
In the first command, chgrp makes the directory, /usr/home/groups/software, exclusively shared for the group, software. The next command, chmod, changes the permission for the directory software.
Restricting Access
A user or a group of users can have restricted access to a directory. To restrict users, add the invalid users option to the section in which you need to restrict end users using the code is:
invalid users = @software
This code restricts those end users who are a part of the group software from accessing the directory. To restrict multiple end users from accessing the directory, specify their usernames as a single string separated by commas. The various options to restrict access to directories are admin users, invalid users, read list, write list, and guest only.
admin users
This option specifies the list of users who can perform the operations as root. This means that an end user logged on as one of the users in the list of admin users can modify or delete data pertaining to other users. End users whose usernames are not specified in the list of admin users cannot access a file created by an end user in the admin users list.
invalid users
This option specifies the list of usernames who cannot access the shared directory. To specify multiple usernames, specify the usernames as a single string separated by commas. If one or more usernames appear as both valid and invalid users, these end users are treated as invalid. If a username does not appear in the valid or invalid list of users, the end user is treated as a valid user.
read list
This option specifies the list of usernames who have the read-only permission. These end users cannot modify the contents of a directory. They can only read the contents. If an end user has the read and write permission in Unix and the username appears in the read list, the end user is granted a read-only permission, overriding the Unix permission.
write list
This option specifies the list of usernames with read and write permission. These end users can read and write the contents of a directory. If an end user has the read-only permission in Unix and the username appears in the write list, the end user is granted a read and write permission, overriding the Unix permission.
Security
Samba offers four methods of security: share-level, user-level, server-level, and domain-level. When a shared directory does not allow guest users to access the directory, Samba uses one of these four levels of security to authenticate the end user.
Share-level security
In this method, every shared directory has one or more passwords. Each password has certain permissions with it, including read-only and read and write permissions. When an end user enters a password, it is compared with the list of passwords associated with the directory. If any one of the passwords matches with the one entered by the end user, Samba allows the end user to access the directory. To implement the share-level security, the code to be included in the smb.conf file is:
[global]
security = share
[software]
path = /home/share/accounting
guest ok = no
writable = yes
username = shaun, glenn, courtney
In this code, the username section specifies the list of usernames that should be checked when the client enters the password to access the directory. When this code is executed, the Samba server checks for the username in its list of passwords in the smbpasswd file. If it does not find the password in the file, it verifies the password of the usernames specified in the username list. If Samba finds the required password, it allows the end user to access the shared directory. The only user option helps you specify a list of usernames, which can access the directory.
User-Level Security
The usernames are verified in two tiers in the user-level security. Samba maintains a list of usernames and passwords in the smbpasswd file. When an end user enters the username and password, Samba uses the smbpasswd file to verify them. If the username and password specified by the end user appear in the file, Samba allows the end user to access the directory. Figure 3-1-17 shows the user-level security:
To implement this security level, the smb.conf file should contain the following code:
[global]
security = user
[software]
writable = yes
guest ok = no
path =/home/share/accounting
In the above code, the username is verified. If the username and password combination is found to be valid, the end user is allowed to access the directory. The valid users option can also be added to enable only the specific users to access the directory.
Server-Level Security
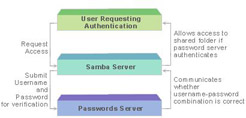
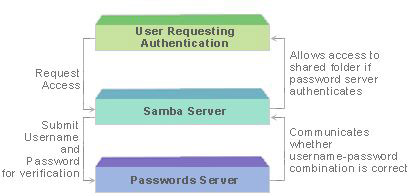
The server-level security is similar to the user-level security except that this level has three tiers for verification: the end user, the samba server, and the passwords server, as shown in Figure 3-1-18:
The client sends a request to connect with the Samba server. The Samba server forwards this request to the password server. The password server authenticates the username and password provided by the end user and communicates the result to the Samba server. The Samba server allows the end user to access the directory if the password server specifies that the username and password is valid. To implement this level of security, the smb.conf file should contain this code:
[global]
security = server
password server = Pass1 Pass43 PServ98
In the above code:

