User and group accounts allow you to use policies and permissions to manage network resources efficiently. Windows Server 2003 provides tools, such as Computer Management and Active Directory Users and Groups, to manage user and group accounts. You can create a group of related user accounts, and assign network access permissions to the group and user accounts.
This ReferencePoint introduces user and group accounts, and describes how to create them in Windows Server 2003. It explains how to configure account and user right policies in Windows Server 2003 and describes how to manage and set restrictions on existing user and group accounts.
Introducing User and Group Accounts
A user account is a record in Windows Server 2003 that contains end user information, such as the user name and password. You can bunch a set of user accounts into a group. User and group accounts are collectively called network accounts.
Network accounts help authenticate end users. You can assign rights to network accounts to perform actions, such as backing up data and shutting down a computer. In addition, you can create user and group policies to regulate access to network resources. For example, you can assign one end user the right to access a printer, and permit another to manage the printer.
| Note | A user account inherits all the permissions and access rights of the group to which it belongs. |
Creating User Accounts
You can create a user account to allow an end user to access network, administer security policies, and audit end user activity. Windows Server 2003 supports two types of user accounts, local and domain. A local user account allows an end user to log on to a network from the local computer alone. This means that a local user account can be assigned rights and permissions to access resources available on a local computer only. You can create local user accounts using the Local Users and Groups tool.
A domain user account enables an end user to log on to the network from any computer, using a user name and a password. This means that a domain user account can be granted rights and permissions to access resources available on any computer on the network. You can create domain user accounts using the Active Directory Users and Computers tool in Windows Server 2003. This tool is available only on a domain controller, which is a computer in the Windows Server 2003 domain that manages user access to network resources.
| Note | Active Directory is the directory service of Windows Server 2003 that uses a database to provide information about end users and network resources. |
A log on name identifies a user account in Windows Server 2003. The log on name has two parts, user name and domain name. For example, in JohnW@domain01.com, JohnW represents the user name, John, and domain01.com represents the domain.
| Note | In Windows Server 2003, you can also create Domain Administrator and Enterprise Administrator accounts to perform various domain- and forest-specific tasks, such as installing a mail server and creating a domain. |
You can also create a user account based on an existing user account. When you do this, the new user account inherits all the environment settings of the existing user account.
Creating Local User Accounts
The Local Users and Groups tool you use to create a local user account is available only on a member server. A member server is a computer that runs Window Server 2003, and is not a domain controller. To create a local user account:
-
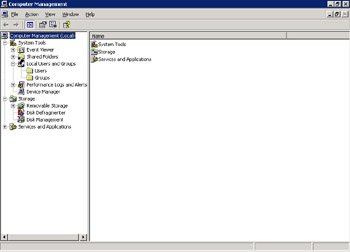
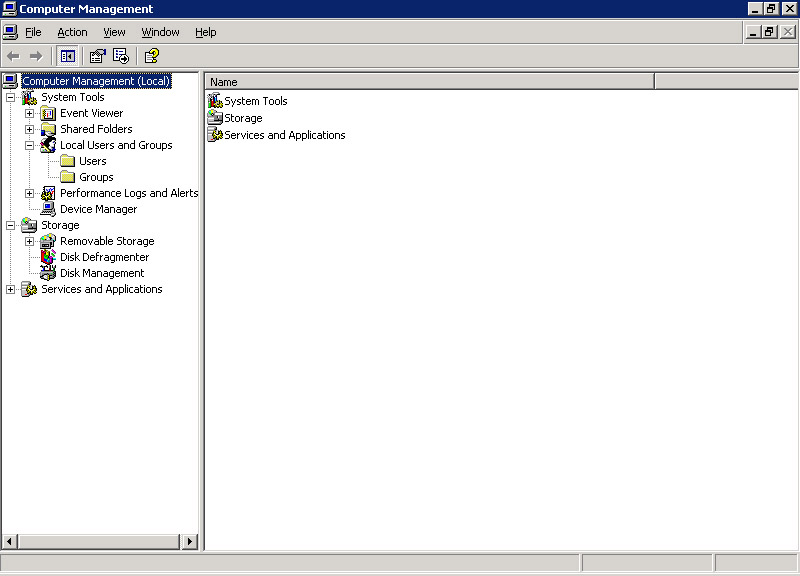
Select Start ->Programs ->Administrative Tools ->Computer Management to display the Computer Management window.
-
Expand the Local Users and Groups folder on the left pane of the Computer Management window, as shown in Figure 14-6-1:
-
Right-click the Users folder to display a shortcut menu to manage local user accounts.
-
Select New User from the shortcut menu to display the New User dialog box.
-
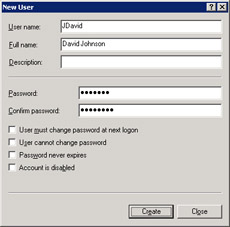
Enter end user details for the local user account, JDavid, in the New User dialog box, as shown in Figure 14-6-2:
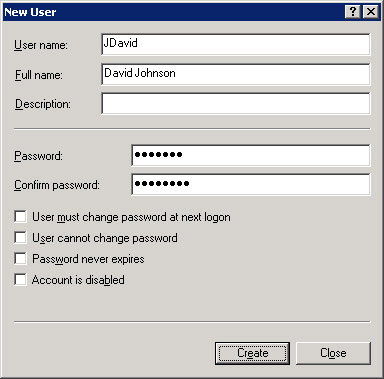
Figure 14-6-2: The New User Dialog BoxThe options the New User dialog box provides for configuring the password for a local user account are:
-
User must change password at next log on: Prompts the end user to change the password during the next log on.
-
User cannot change password: Prevents the end user from changing the password.
-
Password never expires: Assigns a permanent password to the local user account.
-
Account is disabled: Disables the local user account.
-
-
Click Create to create the JDavid local user account.
-
Click Close to close the New User dialog box.
Note You cannot select the User must change password at next log on option along with the User cannot change password and Password never expires options.
Creating Domain User Accounts
To create a new domain user account:
-
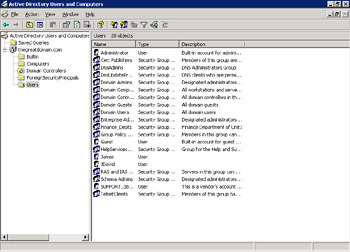
Select Start -> Programs -> Administrative Tools -> Active Directory Users and Computers to open the Active Directory Users and Computers window, as shown in Figure 14-6-3:
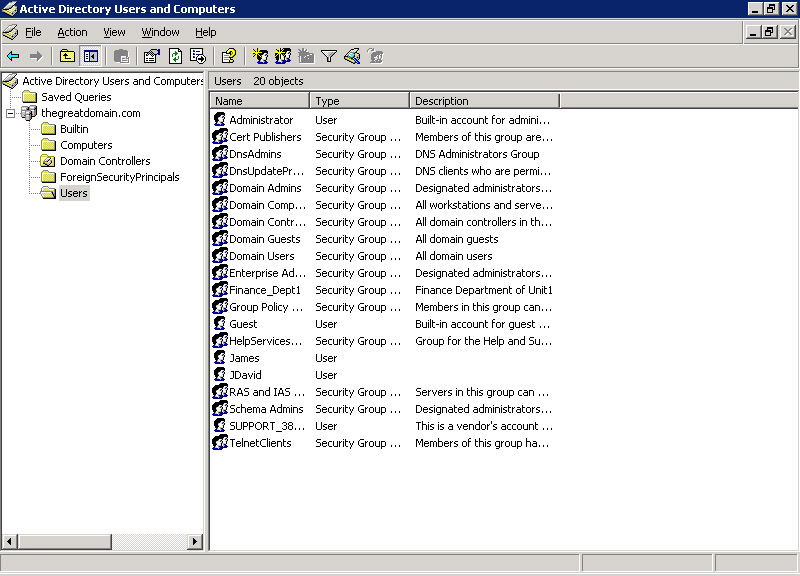
Figure 14-6-3: The Active Directory Users and Computers Window -
Right-click the Users folder in the left pane of the Active Directory Users and Computers window, to display a shortcut menu.
-
Select New ->User from the shortcut menu to display the New Object - User wizard to create a new domain user account.
-
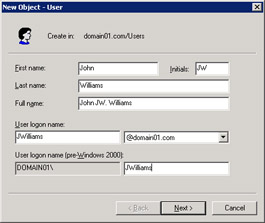
Enter the domain user account name, as shown in Figure 14-6-4:
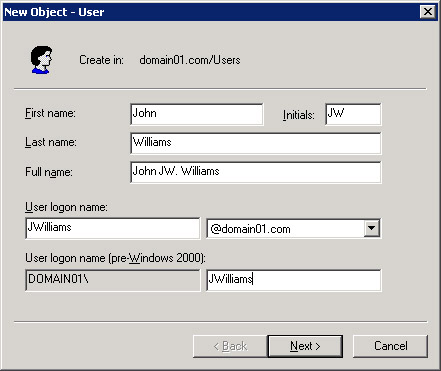
Figure 14-6-4: The New Object - User WizardTip You can change the domain name of the domain user account using the User log on name list box.
-
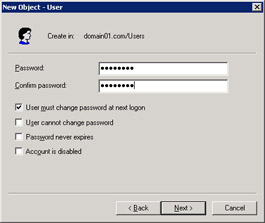
Click Next to display the Password screen of the New Object - User wizard, as shown in Figure 14-6-5:
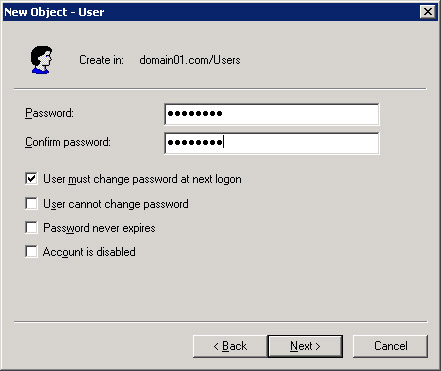
Figure 14-6-5: The Password Screen of the New Object - User Wizard -
Click Next to display a screen that provides information about the new domain user account, JWilliams.
-
Click Finish to create the domain user account, JWilliams.
Tip If a warning message appears after you create the account, you can click Back on the summary screen and re-enter the user name and password information.
Creating Group Accounts
A group account enables you to simultaneously manage multiple users, computers, and groups that have similar rights and permissions. For example, you can grant employees in a company's finance department, the right to access the company's customer account information. To do this, you can create a group account for employees of the finance department and grant permission this account to access customer account information. To revoke group permissions from a user account, you need to remove that user account from the group account.
| Note | An end user can log on to a computer with a user account, but not with a group account. |
There are three types of group accounts:
-
Local group: Represents group accounts you can define and use on local computers only. You can configure local groups using the Local Users And Groups tool. A local group can be created on a member server computer only.
-
Security group: Stores rights and permissions to access network resources. For example, you can create a security group that stores permission to access account information. You can configure security groups in Windows Server 2003 domains using the Active Directory Users and Computers tool. Security groups can be configured on a domain controller only.
-
Distribution group: Stores information that needs to be distributed to multiple user and group accounts. For example, you can create a distribution group to store an e-mail distribution list. You can use this group to send e-mail messages to multiple user accounts simultaneously. You can configure distribution groups in Windows Server 2003 domains using the Active Directory Users And Computers wizard.
Understanding Group Scope
A group scope specifies which users and subgroups you can include in a group. This scope defines the rights and permissions you can apply to user and group accounts in various domains. There are three types of group scope:
-
Domain local: Grants permissions to user accounts in a domain.
-
Global: Grants permissions to all user and group accounts in the domain in which the global group scope is defined.
-
Universal: Grants permissions to user and group accounts of any domain in a domain tree or forest.
Creating Global Groups
A global group consists of user and group accounts from multiple domains. To create a global group:
-
Select Start -> Programs -> Administrative Tools -> Active Directory Users and Computers to open the Active Directory Users and Computers window.
-
Right-click the Users folder in the left pane of the Active Directory Users and Computers window, to display a shortcut menu.
-
Select New->Group to display the New Object - Group dialog box.
-
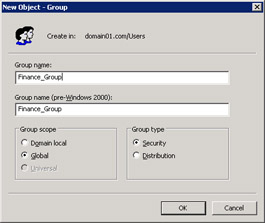
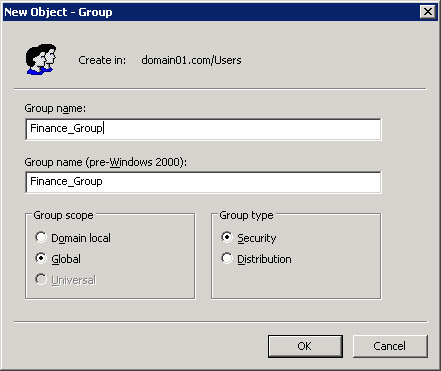
Enter the group name in the Group name text box, and select a group scope from the Group Scope section in the New Object - Group dialog box, as shown in Figure 14-6-6:
-
Click OK to close the New Object - Group dialog box. The Finance_Group group appears in the right pane of the Active Directory Users and Computers window.
Creating Local Groups
A local group consists of user and group accounts from one domain. To create a local group:
-
Select Start ->Programs ->Administrative Tools ->Computer Management to display the Computer Management window.
-
Expand the Local Users and Groups folder on the left pane of the Computer Management window to display the Users and Groups folder.
-
Right-click the Groups folder to display the shortcut menu to manage local group accounts.
-
Select New Group from the shortcut menu to display the New Group dialog box.
-
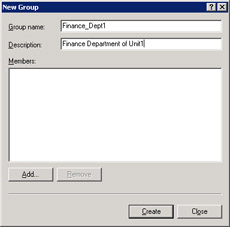
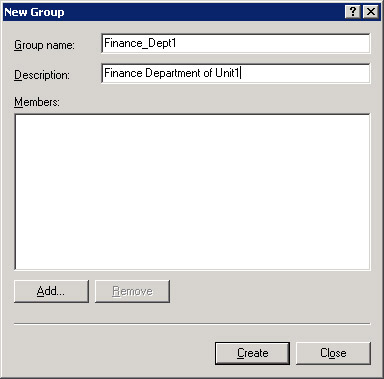
Enter group details for the local group account, Finance_Dept1, in the New Group dialog box, as shown in Figure 14-6-7:
-
Click Create to create the local group account, Finance_Dept1.
-
Click Close to close the New Group dialog box.
Understanding Account Policies and User Rights Policies
You can define domain and local account policies to control access to resources by user and group accounts. A domain account policy defines the settings that are common for all user accounts of a domain. You define this policy using the Default Domain Group Policy object. A local account policy defines the settings for one user account. You define this policy using the local account policy tool.
| Note | The domain account policy overrides the local account policy. |
User rights specify the tasks a user or group account can perform on a computer or a domain. You can create user rights policies to manage the allocation of user rights to user and group accounts. For example, you can create user rights policies to allow a user account to perform tasks, such as creating, deleting, or updating accounts.
Configuring Domain Account Policies
You can use a domain account policy as a group policy to configure the settings and permissions across multiple sites and domains. The domain account policy allows you to handle administration activities, such as installing application software, configuring user profiles, and upgrading the operating systems. You can configure account policies as part of a group policy. There are three types of account policies: Password Policy, Account Lockout Policy, and Kerberos Policy. To configure domain account policies:
-
Select Start -> Programs -> Administrative Tools -> Active Directory Users and Computers to open the Active Directory Users and Computers window.
-
Right-click the Domain Controllers folder in the left pane of the Active Directory Users and Computers window, to display a shortcut menu.
-
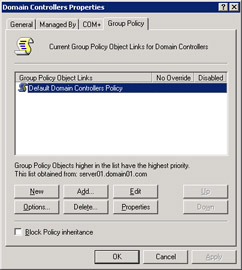
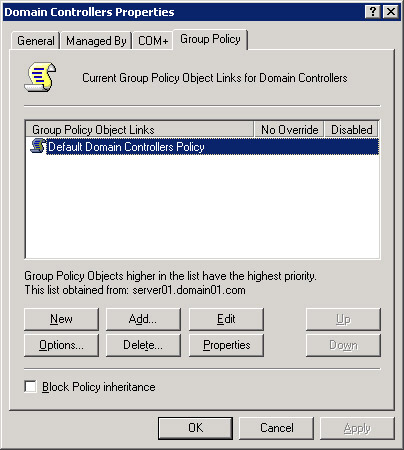
Select Properties from the shortcut menu to display the Domain Controller Properties dialog box, as shown in Figure 14-6-8:
-
Click Add to add a new group policy object.
-
Enter Finance Group Policy Object as the name of the new group policy in the Group Policy Object Links column.
-
Click Edit to open the Group Policy Object Editor window.
-
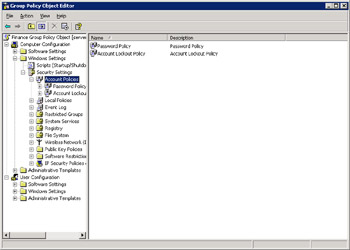
Select Computer Configuration -> Windows Settings -> Security Settings -> Account Policies in the left pane of the Group Policy Object Editor window. A list of account policies appears in the right pane, as shown in Figure 14-6-9:
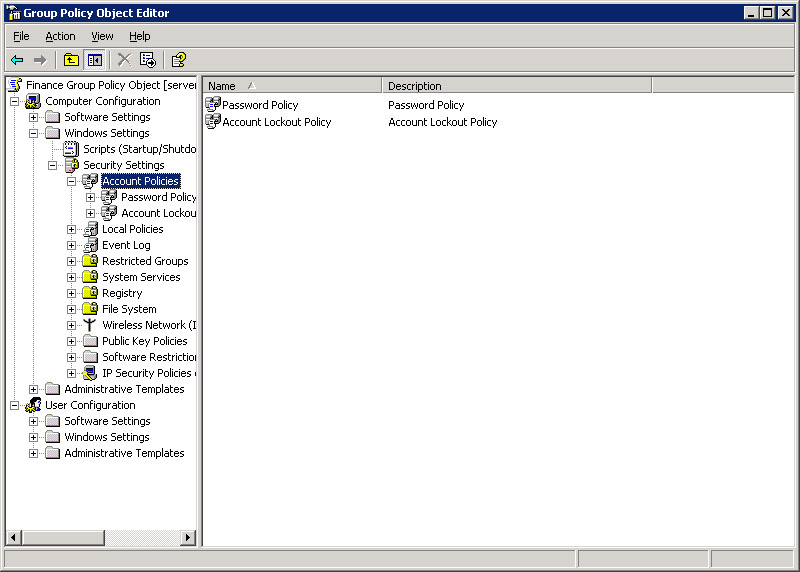
Figure 14-6-9: Accessing Account Policies in Active Directory
Configuring Password Policies
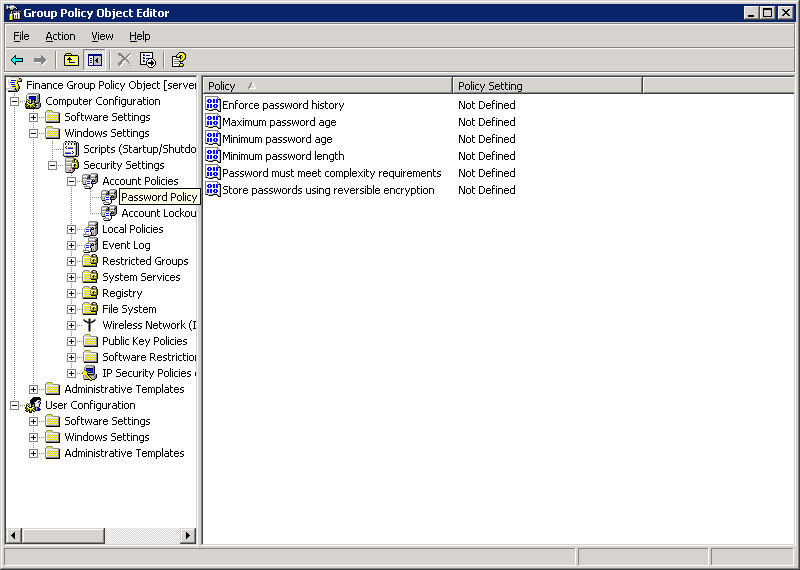
You can use password policies to configure password settings. For example, you can set the minimum length of a password and specify the method to store the password. Windows Server 2003 provides various password policies, such as:
-
Enforce Password History: Restricts end users from changing their passwords frequently, and specifies that the new passwords must be different from previous passwords. Windows Server 2003 maintains a unique password history for each user account. New passwords are validated against this password history to ensure that old passwords are not reused. Windows Server 2003 saves a maximum of 24 passwords for each user account. This restricts the number of password changes an end user can make.
Caution Setting the size of the password history to zero can disable the password history policy.
-
Maximum Password Age: Configures the time for which a user account can use a password. When the time expires, the end user is prompted to change the password.
If the value of the Maximum Password Age policy is set to zero, the password does not expire. The maximum password age can take a value between 0 and 999 days. You can assign a small or high value for the maximum password age depending on whether the system security level is high or low, respectively.
-
Minimum Password Age: Configures the time during which a user account cannot change the password. This ensures that the end user does not change the password frequently.
Note If you set the value of the minimum password age to zero, the end user can change the password at any time.
-
Minimum Password Length: Configures the minimum number of characters required for a password. The length of a password must be between 8 and 14 characters. Longer passwords are more difficult to decipher, as compared to shorter ones.
-
Passwords Must Meet Complexity Requirements: Ensures that the passwords conform to a pre-defined set of security requirements. This policy enables the network administrator to enforce the advanced password and account policies. The pre-defined sets of security requirements are:
-
Value of Minimum Password Length policy is six characters.
-
User account name or part of the end user full name cannot be part of the password.
-
Password must use in at least three of the four permissible character types: lowercase alphabets, uppercase alphabets, numbers, and symbols.
-
-
Store Password Using Reversible Encryption: Allows passwords stored in the password database to be decrypted. You use this policy for applications that can validate passwords. Use this option only for individual user accounts and not for group accounts because enabling it increases the risk of password hacking.
To configure password policies:
-
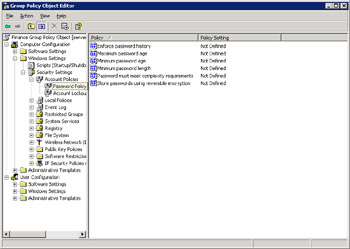
Select Computer Configuration -> Windows Settings -> Security Settings -> Account Policies -> Password Policy in the left pane of the Group Policy Object Editor window. A list of password policies appears in the right pane, as shown in Figure 14-6-10:
-
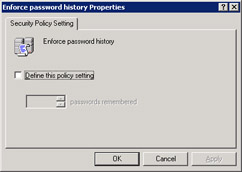
Double-click the Enforce password history icon in the right pane of the Group Policy Object Editor window. The Enforce password history Properties dialog box appears, as shown in Figure 14-6-11:
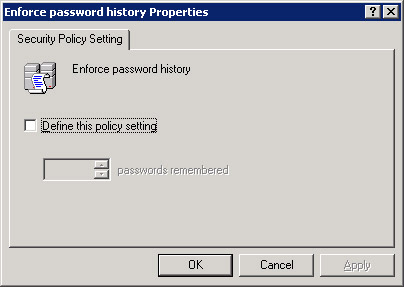
Figure 14-6-11: The Enforce password history Properties Dialog Box -
Select the Define this policy setting option to enable the passwords remembered list box.
-
Specify 3 in the passwords remembered list box, to store the last three passwords in the Windows Server 2003 memory.
-
Click OK to close the Enforce password history Properties dialog box.
Configuring Account Lockout Policies
You use account lockout policies to configure the time for which a user or group account is locked. There are three types of account lockout policies:
-
Account Lockout Threshold: Specifies the number of log on attempts an end user can make before an account is locked out. The Account Lockout threshold value can range between 0 and 999. The default value is set to 0, which implies that the end user is allowed to log on any number of times without being locked out of the computer. The risk of hacking increases if the lockout value goes up.
-
Account Lockout Duration: Determines the duration for which a user account can remain locked if an end user fails to log on within the number of attempts specified in the Account Lockout Threshold policy. The value of this duration can range from 1 to 99,999 minutes. To lock an account indefinitely, you can set the value of the account lockout duration to 0. A system administrator alone can unlock a locked account.
-
Reset Account Lockout Counter After: Controls the Account Lockout counter. Whenever an end user fails to log on to a network, the Account Lockout counter is incremented by 1. The Reset Account Lockout Counter After policy sets the duration for preserving information about the failed log on attempts. This policy can store a value between 1 and 99,999 minutes. The value is reset to 0 after an end user logs on successfully.
Tip A safe value for the Reset Account Lockout Counter After policy is between 1 and 2 hours.
To configure account lockout policies:
-
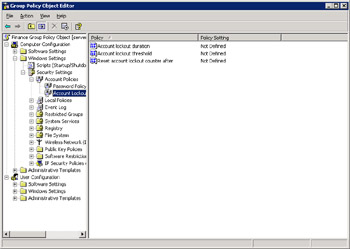
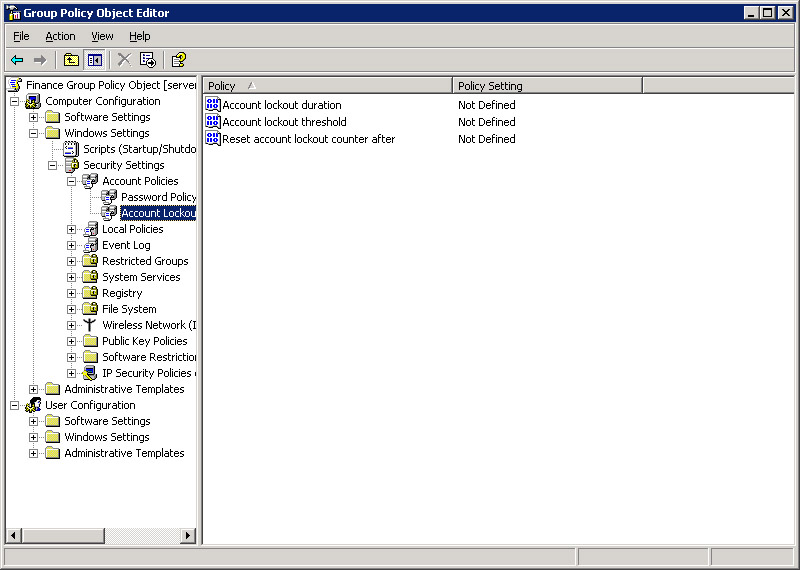
Select Computer Configuration -> Windows Settings -> Security Settings -> Account Policies -> Account Lockout Policy in the left pane of the Group Policy Object Editor window. The list of account lockout policies appears in the right pane, as shown in Figure 14-6-12:
-
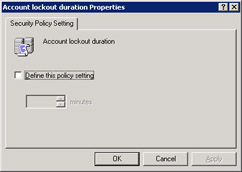
Double-click Account lockout duration in the right pane of the Group Policy Object Editor window. The Account lockout duration Properties dialog box appears, as shown in Figure 14-6-13:
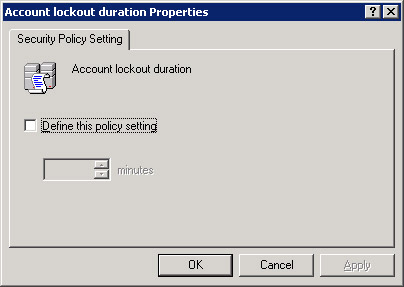
Figure 14-6-13: The Account lockout duration Properties Dialog Box -
Select the Define this policy setting option to enable the Account is locked out for list box.
-
Select 10 in the Account is locked out for list box, to lock out the account for 10 minutes.
-
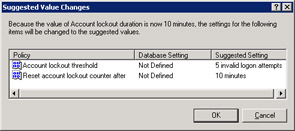
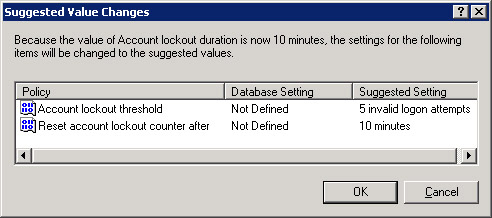
Click OK to update the account lockout duration policy. The Suggested Value Changes dialog box appears, as shown in Figure 14-6-14:
-
Click OK to close the Account lockout duration Properties dialog box.
Configuring Kerberos Policies
You can use Kerberos policies to configure the authorization of user accounts using Kerberos V5 protocol. This protocol uses encrypted data to authenticate domain user accounts and network services. The data is stored as tickets on a domain controller. For authentication, service and user processes in Windows Server 2003 use service and user tickets, respectively.
Windows Server 2003 provides various Kerberos policies, such as:
-
Enforce user log on restrictions: Implements the settings and permissions of a user account. For example, if an end user is permitted to log on from a particular workstation, this policy ensures that the end user is not able to log on from any other workstation. By default, this policy is enabled.
-
Maximum lifetime for service ticket: Specifies the maximum duration for which you can use a service ticket. The value for this duration can range from 0 to 99,999 minutes. The default time limit for a service ticket is 600 minutes.
-
Maximum lifetime for user ticket: Specifies the maximum duration for which you can use a user ticket. The value for this duration can range from 0 to 99,999 hours. The default time limit for a user ticket is 10 hours.
Tip To disable the expiry of user and service tickets, set the value of Maximum lifetime for user and service tickets to 0.
-
Maximum lifetime for user ticket renewal: Determines the duration after which an expired user ticket can be renewed. The value for this duration can range from 0 to 99,999 days. The default time limit for renewing a user ticket is 7 days.
Tip To renew user and service tickets any time after their expiry, set the value of Maximum lifetime for user ticket renewal to 0.
-
Maximum tolerance for computer clock synchronization: Specifies the maximum duration allowed for synchronizing all the computers on the network. A user account cannot access network resources if it does not synchronize its clock with the network server, and tries to log on after maximum tolerance for the computer clock. The values for this policy can range from 0 to 99,999 minutes.
Tip To ensure that all end users log on at the same time, set the value of Maximum tolerance for computer clock to 0.
To configure the Kerberos policies:
-
Select Start -> Programs -> Administrative Tools -> Domain Security Policy to display the Domain Security Settings window.
-
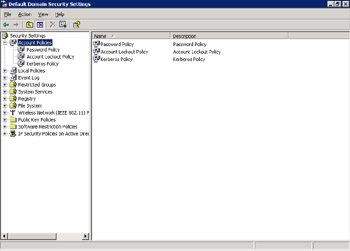
Expand Account Policies in the left pane of the Domain Security Settings window, as shown in Figure 14-6-15:
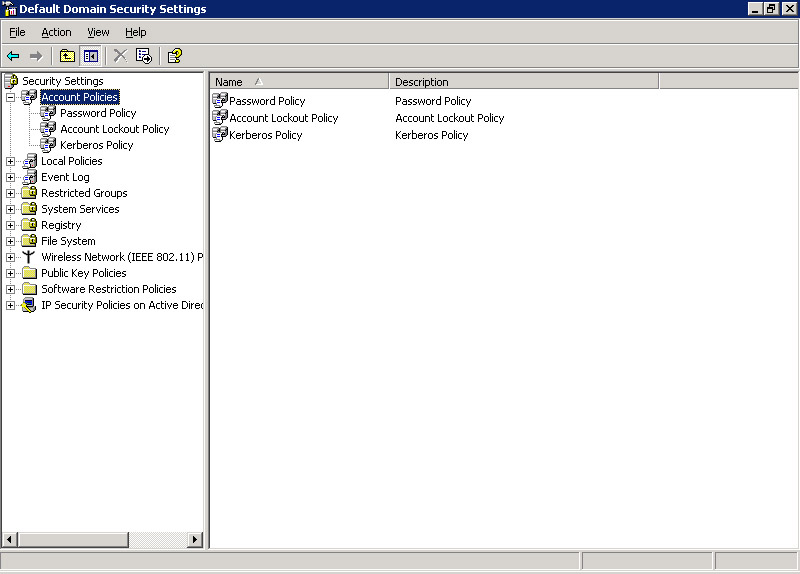
Figure 14-6-15: The Account Policies in Domain Security Settings Window -
Select Kerberos Policy in the left pane of the Domain Security Settings window to display the list of Kerberos policies in the right pane.
-
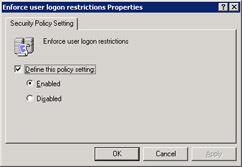
Double-click Enforce user log on restrictions in the right pane of the Domain Security Settings window. The Enforce user log on restrictions Properties dialog box appears, as shown in Figure 14-6-16:
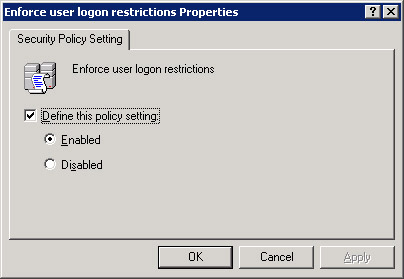
Figure 14-6-16: The Enforce user log on restrictions Properties Dialog Box -
Select the Enabled option below the Define this policy setting option to enable the enforce log on restrictions policy.
-
Click OK to close the Enforce user log on restrictions Properties dialog box.
Configuring User Rights Policies
To manage user rights, you can assign them to the user account or make the user account a member of an existing group account. There are three types of user rights:
-
Privileges: Perform administrative tasks, such as computer startup and shutdown.
-
log on Rights: Allow an end user to log on to Windows Server 2003.
-
Access Permissions: Allow an end user to access the resources on Windows Server 2003.
Configuring User Rights Globally
You can create user rights policies on a local computer or import them into the Active Directory of a domain controller. These policies can be added to the existing group policies on another Web site domain, or business unit. To configure user rights for a Web site, domain, or business unit:
-
Open the Group Policy Object Editor window.
-
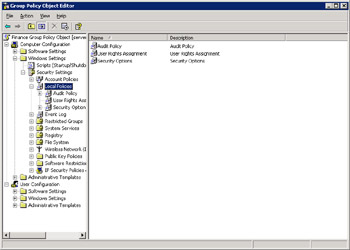
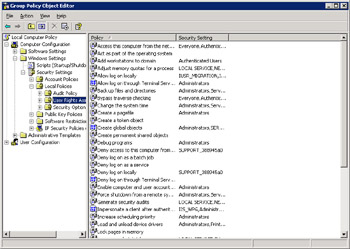
Select Computer Configuration -> Windows Settings -> Security Settings -> Local Policies to display local policies in the right pane, as shown in Figure 14-6-17:
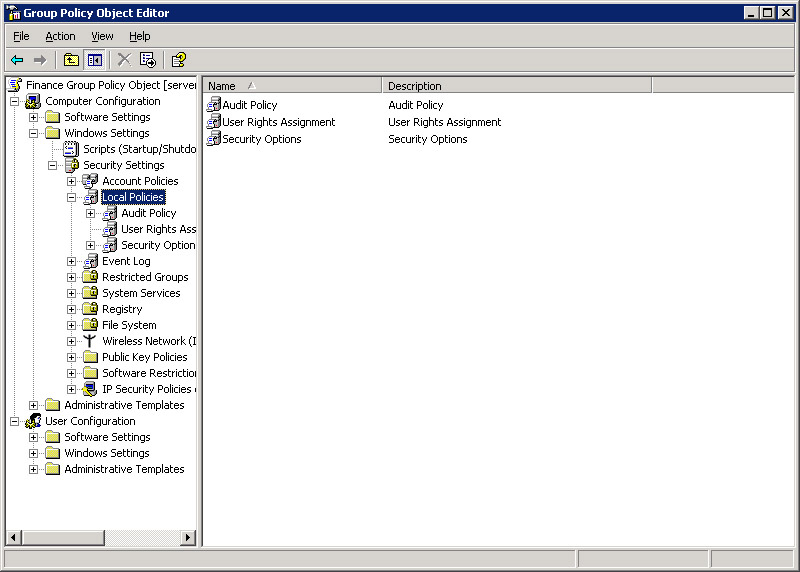
Figure 14-6-17: Local Policies in Group Policy Object Editor Window -
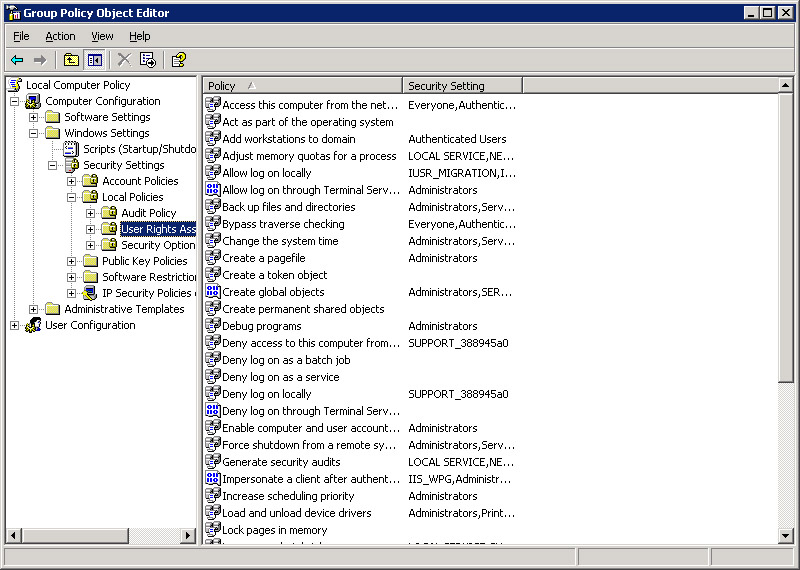
Select User Rights Assignment in the left pane to display the user rights policies in the right pane.
-
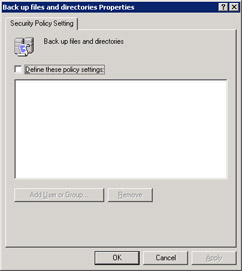
Double-click the Backup files and directories policy icon in the right pane, to open the Backup files and directories Properties dialog box, as shown in Figure 14-6-18:
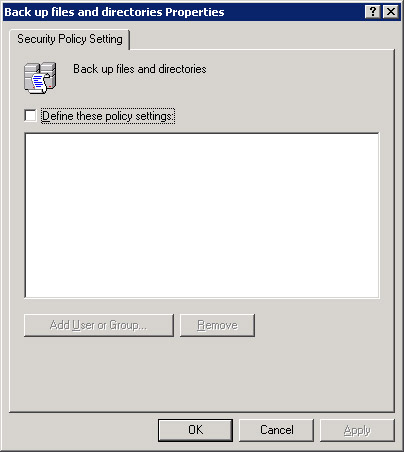
Figure 14-6-18: The Backup files and directories Properties Dialog box -
Select Define these policy settings option to enable the Add User or Group command button.
-
Click Add User or Group to display the Add User or Group dialog box.
-
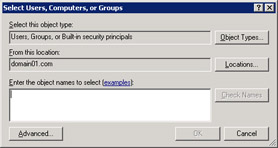
Click Browse to display the Select Users, Computers, or Groups dialog box, as shown in Figure 14-6-19:
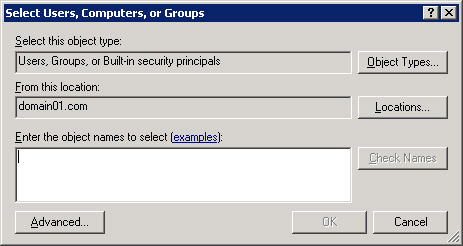
Figure 14-6-19: The Select Users, Computers, or Groups Dialog Box -
Click Advanced to expand the Select Users, Computers, or Groups dialog box.
-
Click Find Now to display user accounts.
-
Select Administrator and Backup Operators user accounts.
-
Click OK to add user accounts to the Select Users, Computers, or Groups dialog box.
-
Click OK to close the Select Users, Computers, or Groups dialog box.
-
Click OK to close the Add User or Group dialog box.
-
Click OK to close the Backup files and directories Properties dialog box.
Configuring User Rights Locally
You can assign user rights to local user accounts to perform system administration tasks, such as server startup, shut down, and backup. To assign user rights on local computers:
-
Select Start -> Run to display the Run dialog box.
-
Enter gpedit.msc in the Open text box and click OK to display the Group Policy Object Editor window.
-
Select Computer Configuration -> Windows Settings -> Security Settings -> Local Policies to display local policies in the right pane.
-
Select User Rights Assignment in the left pane to display user rights policies in the right pane, as shown in Figure 14-6-20:
-
Double-click the Backup files and directories policy icon in the right pane to open the Backup files and directories Properties dialog box.
-
Click Add User or Group to display the Add User or Group dialog box.
-
Click Browse to display the Select Users, Computers, or Groups dialog box.
-
Click Advanced to expand the Select Users, Computers, or Groups dialog box.
-
Click Find Now to display the user accounts.
-
Select the Administrator and Backup Operators user accounts.
-
Click OK to add the user accounts in the Select Users, Computers, or Groups dialog box.
-
Click OK to close the Select Users, Computers, or Groups dialog box.
-
Click OK to close the Add User or Group dialog box.

