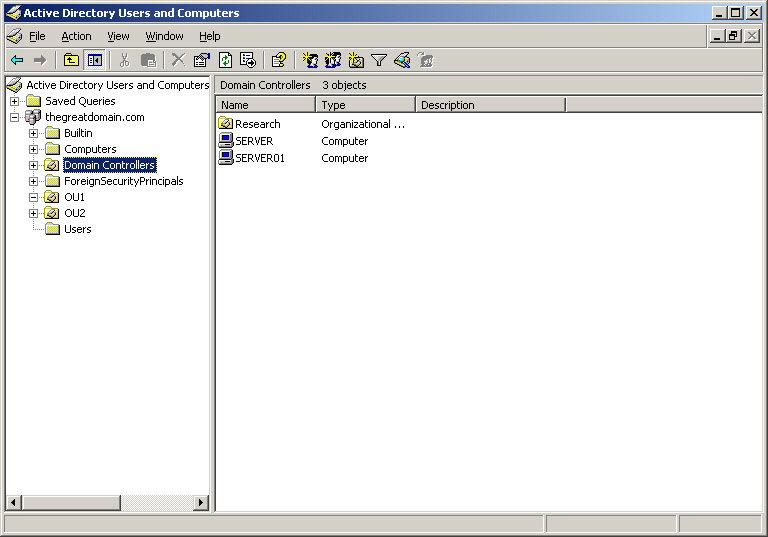
Windows Server 2003 provides various tools you can use to administer the Active Directory. Using Administrative tools, Command-line tools, and Support tools, you can manage the Active Directory and its objects, such as users, computers, and organizational units. You can also manage domain controllers, roles, and catalogs by using the Active Directory tools.
This ReferencePoint describes how to administer Windows Server 2003 Active Directory by using various tools. In addition, the ReferencePoint describes how to manage domain controllers, users, and organizational units in Windows Server 2003 Active Directory.
Active Directory Tools
The Active Directory tools help you to manage Active Directory. Windows Server 2003 provides various Active Directory tools, which are Administrative tools, Command-line tools, and Support tools. You can use Active Directory tools to manage the objects, such as user and computer accounts in the Active Directory.
Active Directory Administrative Tools
The Active Directory administrative tools are snap-ins to Microsoft Management Console (MMC). These tools include:
-
Active Directory Users and Computers: Manages the user accounts, groups, computers, and organizational units in Active Directory. You can use the Active Directory Users and Computers tool to create, delete, modify, move, and assign permissions to Active Directory objects, such as users and groups.
-
Active Directory Domains and Trusts: Manages the domain trusts, domain and forest functional levels, and user principal name suffixes. You can use the Active Directory Domains and Trusts tool to create domains and establish trust relationships between domains.
Note A user principal name suffix is a part of user account name that appears to the right of the @ symbol.
-
Active Directory Sites and Services: Manages the sites and subnets of Active Directory. The Active Directory Sites and Services tool also checks whether or not the Active Directory data replication process is working.
-
Active Directory Schema: Manages and modifies the schema. The schema contains the definitions for objects, such as files, folders, users, and groups stored in Active Directory. By default, the Active Directory Schema tool is not available in the Administrative Tools menu and you need to manually add this tool to the menu.
-
Resultant Set of Policy: Displays the current group policy applied to a user account. You can also use the Resultant Set of Policy tool also to plan how to change the group policies. The Resultant Set of Policy tool applies group policies on the Active Directory objects, and troubleshoots errors while applying group policies.
| Note | An object is an entity, such as a file, shared folder, printer or other Active Directory objects that you can identify with a set of unique attributes. |
You need to install the Active Directory administrative tools before you can add an Active Directory administrative tool as snap-in to the MMC. You also need to install the Active Directory administrative tools when you are remotely accessing Windows Server 2003.
You can install the Active Directory administrative tools by using the Adminpak.msi software installation package stored in the I386 folder in the Windows Server 2003 CD. You can also create the software installation package for installing the Active Directory administrative tools. You can distribute and install the software installation package that you create on other computers by using Active Directory administrative tools. For example, you can add Active Directory Schema administrative tool as snap-in to MMC after installing the Active Directory administrative tool.
To add the Active Directory Schema snap-in:
-
Select Start -> Run to open the Run dialog box.
-
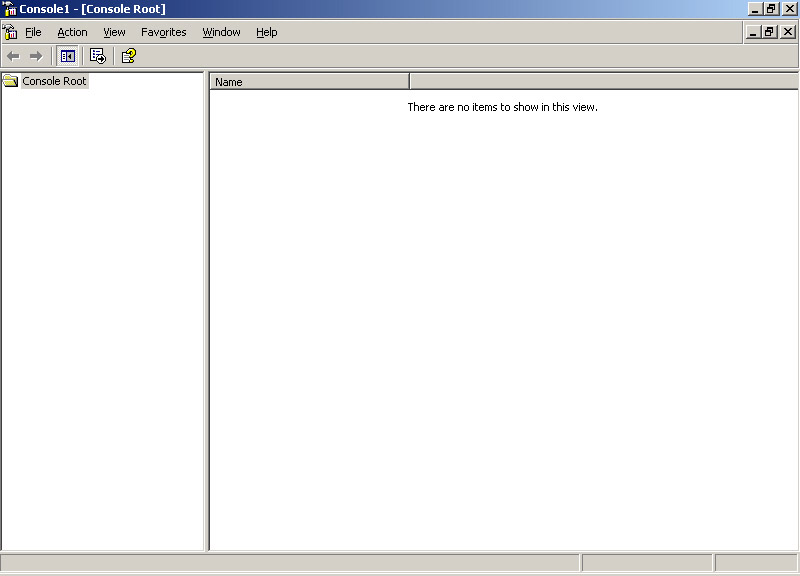
Enter mmc in the Open field of the Run dialog box. The MMC window appears, as shown in Figure 14-5-1:
-
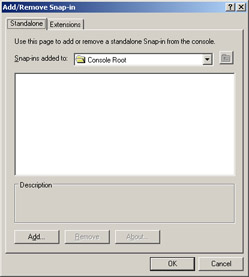
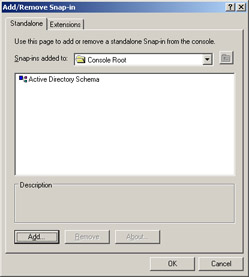
Select File -> Add/Remove Snap-in to open the Add/Remove Snap-in dialog box. The Add/Remove Snap-in dialog box contains two tabs, Standalone and Extensions. Click the Standalone tab to display the Standalone tab page, as shown in Figure 14-5-2:
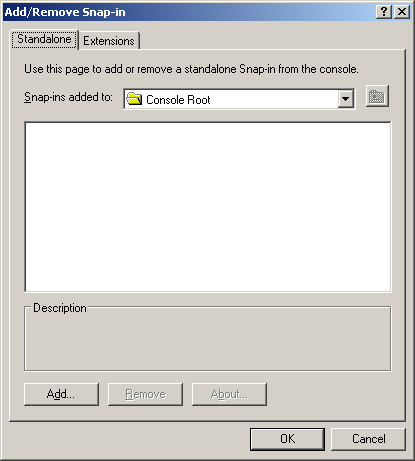
Figure 14-5-2: The Standalone Tab of the Add/Remove Snap-in Dialog Box -
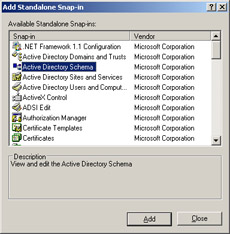
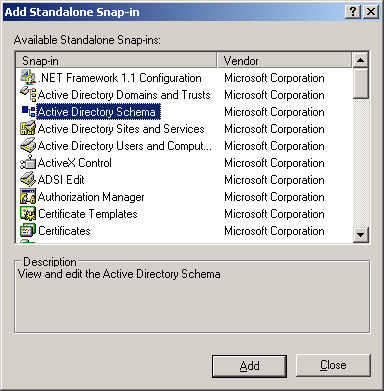
Click the Add button to open the Add Standalone Snap-in dialog box. The Add Standalone Snap-in dialog box contains a list of Active Directory administrative tool snap-ins.
-
Select the Active Directory Schema snap-in from the Add Standalone Snap-in dialog box, as shown in Figure 14-5-3:
-
Click the Add button to add the Active Directory Schema snap-in to the MMC.
-
Click the Close button to close the Add Standalone Snap-in dialog box. The icon for Active Directory Schema snap-in appears in the Add/Remove Snap-in dialog box, as shown in Figure 14-5-4:
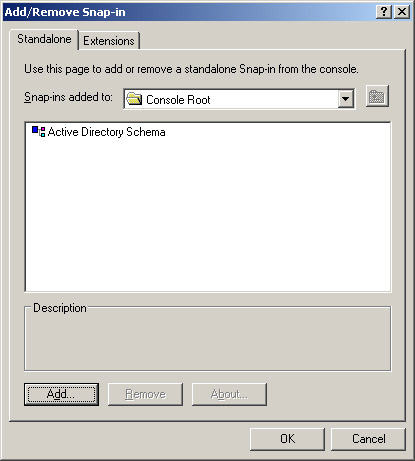
Figure 14-5-4: Icon for Active Directory Schema in the Add/Remove Snap-in Dialog Box -
Click the OK button to close the Add/Remove Snap-in dialog box. The Active Directory Schema snap-in appears as a node below the Console Root folder in the MMC Console window.
Active Directory Command-line Tools
You use the Active Directory command-line tools to manage Windows Server 2003 Active Directory from the command line in the command prompt window. Windows Server 2003 provides the following Active Directory command-line tools:
-
Csvde: Imports and exports data from Active Directory by using files that store data in the Comma-Separated Value (CSV) format.
-
Dsadd: Adds computers, user accounts, groups, contacts related to the user accounts, and organizational units, to the Active Directory.
-
Dsmod: Modifies the properties of objects, such as computers, user accounts, groups, contacts, organizational units, and servers in the Active Directory.
-
Dsrm: Removes objects from the Active Directory.
-
Dsmove: Moves an existing object of the Active Directory from the current location to a new location within a single domain controller. You can also use the dsmove command-line tool to rename an object of the Active Directory.
-
Dsquery: Finds computers, user accounts, groups, contacts, organizational units, site subnets, and servers in the Active Directory, based on a specific search criterion.
-
Dsget: Displays the attributes of objects, such as computers, contacts, subnets, user accounts, groups, organizational units, servers, and sites in the Active Directory.
-
Ldifde: Creates, modifies, and deletes objects of the Active Directory. You can use the Ldifde command-line tool to extend the schema, and export user and group information to other applications and Active Directories. The Ldifde tool also imports data from one Active Directory to another.
-
Ntdsutil: Displays site, domain, and server information and maintains a database for the Active Directory objects. The ntdsutil command-line tool also manages and controls the operations master roles assigned to the domain controllers.
| Note | Operations master role is assigned to a domain controller to perform tasks that cannot occur simultaneously at different places on the network. |
You use the Active Directory command-line tools by typing the command with the required parameters on the command line. For example, the csvde command-line tool has various parameters, such as -i, -f, and -j. The -i parameter of the csvde tool specifies the import mode. The -f parameter specifies the name of the file, which stores the data that is imported or exported. The -j parameter allows you to set the location for the log file.
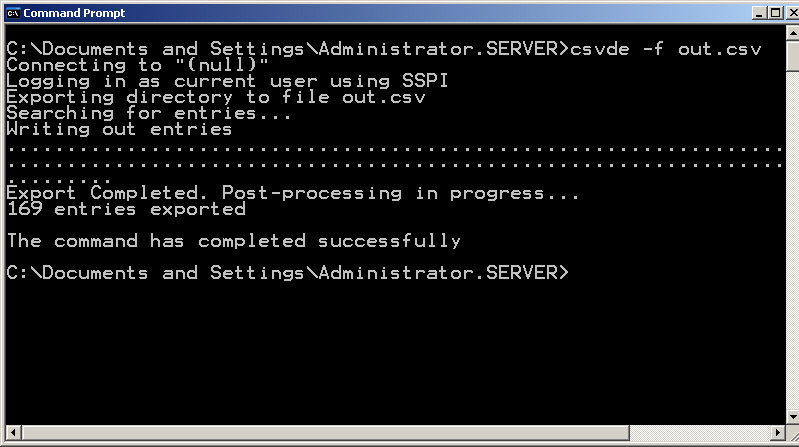
You can type csvde -f on the command line to store the Active directory data in the file name specified after the –f parameter.
Figure 14-5-5 shows how to use the csvde command-line tool:
| Note | You need to install the Active Directory command-line tools on the domain controller in a domain. |
Windows Server 2003 enables you to view the help information for command-line tools. To view the help information, you need to type the command for the command line tool followed by a forward slash and a question mark on the command line. For example, if you want to view the help information about using the ntdsutil command-line tool, you need to type ntdsutil/? on the command line.
Active Directory Support Tools
Active Directory support tools are available in the Tools subfolder under the Support folder in the installation CD of Windows Server 2003. The various Active Directory support tools include:
-
Movetree: Moves the Active Directory objects from one domain to another.
-
SIDWalk: Provides the access control lists for the objects previously used by the user and computer accounts that were moved, orphaned, or deleted. SIDWalk is also called the Security ID Check support tool.
-
LDP: Performs Lightweight Directory Access Protocol (LDAP) tasks on Active Directory. LDP is called Active Directory administration tool.
-
Dnscmd: Checks if the domain controller locator records are available in the Domain Name System (DNS). You can also use the dnscmd support tool to add or delete domain controller locator records. The dnscmd support tool configures the DNS servers, zones, and records. Dnscmd is also called the DNS server troubleshooting tool.
-
DSACLS: Manages access control lists of the Active Directory objects. DSACLS is also called the Directory Services Access Control Lists utility.
-
Netdom: Manages domains and trust relationships. Netdom is also called the Windows Domain Manager support tool and is executed from the command line.
-
NETDiag: Checks whether or not the network and distributed services are working. NETDiag is also called the Network Diagnostic support tool.
-
NLTest: Checks whether or not the network locator and secure channels are working. NLTest is also called the Network Locator Test support tool.
-
Repadmin: Manages and monitors Active Directory data replication from the command line. Repadmin is also called the Replication Diagnostics tool.
-
Replmon: Manages and monitors Active Directory replication by using a Graphical User Interface (GUI). Replmon is also called the Active Directory Replication Monitor support tool.
-
DSAStat: Compares the Active Directory information available on one domain controller with the information on another Active Directory. You can use the DSAStat support tool to identify the differences in the Active Directory information on various domain controllers.
-
ADSI Edit: Displays all the Active Directory objects. You can also use the ADSI Edit support tool to modify the Active Directory objects. The ADSI Edit support tool provides the access control lists for the Active Directory objects.
-
SDCheck: Checks the propagation, replication, and inheritance of the access control lists. SDCheck is also called the Security Descriptor Check utility.
-
ACLDiag: Checks if an end user has been assigned or denied access to an Active Directory object. The ACLDiag support tool resets the access control lists to their default state. ACLDiag is also called Access Control Diagnostics support tool.
-
DFSUtil: Manages Distributed File System (DFS) and displays the DFS information. DFSUtil is also called Distributed File System utility.
-
Dcdiag: Analyzes the state of domain controllers in a forest. The dcdiag support tool also reports errors in the domain controllers and assists in troubleshooting the errors. Dcdiag is also called Domain Controller Diagnostics support tool.
-
Active Directory Migration Tool (ADMT): Migrates user accounts, groups, and computer accounts from the Windows NT 4.0 domains to the Active Directory domains. The ADMT support tool is a MMC snap-in.
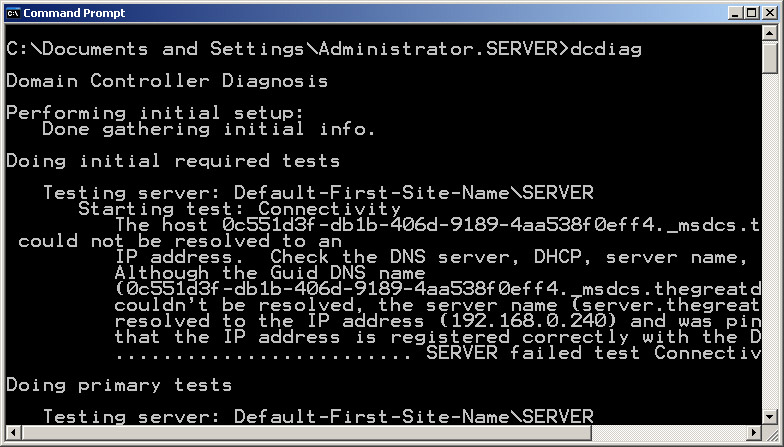
You can use the support tools by typing a specific command on the command line. For example, you can use the dcdiag support tool by typing the dcdiag command on the command line.
Figure 14-5-6 shows how to use the dcdiag support tool:
Windows server 2003 allows you to view the help information for the support tools by using a method similar to the method you use to view the help information for command-line tools.
You need to add the support tools to the MMC to use them. The replmon support tool can also be used from the command line. When you type the replmon command on the command line, the Active Directory Replication Monitor window appears where you can manage Active Directory replication.
Managing Domain Controllers, Roles, and Catalogs
In Windows Server 2003, you can manage domain controllers, roles, and catalogs by using administrative tools, such as Active Directory Users and Groups and Active Directory Domains and Trusts. To manage domain controllers, roles, and catalogs, you need to perform various functions, such as:
-
Installing and demoting domain controllers.
-
Managing the roles in a domain.
-
Configuring global catalogs.
-
Configuring universal group membership caching.
| Note | Global catalog is a directory database that contains information related to Active Directory objects. |
Installing and Demoting Domain Controllers
Windows Server 2003 enables you to install domain controllers on a server that is part of a domain, by configuring the Active Directory. You need to transfer operations master roles and reconfigure the global catalog structure before you install a domain controller.
To configure Active Directory to install a domain controller, you need to ensure that DNS is working. You also need to convert the file system of the Active Directory data drive to New Technology File System (NTFS) 5.0 or later before configuring the Active Directory to install a domain controller.
You can install a domain controller by using the dcpromo utility. The Configure Your Server Wizard tool available in the Administrative Tools menu also enables you to install a domain controller. Active Directory Installation wizard starts when you run the dcpromo utility. The Active Directory Installation wizard installs the Active Directory services on the member server to make the member server a domain controller. To install a domain controller:
-
Select Start -> Run to open the Run dialog box.
-
Type dcpromo in the Open field and click OK. The Welcome screen of the Active Directory Installation wizard appears.
-
Click the Next button to display the Operating System Compatibility screen. This screen provides information that older versions of Windows, such as Windows 95 and Windows NT 4.0 with Service Pack 3, cannot access the domain controller.
-
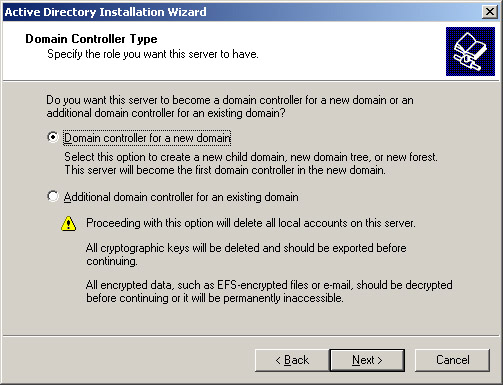
Click the Next button to display the Domain Controller Type screen to define the role for the member server.
-
Select the Domain controller for a new domain option from the Domain Controller Type screen, as shown in Figure 14-5-7:
-
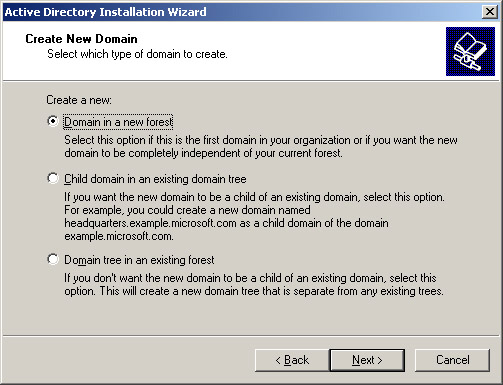
Click the Next button to display the Create New Domain screen to select the domain type for the domain controller.
-
Select the Domain in a new forest option, as shown in Figure 14-5-8:
-
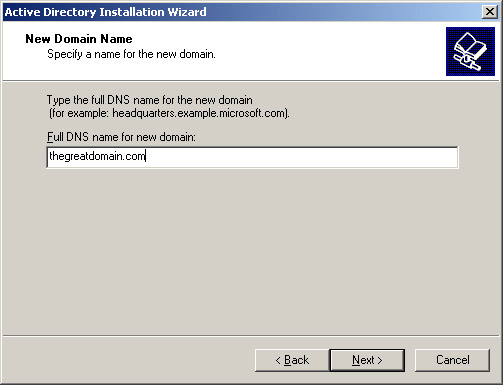
Click the Next button to display the New Domain Name screen to provide a domain namespace for the new domain.
-
Enter thegreatdomain.com as the domain namespace for the new domain in the Full DNS name for new domain text box, as shown in Figure 14-5-9:
-
Click the Next button to display the NetBIOS Domain Name screen to provide a NetBIOS name for the new domain. The domain namespace that you enter in the New Domain Name screen is selected as the NetBIOS name by default.
-
Click the Next button to display the Database and Log Folders screen to provide the location of the folders in which you want to store the Active Directory database and log files. The NTDS subfolder under the WINNT folder on C drive is selected by default as the folder for storing the Active Directory database and log files.
-
Click the Next button to display the Shared System Volume screen to specify the location for the folder that needs to be shared as system volume. The SYSVOL subfolder under the WINNT folder on C drive is selected as the shared system volume folder by default.
-
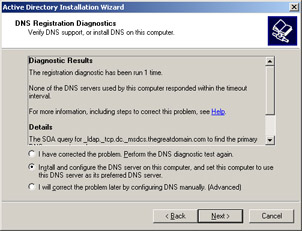
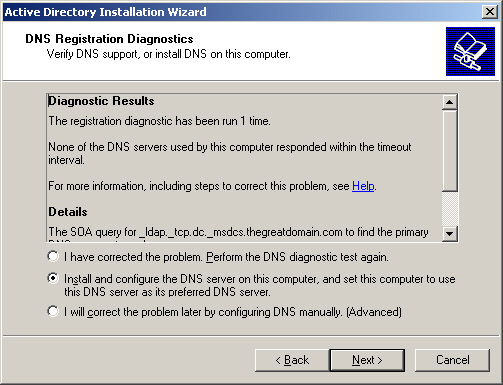
Click the Next button to display the DNS Registration Diagnostics screen to check whether or not DNS server is installed, and to install DNS server if it is not installed.
-
Select the option, Install and configure the DNS server on this computer, and set this computer to use this DNS server as its preferred DNS server, to install the DNS sever, as shown in Figure 14-5-10:
-
Click Next to display the Permissions screen that provides options for setting permissions, such as Permissions compatible only with Windows 2000 or Windows 2003 operating system for user accounts and groups on the Active Directory objects. The option, Permissions compatible only with Windows 2000 or Windows 2003 operating system is selected by default.
-
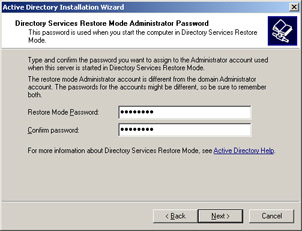
Click the Next button to display the Directory Services Restore Mode Administrator Password screen where you can provide the restore mode password for the Active Directory services.
-
Enter the password, System123, in the Restore Mode Password and Confirm password text boxes, as shown in Figure 14-5-11:
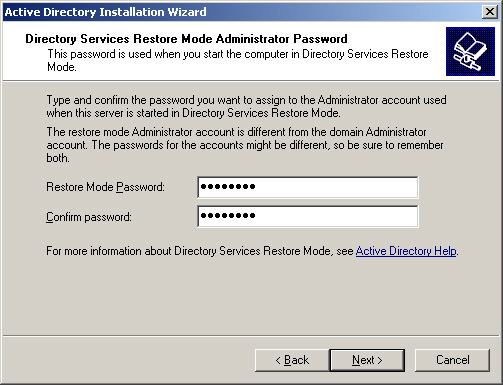
Figure 14-5-11: The Directory Services Restore Mode Administrator Password Screen -
Click the Next button to display the Summary screen, which displays the summary of the domain controller installation process.
-
Click the Next button to display the last screen of the Active Directory installation wizard, which displays the message that the Active Directory is being configured. The Completing the Active Directory Installation Wizard screen appears after the Active Directory is configured.
-
Click the Finish button on the Completing the Active Directory Wizard screen to complete the process of installing the domain controller.
If you do not want the member server to perform domain controller tasks, you can demote a domain controller by using the Active Directory Installation wizard. You can also use the Configure Your Server Wizard tool available in the Administrative Tools menu to demote a domain controller.
The three tasks that you need to perform before demoting a domain controller are:
-
Move the global catalog from the domain controller that you want to demote to another domain controller.
-
Transfer the operations master roles from the domain controller that you want to demote to another domain controller.
-
Remove any application directory partitions on the domain controller.
To demote a domain controller:
-
Select Start -> Run to open the Run dialog box.
-
Type dcpromo in the Open field and click OK. The Welcome screen of the Active Directory Installation wizard appears.
-
Click the Next button to display the Active Directory Installation Wizard message box, which prompts that you need to move the global catalogs to another domain controller before demoting the domain controller.
-
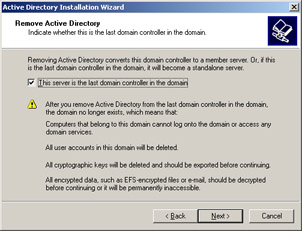
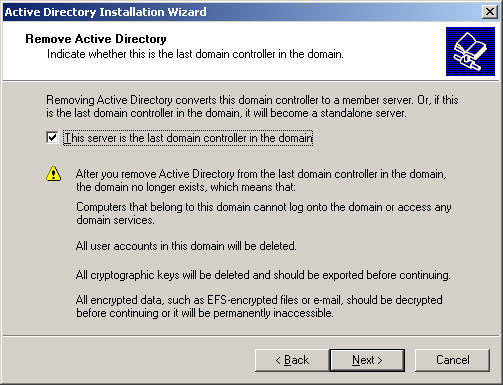
Click OK to display the Remove Active Directory screen.
-
Select the This server is the last domain controller in the domain check box to specify that the domain controller, which you are installing, is the only domain controller in the domain, as shown in Figure 14-5-12:
-
Click the Next button to display the Application Directory Partitions screen, which provides information about the application directory partitions stored in the domain controller. Application directory partitions store and replicate Active Directory data.
-
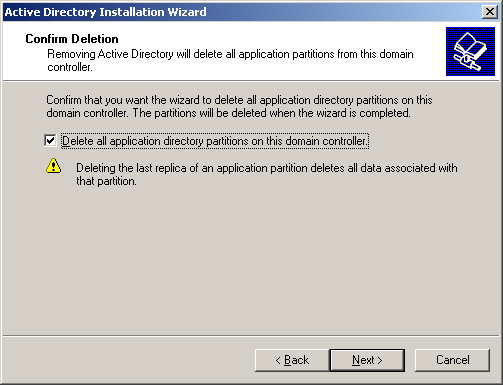
Click the Next button to display the Confirm Deletion screen, which confirms the deletion of all application directory partitions on the domain controller.
-
Select the Delete all application directory partitions on this domain controller check box to delete all the application directory partitions, as shown in Figure 14-5-13:
-
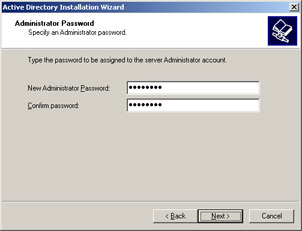
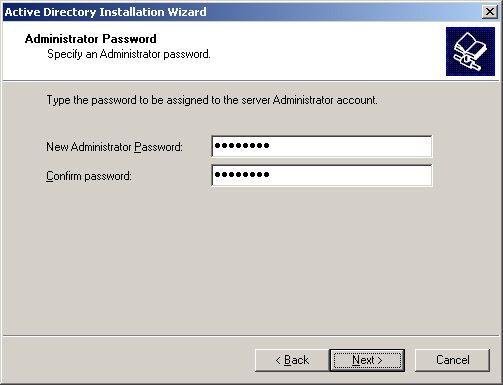
Click the Next button to display the Administrator Password screen to provide an administrator password for the member server.
-
Enter the administrator password in the New Administrator Password and Confirm password text boxes, as shown in Figure 14-5-14:
-
Click the Next button to display the Summary screen, which provides a summary of the information that you provide in the Active Directory Installation wizard while demoting the domain controller.
-
Click the Next button to display the last screen in which the Active Directory services are prepared for demoting the domain controller. The Completing the Active Directory Installation Wizard screen appears after the Active Directory service is prepared for the demotion.
-
Click the Finish button that appears in the Completing the Active Directory Installation Wizard screen to demote the domain controller.
| Note | You need to restart the computer after installing or demoting a domain controller. |
Managing Roles
After installing the domain controller, you can use the Active Directory administrative tools to manage roles, such as operations master and domain naming master roles. When managing roles, you view the roles assigned to a domain controller and transfer roles from one domain controller to another domain controller.
The Active Directory Users and Computers Active Directory administrative tool allows you to view and change the location of the operations master roles in a domain. In a domain, you can manage roles for the domain controllers with roles, such as relative ID master, the Primary Domain Controller (PDC) emulator master, and the infrastructure master.
The domain controller with relative ID master role allocates relative IDs, which uniquely identify an account or group in a domain, to other domain controllers. The domain controller with PDC emulator master role acts as a Windows NT PDC in the domain that contains client computers with Active Directory client software not installed on them.
A domain controller also performs PDC emulator role if the domain contains Windows NT Backup Domain Controller (BDC). The domain controller with infrastructure master role updates references from objects in its domain to objects in other domains.
The operations master role is assigned to a domain controller to perform tasks that cannot be performed simultaneously at different network locations. For example, suppose that the operations master role for the domain, thegreatdomain.com, needs to be transferred to a domain controller in another domain. To transfer the operations master role:
-
Select Start -> Administrative Tools -> Active Directory Users and Computers, to display the Active Directory Users and Computers window.
-
Right-click the thegreatdomain.com domain node in the left pane of the Active Directory Users and Computers window to display a shortcut menu.
-
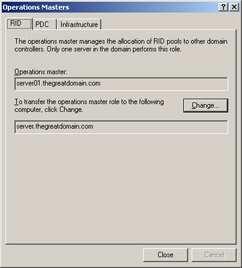
Select the Operations Masters option from the shortcut menu. The Operations Masters dialog box appears, as shown in Figure 14-5-15:
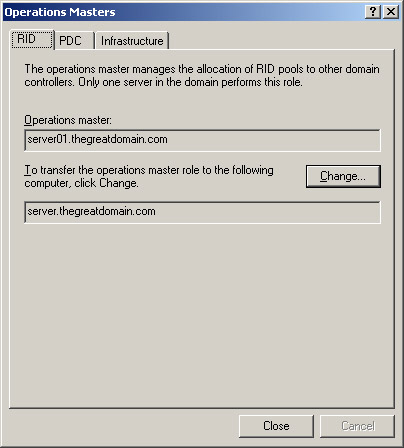
Figure 14-5-15: The Operations Masters Dialog BoxThe Operations Masters dialog box contains three tabs:
-
RID: Provides information about the current location of the relative ID master.
-
PDCM: Provides information about the current location of the Primary Domain Controller (PDC) emulator master.
-
Infrastructure: Provides information about the current location of the infrastructure master.
-
-
Click the Change button on the RID tab to display the Active Directory dialog box where you can confirm the operations master role transfer.
-
Click the Yes button on the Active Directory dialog box to transfer the operations master role to another domain controller.
You can transfer the domain naming master to a domain by using the Active Directory Domains and Trusts tool. To do this, right-click the Active Directory Domains and Trusts node in the Active Directory Domains and Trusts window. From the shortcut menu, select the Operations Master option to transfer the domain naming master role.
You use the Active Directory Schema tool to transfer the schema master role from one domain controller to another. You have to add the Active Directory Schema tool to the MMC before transferring the schema master role. To transfer the schema master role, right-click the Active Directory node after adding the Active Directory Schema to the MMC. Select the Change Domain Controller option from the shortcut menu to transfer the domain naming master role to another domain controller.
| Note | In Windows Server 2003, you can also transfer a role by using the ntdsutil tool from the command line. |
Configuring Global Catalogs
You can configure global catalogs in Windows Server 2003 by enabling domain controllers to host the global catalog. You can also disable a global catalog on a domain controller when there are two or more global catalogs in a domain site. You can prevent a domain controller from hosting the global catalog when you disable the global catalog.
To enable a global catalog:
-
Select Start -> Administrative Tools -> Active Directory Sites and Services to open the Active Directory Sites and Services window.
-
Expand the Sites node in the Active Directory Sites and Services window to view the Default-First-Site-Name node.
-
Expand the Default-First-Site-Name node to view the Servers node.
-
Expand the Servers node to view the SERVER and SERVER01 nodes.
-
Click the SERVER node to display the NTDS Settings icon in the right pane of the Active Directory Sites and Servers window.
-
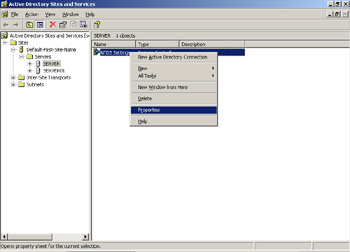
Right-click the NTDS Settings icon to display a shortcut menu, as shown in Figure 14-5-16:
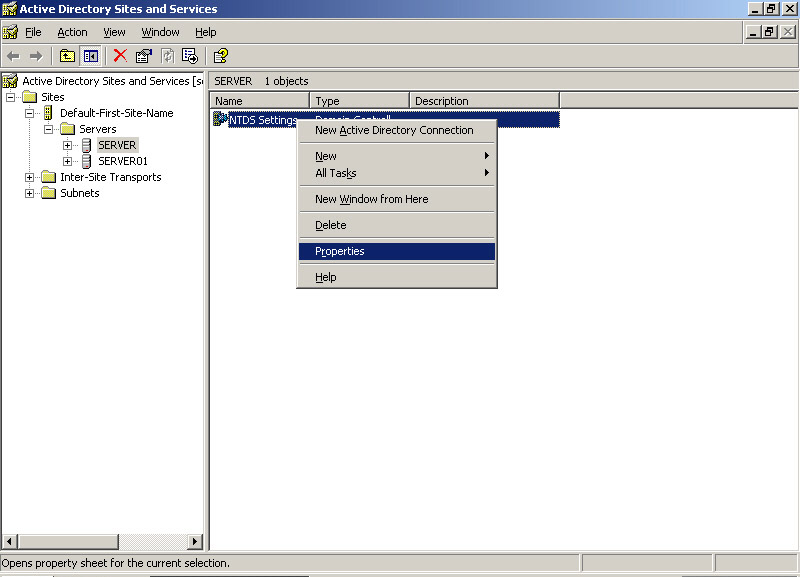
Figure 14-5-16: Shortcut Menu for Selecting the Properties Option -
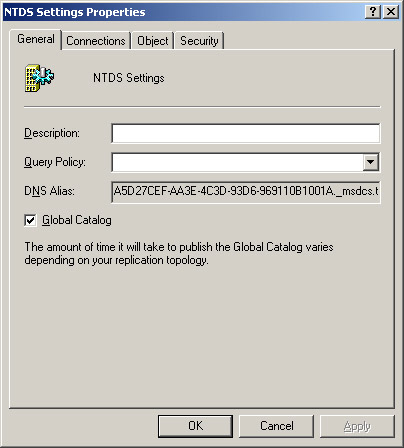
Select the Properties option from the shortcut menu to display the NTDS Settings Properties dialog box.
-
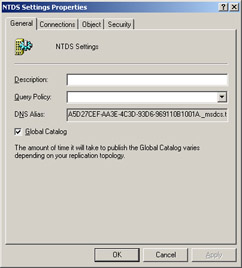
Select the Global Catalog check box from the NTDS Settings Properties dialog box, as shown in Figure 14-5-17:
-
Click the Apply button to enable the global catalog on a domain controller.
-
Click the OK button to close the NTDS Settings Properties dialog box.
| Note | You can disable a global catalog on a domain controller by deselecting the Global Catalog check box on the NTDS Settings Properties dialog box. |
Configuring Universal Group Membership Caching
The universal group membership caching feature allows end users to logon on to a network without depending on the global catalog server to resolve their logon requests.
To enable the universal group membership caching:
-
Select Start -> Administrative Tools -> Active Directory Sites and Services to open the Active Directory Sites and Services window.
-
Expand the Sites node in the Active Directory Sites and Services window to view the Default-First-Site node.
-
Click the Default-First-Site-Name node to view the NTDS Settings icon in the right pane of the Active Directory Sites and Services window.
-
Right-click the NTDS Settings icon to display a shortcut menu.
-
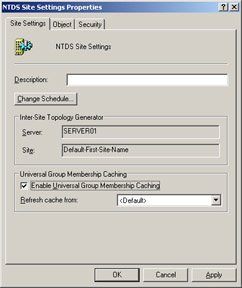
Select the Properties option from the shortcut menu to display the NTDS Site Settings Properties dialog box.
-
Select the Enable Universal Group Membership Caching check box from the NTDS Site Settings Properties dialog box, as shown in Figure 14-5-18:
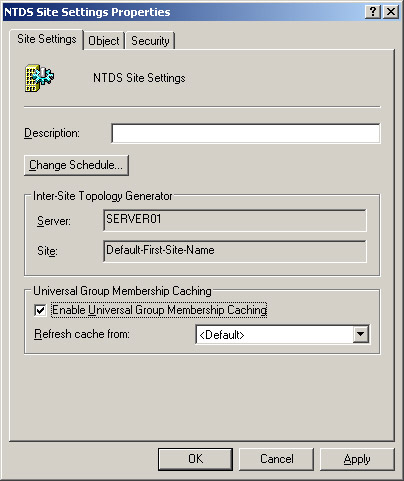
Figure 14-5-18: The NTDS Site Settings Properties Dialog Box -
Click the Apply button to enable universal group membership caching on a domain controller.
-
Click OK to close the NTDS Site Properties dialog box.
| Note | In Windows Server 2003, you can disable the universal group membership caching by deselecting the Enable Universal Group Membership Caching check box. |
Managing Active Directory Users and Computers
You can manage user accounts and computers by using the Active Directory Users and Computers tool. Managing users and computers involves various tasks, such as:
-
Connecting to a domain controller to access the objects stored in the Active Directory.
-
Connecting to a domain to access the domain controllers of a particular domain.
-
Searching for accounts and shared resources to access them.
-
Managing computer accounts by performing certain tasks, such as creating the computer accounts and editing their properties.
-
Managing computers by performing tasks, such as creating computer accounts and editing their properties.
Starting the Active Directory Users and Computers Tool
You can start the Users and Computers tool by using the Active Directory Users and Computers option available in the Administrative Tools menu to manage user and computer accounts in Windows Server 2003. You need to add the Users and Computers tool in the MMC before starting the tool. To add the Users and Computers tool:
-
Select Start -> Run to open the Run dialog box.
-
Enter mmc in the Open field.
-
Click OK to display the mmc window.
-
Select File -> Add/Remove Snap-in to display the Add/Remove Snap-in dialog box.
-
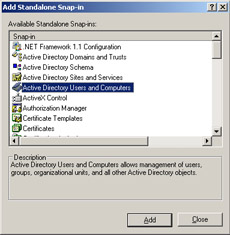
Click the Add button on the Add/Remove Snap-in dialog box to display the Add Standalone Snap-in dialog box.
-
Select the Active Directory Users and Computers option from the Add Standalone Snap-in dialog box, as shown in Figure 14-5-19:
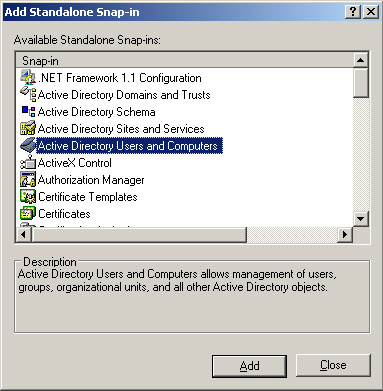
Figure 14-5-19: Selecting the Active Directory Users and Computers Option -
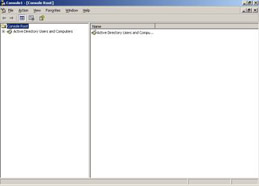
Click the Add button to add the Active Directory Users and Computers tool to the MMC. The Active Directory Users and Computers tool appears as a node in the left pane of the MMC window, as shown in Figure 14-5-20:
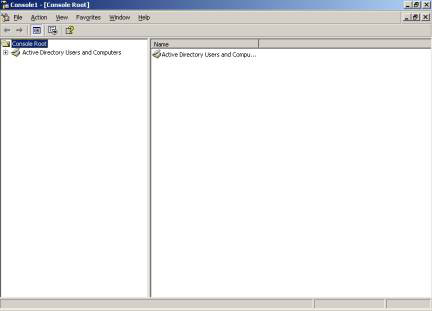
Figure 14-5-20: Adding the Active Directory Users and Computers Tool to MMC
Understanding the Active Directory Users and Computers Tool
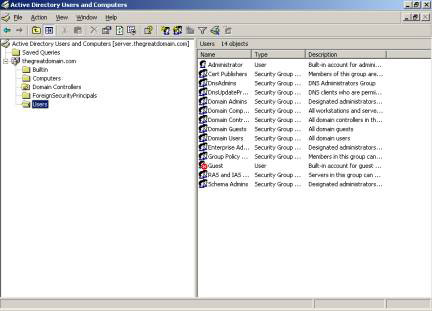
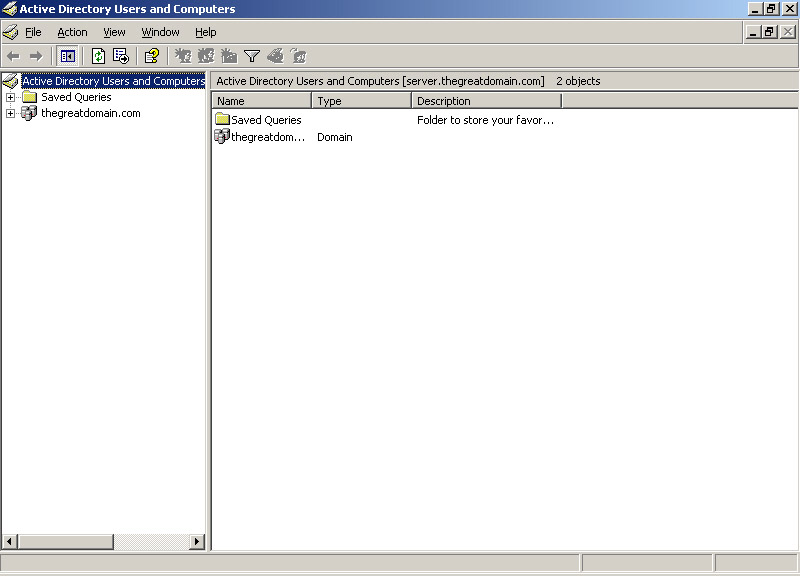
You can use the Active Directory Users and Computers tool to perform various tasks, such as creating a user account and a computer account for a specific domain. You can access the Active Directory objects, such as users and computers for a specific domain, by using the console tree that appears in the Active Directory Users and Computers window, as shown in Figure 14-5-21:
You can also use the Active Directory Users and Computers tool to connect your computer to other domain controllers in the network for accessing Active Directory objects, such as users and computers of other domains.
You can also connect your computer to other domains in the network by using the Action menu in the Active Directory Users and Computers window. The Active Directory Users and Computers tool also enables you to search an Active Directory object, such as a user or computer.
The Active Directory Users and Computers window displays folders, such as Users and Computers, when you expand the domain node contained in the Active Directory Users and Computers. These folders that appear below the domain node are also called containers. The folders available in the Active Directory Users and Computers window are:
-
Saved Queries: Contains a list of saved search criteria so that you can search for Active Directory objects quickly.
-
Builtin: Contains a list of built-in user accounts.
-
Computers: Contains a list of computer accounts in a domain.
-
Domain Controllers: Contains a list of domain controllers in a domain.
-
ForeignSecurityPrincipals: Contains information about the Active Directory objects in another domain, which is trusted by the current domain.
-
Users: Contains a list of user accounts in a domain.
You can also use the Advanced Features option of the Active Directory Users and computers tool to perform tasks, such as restoring a deleted Active Directory object. Additional folders appear below the domain node in the Active Directory Users and Computers window when you access Active Directory Users and Computers advanced options. These additional folders are:
-
LostAndFound: Contains a list of the Active Directory objects that you have deleted. You can also recover the deleted Active Directory objects from the LostAndFound folder.
-
NTDS Quotas: Contains quota data for Active Directory. Quota data is data related to the disk space available for a user in a domain.
-
Program Data: Contains Active Directory data for Microsoft applications.
-
System: Contains built-in system settings.
Connecting to a Domain Controller
In Windows Server 2003, you can connect a computer to a domain controller by using the Active Directory Users and Computers tool for accessing the Active Directory objects of another domain controller. By connecting the computer to a domain controller, you can verify whether or not data replication in the Active Directory of the domain controller is working. You can also check the Active Directory objects for errors after connecting the computer to a domain controller.
To connect a computer to a domain controller:
-
Select Start -> Run to open the Run dialog box.
-
Enter mmc in the Open field to display the MMC window.
-
Right-click the Active Directory Users and Computers node in the left pane of the MMC window to display a shortcut menu.
-
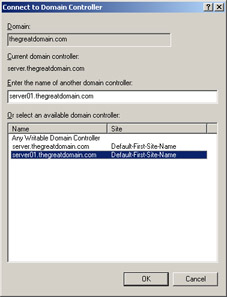
Select the Connect to Domain Controller option from the shortcut menu. The Connect to Domain Controller dialog box appears, as shown in Figure 14-5-22:
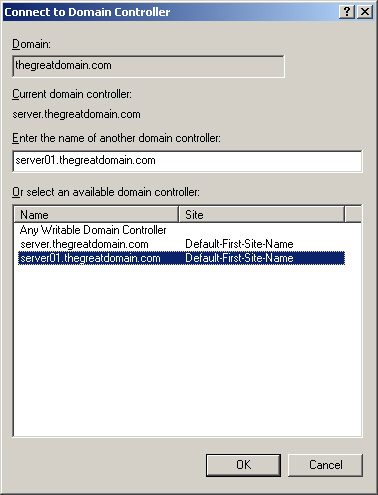
Figure 14-5-22: The Connect to Domain Controller Dialog BoxThe Connect to Domain Controller dialog box also contains a list box, Or select an available domain controller, which displays a list of domain controllers.
-
Enter the name of the domain controller, server01.thegreatdomain.com, in the Enter the name of another domain controller text box.
-
Click OK to connect the computer to the specified domain controller.
| Note | You can also connect a computer to a domain controller by using the Connect to Domain Controller option of the Action menu available in the Active Directory Users and Computers window. |
Connecting to a Domain
You can connect your computer to a domain to access the Active Directory objects on another domain. The Active Directory Users and Computers tool helps you to connect your computer to another domain.
To connect to a domain:
-
Select Start -> Run to open the Run dialog box.
-
Enter mmc in the Open field to display the MMC window.
-
Right-click the Active Directory Users and Computers node in the left pane of the MMC window to display a shortcut menu.
-
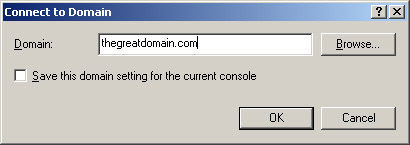
Select the Connect to Domain option from the shortcut menu to display the Connect to Domain dialog box.
-
Enter the name of the domain, thegreatdomain.com, in the Domain text box on the Connect to Domain dialog box, as shown in Figure 14-5-23:
-
Click OK to connect the computer to the specified domain. A node for the domain appears in the left pane of the MMC window when you expand the Active Directory Users and Computers node, as shown in Figure 14-5-24:
| Note | You can also use the Connect to Domain option of the Action menu available in the Active Directory Users and Computers window to connect a computer to a domain. |
Searching for Accounts and Shared Resources
Windows Server 2003 provides a built-in search feature you can use to search for the Active Directory objects, such as users, groups, and computers. Use the Find option in the Action menu to search for an Active Directory object. The shortcut menu that appears when you right-click the domain node in the left pane of the Active Directory Users and Computers window also enables you to search for the objects.
To search for an Active directory object:
-
Select Start -> Administrative Tools -> Active Directory Users and Computers, to display the Active Directory Users and Computers window.
-
Right-click the domain node in the left pane of the Active Directory Users and Computers window to display a shortcut menu.
-
Select the Find option from the shortcut menu. The Find dialog box appears.
-
Select the required computer search type option from the Find list box in the Find dialog box to search for a computer in a domain. The Find list box provides various search options, such as:
-
Users, Contacts, and Groups: Locates users, contacts, and groups in the Active Directory of a domain.
-
Computers: Locates computers in the Active Directory of a domain.
-
Printers: Locates printers in the Active Directory of a domain.
-
Shared Folders: Locates shared folders in the Active Directory of a domain.
-
Organizational Units: Locates the organizational units in the Active Directory of a domain.
-
Custom Search: Performs an advanced search by using an LDAP query. The custom search option also helps you to search for objects based on a criterion.
-
Remote Installation Servers: Locates servers installed on remote sites. You can also use the Remote Installation Servers search option to perform an advanced search. For example, you can search for a computer in the Active Directory of the servers installed at a remote location.
-
Common Queries: Searches for information about the user, computer, and group accounts, such as account name, account description, disabled accounts, non-expiring passwords, and number of days since the last time an end user logged on to the network.
-
Remote Installation Clients: Locates client computers installed on remote sites. The Remote Installation Clients search option also helps you to perform advanced search. For example, you can search for users in the Active Directory of client computers installed at a remote site.
Note The name of the Find dialog box changes based on the search option that you select from the Find list box. For example, if you select computers from the Find list box, the name of the dialog box appears as Find Computers.
-
-
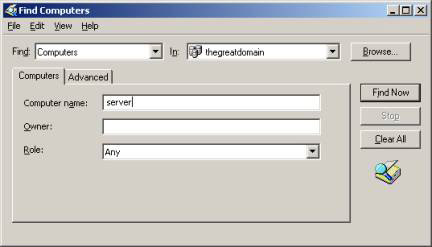
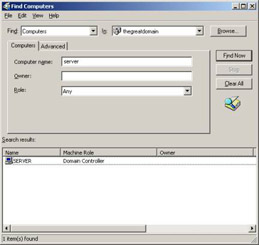
Enter the name of the computer, server, in the Computer Name text box of the Find Computers dialog box, as shown in Figure 14-5-25:
-
Click the Find Now button on the Find Computers dialog box to search for the computer named server. The result of the search appears in the Search results section of the Find dialog box, as shown in Figure 14-5-26:
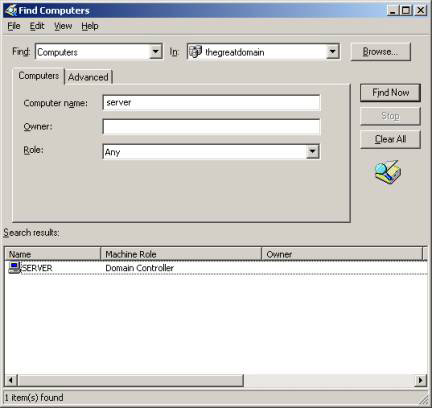
Figure 14-5-26: Search Results in the Find Computers Dialog Box
The Search results section provides the information that the computer named server is a domain controller in thegreatdomain.com domain.
Managing Computer Accounts
In Windows Server 2003, you use computer accounts to control access of the network resources by the end users. You create a new computer account in Windows Server 2003 to access the resources available in a domain. You can also view and edit the computer account properties by using the Active Directory Users and Computers tool.
You can use the Active Directory Users and Computers tool to delete, disable, and enable existing computer accounts. You can join a computer to a domain to create a computer account on a workstation or server. The computer account is automatically created when you join your computer to a domain. You can also create computer accounts by using the Active Directory Users and Computers tool. You can create a computer account in any container that appears below the domain node in the Active Directory Users and Computers window.
To create a computer account:
-
Select Start -> Administrative Tools -> Active Directory Users and Computers to display the Active Directory Users and Computers window.
-
Right-click the Computers folder to display a shortcut menu.
-
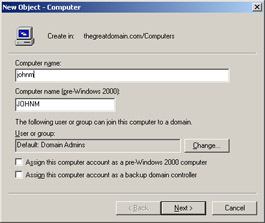
Select New -> Computer to start the New Object - Computer wizard. A screen appears, in which you can enter a name for the computer account that you want to create.
-
Enter the name, johnm, in the Computer name text box, as shown in Figure 14-5-27:
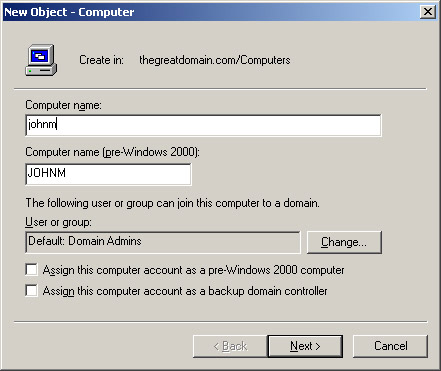
Figure 14-5-27: The New Object - Computer Wizard Screen for Entering Computer Name -
Click the Next button to display the Managed screen of the New Object - Computer wizard. The Managed screen helps you to enter a Globally Unique Identifier (GUID) for the managed computer account in a domain.
-
Click the Next button to display a summary of information for creating a new computer account.
-
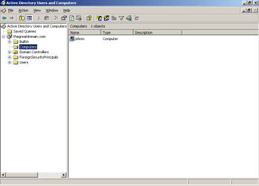
Click the Finish button to create a new computer account. The new computer account is represented by a computer icon, which appears in the right pane of the Active Directory Users and Computers window, as shown in Figure 14-5-28:
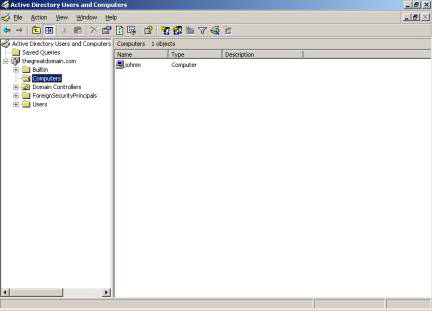
Figure 14-5-28: Computer Icon in the Active Directory Users and Computers Window
In Windows Server 2003, you can view and edit the properties of the computer account by right-clicking the icon for the computer account that appears in the right pane of the Active Directory Users and Computers window. To view and edit the properties of a computer account:
-
Select Start -> Administrative Tools -> Active Directory Users and Computers to display the Active Directory Users and Computers window.
-
Expand the domain node in the left pane of the Active Directory Users and Computers window to view the containers, such as Users and Computers.
-
Select the Computers container where you have created the computer account. The computer icon that represents the computer account appears in the right pane of the Active Directory Users and Computers window.
-
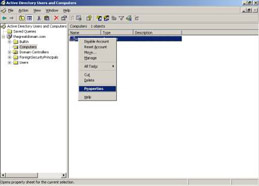
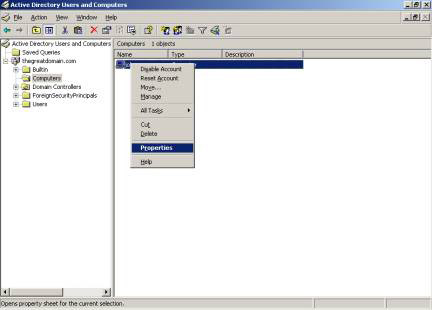
Right-click the computer icon to display a shortcut menu, as shown in Figure 14-5-29:
-
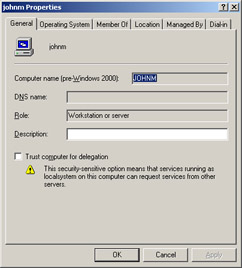
Select the Properties option from the shortcut menu to open the Properties dialog box. The Properties dialog box allows you to view and edit the properties of a computer account, as shown in Figure 14-5-30:
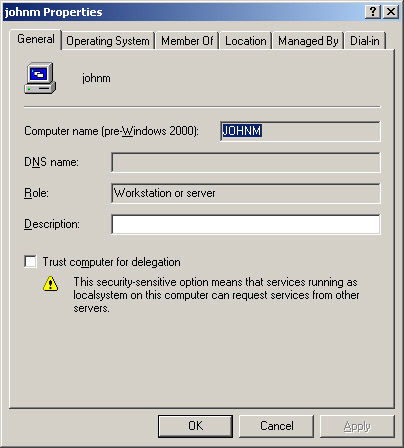
Figure 14-5-30: The Properties Dialog Box for johnm Computer Account
The shortcut menu, which appears when you right-click the icon of an existing computer account, also provides options, such as Delete and Move for deleting and moving a computer account. You can use the Disable Account and Enable Account options from the shortcut menu to disable and enable an existing computer account. The Reset Account option in the shortcut menu allows you to reset a locked computer account. In Windows Server 2003, computer accounts contain a password and a private key password. A computer is locked if the computer account and private key passwords are not the same.
Managing Computers
In Windows Server 2003, you can use the Computer Management feature to perform tasks, such as sending messages to the computers in the domain and viewing shared folders on the computers. You can access the Computer Management feature by using the Administrative Tools menu. In Windows Server 2003, you can also access the Computer Management feature by using the Active Directory Users and Computers tool. The Computer Management window appears when you right-click a computer icon, which represents a computer account, and select the Manage option from the shortcut menu.
You can add a computer to a domain or workgroup by using the Computer Management tool. Computers with the Windows NT, Windows 2000, or Windows XP operating systems, can logon and access the network when joined to a domain or workgroup.
Before joining a computer to a domain, you need to check whether or not all the networking components, such as TCP/IP and DNS, are installed on the computer. To join a computer to a domain, you need to provide the name of the computer and the domain.
You can join a computer to a domain at the time of installing Windows Server 2003. You can also join a computer to another domain if it is already joined to one domain.
To join a computer to a domain:
-
Select Start -> Control Panel to display the Control Panel window.
-
Select System icon to open the System Properties dialog box.
-
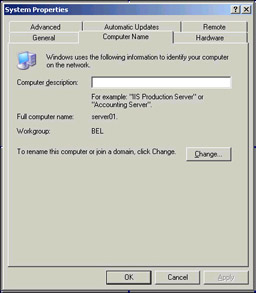
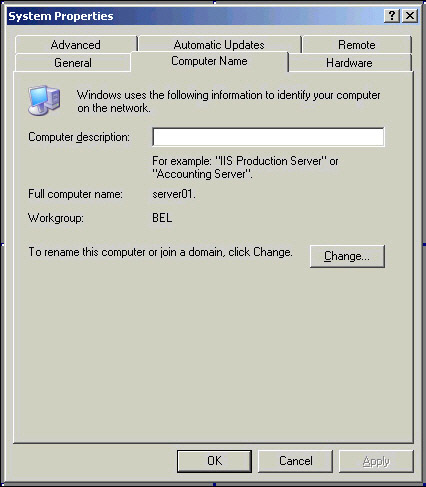
Click the Computer Name tab to display the Computer Name tab page, as shown in Figure 14-5-31:
-
Click the Change button to display the Computer Name Changes dialog box.
-
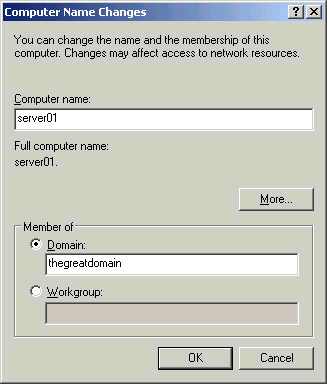
Select the Domain radio button and enter the name, thegreatdomain, in the text box below the Domain radio button, as shown in Figure 14-5-32:
-
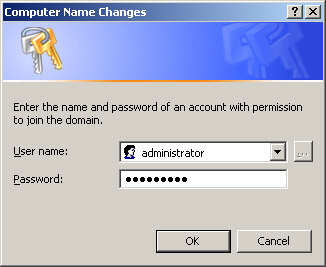
Click OK to display a dialog box that contains two text boxes, User name and Password. Enter the user name and password for the domain to which you want to join the computer, in the User name and Password text boxes, as shown in Figure 14-5-33:
-
Click OK to close the dialog box. A message appears to confirm that the computer has joined the specified domain.
| Note | You need to restart the computer after joining it to a domain. |
Managing Organizational Units
You can manage organizational units by using the Active Directory Users and Computers tool. Managing an organizational unit involves the following tasks:
-
Creating an organizational unit.
-
Viewing and editing the properties of an organizational unit.
-
Renaming and deleting an organizational unit.
-
Moving an organizational unit.
Creating Organization Units
You can create organizational units to reflect the functional structure of an organization. You use the Active Directory Users and Computers tool to create organizational units, which are represented as containers below the domain node. You can also create an organizational unit as a child unit below another organizational unit. To create an organizational unit:
-
Select Start -> Administrative Tools -> Active Directory Users and Computers to open the Active Directory Users and Computers window.
-
Right-click the domain node in the Active Directory Users and Computers window to display a shortcut menu.
-
Select New -> Organizational Unit to display the New Object – Organizational Unit dialog box.
-
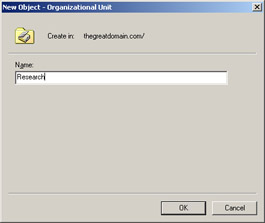
Enter the name of the organizational unit, Research, in the Name text box, as shown in Figure 14-5-34:
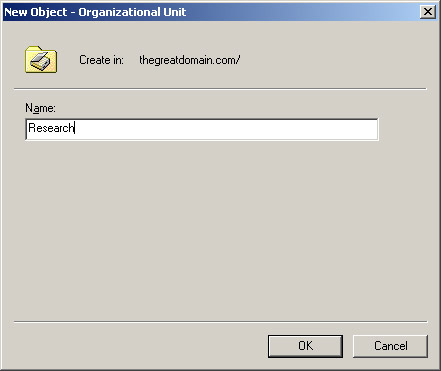
Figure 14-5-34: The New Object - Organizational Unit Dialog Box -
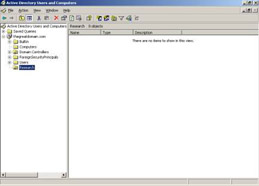
Click OK to create the organizational unit and close the New Object – Organizational Unit dialog box. A folder representing the organizational unit appears below the domain node in the Active Directory Users and Computers window, as shown in Figure 14-5-35:
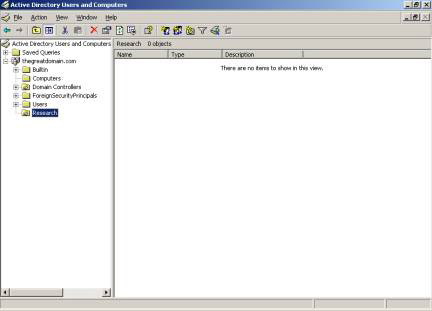
Figure 14-5-35: Organizational Unit in Active Directory Users and Computers Window
Viewing and Editing Organizational Unit Properties
You can view and edit the properties of an organizational unit to access information, such as the description of the organizational unit. To view and edit the properties of the organizational unit:
-
Select Start -> Administrative Tools -> Active Directory Users and Computers to open the Active Directory Users and Computers window.
-
Expand the domain node in the Active Directory Users and Computers window to view the Research organizational unit folder.
-
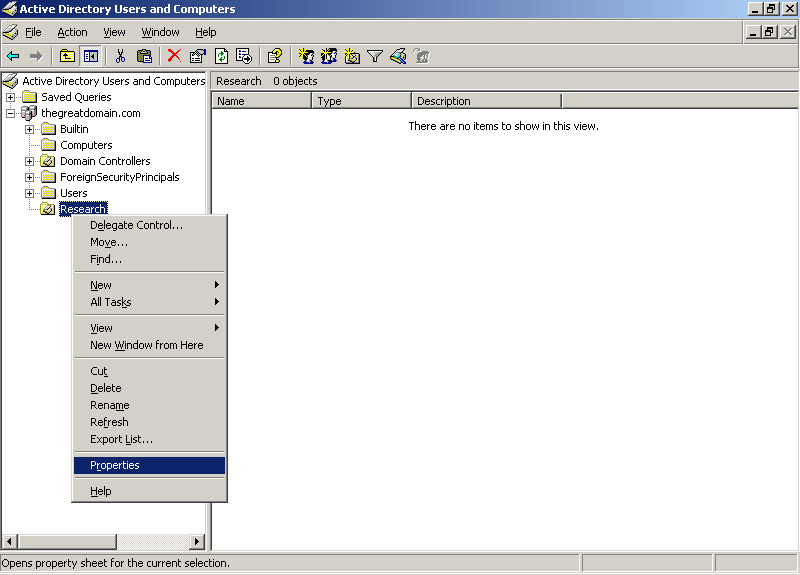
Right-click the Research organizational unit folder below the domain node to display a shortcut menu, as shown in Figure 14-5-36:
-
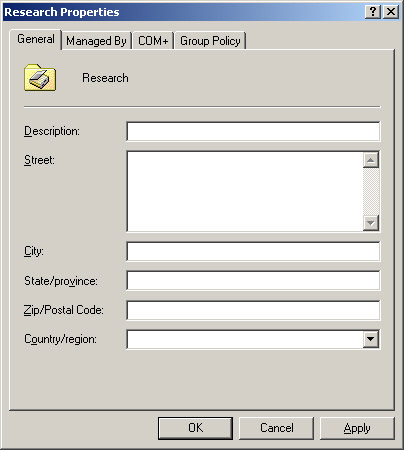
Select the Properties option from the shortcut menu to open the Properties dialog box, as shown in Figure 14-5-37:
-
Enter the description of the organizational unit and other information in the corresponding text boxes that appear in the Research Properties dialog box.
-
Click the Apply button to save the information that you provided in the Research Properties dialog box.
-
Click OK to close the Research Properties dialog box.
Renaming and Deleting Organizational Units
Due to changes in the organizational structure, you might want to rename some organizational units. To rename an organizational unit:
-
Select Start -> Administrative Tools -> Active Directory Users and Computers to open the Active Directory Users and Computers window.
-
Expand the domain node in the Active Directory Users and Computers window to view the Research organizational unit folder.
-
Right-click the Research organizational unit folder below the domain node to display a shortcut menu.
-
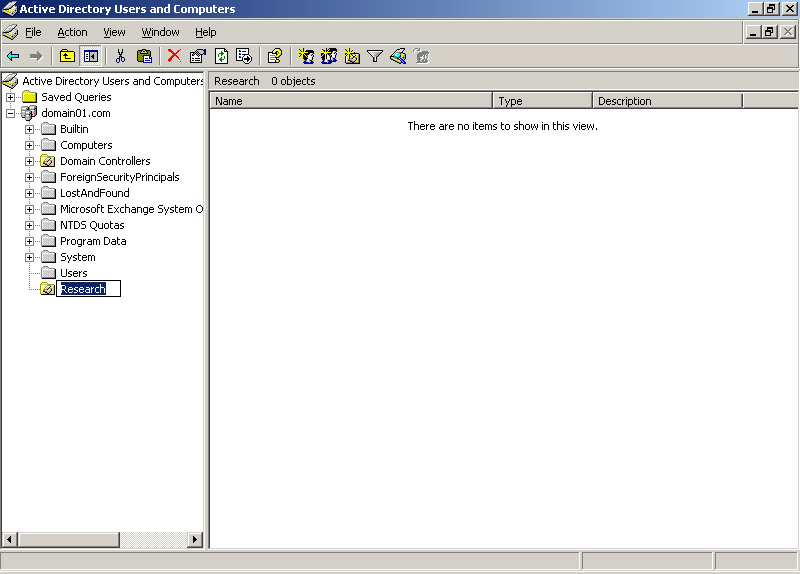
Select the Rename option from the shortcut menu. The name of the Research organizational unit changes to an editable text, as shown in Figure 14-5-38:
-
Enter the text, Marketing, as the name of the organizational unit.
You can also delete an organizational unit. To delete an organizational unit:
-
Select Start -> Administrative Tools -> Active Directory Users and Computers to display the Active Directory Users and Computers window.
-
Expand the domain node in the Active Directory Users and Computers window to view the Research organizational unit folder.
-
Right-click the Research organizational unit folder below the domain node to display a shortcut menu.
-
Select the Delete option to delete an organizational unit. The Active Directory dialog box appears that prompts if you want to delete the organizational unit.
-
Click the Yes button on the Active Directory dialog box to delete the organizational unit.
| Note | You can also double-click an organizational unit to rename it. |
Moving Organizational Units
You can move an organizational unit to a different location in the domain by selecting and dragging the organization unit from one location to another location in the Active Directory Users and Computers window. You can also use the Move option in the shortcut menu. To move an organizational unit:
-
Select Start -> Administrative Tools -> Active Directory Users and Computers to open the Active Directory Users and Computers window.
-
Expand the domain node in the Active Directory Users and Computers window.
-
Right-click the Research organizational unit folder below the domain node to display a shortcut menu.
-
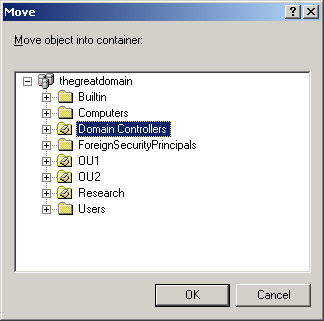
Select the Move option from the shortcut menu to display the Move dialog box.
-
Select the Domain Controllers folder from the Move dialog box to specify the location to move the organizational unit, as shown in Figure 14-5-39:
-
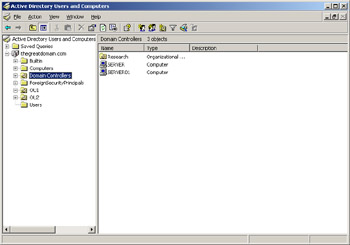
Select the folder where you want to move the organizational unit and click OK. The Research organizational unit is moved to the selected folder, as shown in Figure 14-5-40:
In Windows Server 2003, you cannot move an organizational unit to certain folders, such as Users, built-in, and Computers, which appear in the Active Directory Users and Computers window. The Active Directory dialog box displays an alert message when you try to move an organizational unit to these folders.

