Transmission Control Protocol/Internet Protocol (TCP/IP) networks, such as the Internet, use Domain Name System (DNS) to map a domain name to its Internet Protocol (IP) address. Private networks also use DNS to map a computer name to its numeric IP address so that the computer can use the network resources.
The Windows Server 2003 DNS is a service that translates a domain name into its Internet Protocol (IP) address and an IP address to the corresponding domain name. The Internet network layer uses an IP address to identify a domain.
This ReferencePoint introduces the features of the Windows Server 2003 DNS server. It explains how to install and configure a DNS server and how to manage remote DNS servers. In addition, it describes how to integrate DNS with Active Directory and the Windows Internet Name Service (WINS) service.
Introducing DNS
DNS consists of two components, a client and a server. The server provides network services to its clients. DNS server contains a database called Hosts file, which contain domain names and their corresponding IP addresses in the form of records called resource records.
DNS service provides a standard naming convention for locating the computers and network services. It is based on a hierarchical and logical tree structure of domains called the domain namespace. The hierarchical structure of the domain namespace consists of a root domain, top-level domains, second-level domains, and host names. The highest-level domain in the domain tree structure is called a root domain.
In the hierarchical structure of the domain, each level identifies a specific type of resource information. A DNS client queries a DNS server to resolve a domain name to the resource information represented by the domain.
DNS divides a domain namespace into zones, which store information about one or more domain names. The top level of the DNS hierarchy is called the DNS root zone. Data stored on a DNS server helps to identify the authoritative DNS servers for the root zone of a DNS namespace. This data on the DNS server is called a root hint. A computer that locates DNS servers containing authoritative data for the top-level domains in the domain hierarchy is called a root server.
The domain names and the corresponding IP addresses for a zone are stored in the zone database file. The zone database file for a single zone or multiple zones is stored in the DNS name server. A zone serves as a database and stores information about the domains within it. DNS provides a mechanism for querying a DNS server, and updating and replicating the data in the zone database file among the various DNS servers.
A DNS client queries a DNS server to resolve a domain name when it requires information about the specified domain name. For example, suppose a DNS client queries a DNS server for the IP address of the computer with the domain name, example.books.com. The DNS server uses its Hosts file to return the resource record that contains the information about the IP address for the example.books.com domain.
DNS supports two types of queries, a forward lookup and a reverse lookup. In the forward lookup query, a DNS server translates a domain name to its IP address. In the reverse lookup query, a DNS server translates an IP address to its domain name.
| Note | To learn more about this topic, see the Working with the Windows Server 2003 Active Directory ReferencePoint. |
Features of the DNS Server
A DNS server is Request For Comment (RFC)-compliant. This means that the DNS specifications are based on the approved RFCs published by the Internet Engineering Task Force (IETF) working group.
| Note | RFC is an official document of the IETF working group that specifies the details of protocols belonging to the TCP/IP suite. |
A DNS server is interoperable with other DNS server implementations because a DNS server is RFC-compliant and uses the standard resource record formats. A DNS server also provides enhanced data security. The four types of DNS servers in Windows Server 2003 are:
-
Active Directory integrated primary server: A DNS server that is completely integrated with the Active Directory service. Active Directory stores all the DNS data in this DNS server.
-
Primary server: A DNS server that is partially integrated with Active Directory. The primary server contains a read/write copy of a zone database file and controls any change to the zone.
-
Secondary server: Maintains a copy of an existing DNS zone and provides backup services for a domain. This server obtains the DNS information from a primary server.
-
Forwarding-only server: Passes client requests to other DNS servers. If you boot a forwarding-only server, no information is available in its database.
DNS supports administrative tools and tools that monitor the performance of DNS server. DNS also supports the tools that help you to troubleshoot the problems related to DNS clients and server. These tools are:
-
DNS console: Manages DNS servers.
-
Command-line utility: Troubleshoots the problems pertaining to DNS clients and servers. For example, you can use the command-line utility, Ipconfig, to view and modify IP configuration information of a computer.
-
Performance monitoring utility: Monitors and measures the DNS server activities. An example of the performance monitoring utility is a statistical counter.
Installing DNS Server on Windows Server 2003
You need to install a DNS server for establishing a communication between the computers on a network. To install a DNS server, you should be a member of the administrators group on the local computer or you must be assigned administrative rights. After installing a DNS server, you can administer its zones using the DNS console and the DNS command line tool, dnscmd.
To install a DNS server on Windows Server 2003:
-
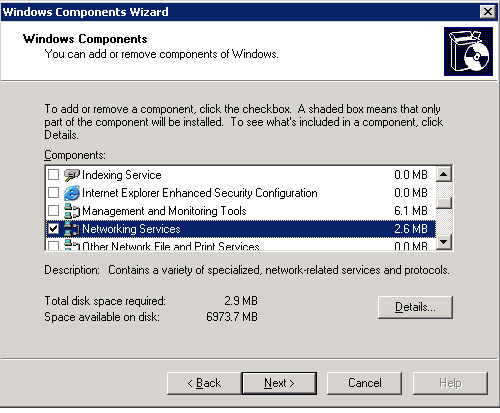
Select Start->Settings->Control Panel->Add or Remove Programs->Add/Remove Windows Components. The Windows Components Wizard window appears, as shown in Figure 14-13-1:
-
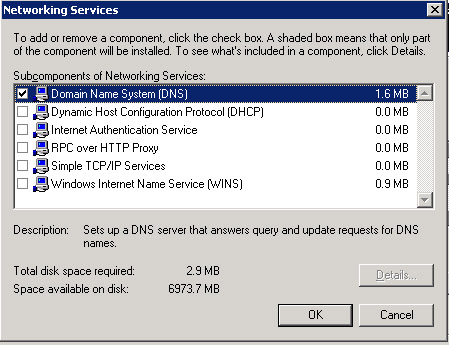
Select the Networking Services option from the Component list and click the Details button. The Networking Services window appears, as shown in Figure 14-13-2:
-
In the Subcomponents of Networking Services list, select the Domain Name System (DNS) option and click OK. The Windows Components Wizard screen reappears.
-
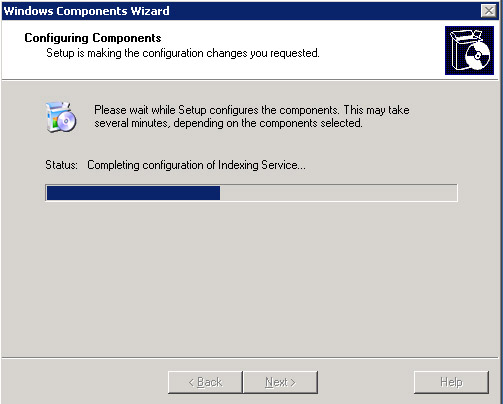
Click the Next button on the Windows Components Wizard screen. The Configuring Components screen appears.
Figure 14-13-3 shows the progress of the networking services configuration process:
-
Click Finish.
Configuring DNS
You need to configure DNS clients and servers to enable the DNS service on a network and resolve and update information about the IP address configuration. To configure DNS clients, you need to specify the IP addresses of the DNS servers that are located on the network. Using these IP addresses, a DNS client can communicate with any DNS server on the network.
The DNS client can receive information about the IP address configuration using two methods. One of these methods uses a manual technique and the other uses Dynamic Host Configuration Protocol (DHCP). DHCP is an IP standard that automatically provides configuration information to its clients.
To manually configure a DNS client:
-
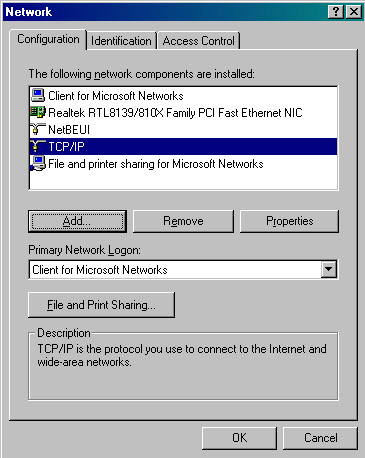
Right-click My Network Places and select the Properties option from the shortcut menu. The Network dialog box appears, as shown in Figure 14-13-4:
-
Click the Configuration tab on the Network dialog box and select the TCP/IP option from the network components list.
-
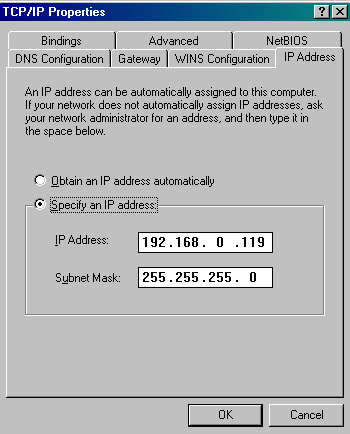
Click the Properties button to open the TCP/IP Properties dialog box, as shown in Figure 14-13-5:
-
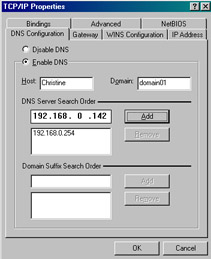
Click the DNS Configuration tab on the TCP/IP Properties dialog box. Type the host name and the domain name of the required DNS server in the Host and Domain text boxes, as shown in Figure 14-13-6:
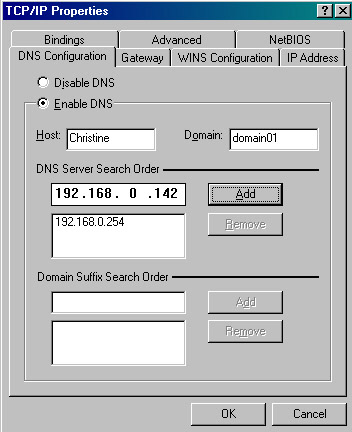
Figure 14-13-6: Specifying the Host Name and the Domain Name -
Click the Add button to add the specified DNS server to the list of DNS servers and click OK. The Network dialog box appears.
-
Click OK.
You can configure any computer that supports the Windows Server 2003 operating system as a DNS server. Configuring a DNS server means creating forward and reverse lookup zones. You also need to specify root hints and forwarders. A forwarder is a DNS server to which other DNS servers can forward their queries for resolving the domain names.
Forward lookup zones return IP addresses corresponding to the domain names. Reverse lookup zones return domain names corresponding to their IP addresses.
To configure a DNS server:
-
Select Start->Control Panel->Administrative Tools->DNS to open the DNS window.
-
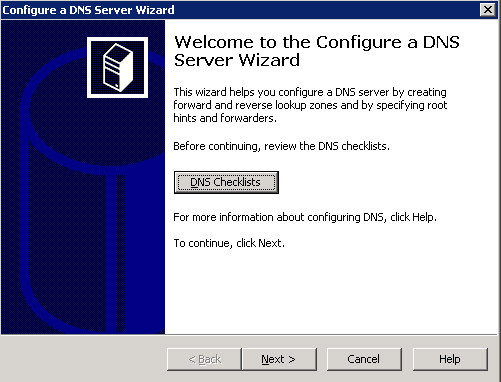
Select Action-> Configure a DNS Server from the DNS window. The Configure a DNS Server Wizard screen appears, as shown in Figure 14-13-7:
-
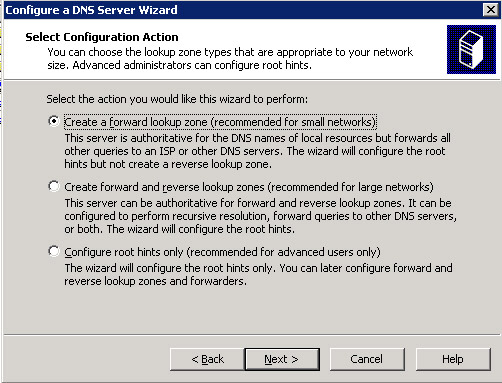
Click the Next button to open the Select Configuration Action screen, as shown in Figure 14-13-8:
-
Select the option, Create a forward lookup zone (recommended for small networks), to create a forward lookup zone. This option specifies that SERVER01 serve as an authoritative server only for the forward lookup zones.
-
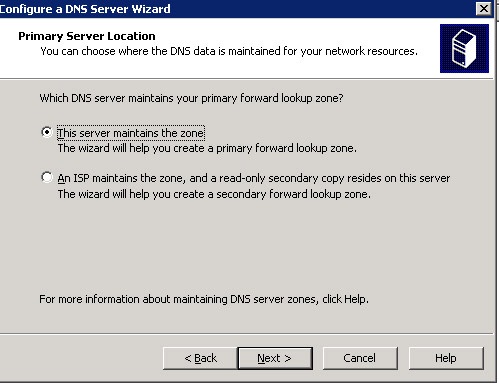
Click Next. The Primary Server Location screen appears, as shown in Figure 14-13-9:
-
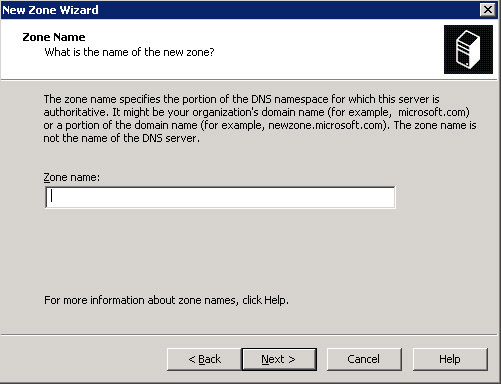
Select the option, This server maintains the zone, from the Primary Server Location screen and click the Next button. The Zone Name screen appears, as shown in Figure 14-13-10:
-
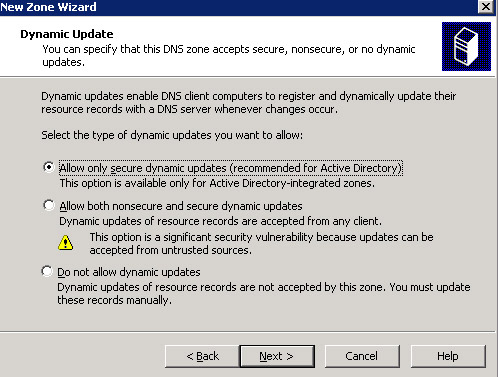
Type the zone name, examplezone, in the Zone name text box and click the Next button. The Dynamic Update screen appears, as shown in Figure 14-13-11:
-
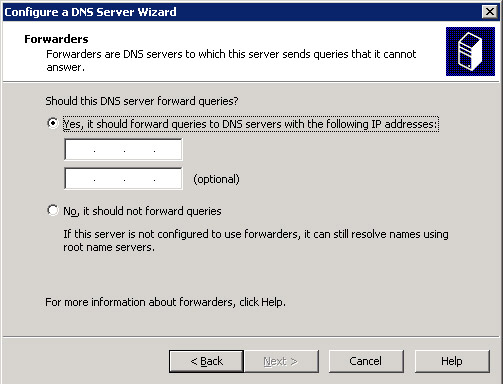
Select the option, Allow both nonsecure and secure dynamic updates, from the Dynamic Update screen and click the Next button to open the Forwarders screen, as shown in Figure 14-13-12:
-
Select the option, Yes, it should forward queries to DNS servers with the following IP addresses from the Forwarders screen and type the IP address, 192.168.0.21 in the text box provided below the option.
-
Click the Next button to open the Completing the Configure a DNS Server Wizard screen, which shows the configuration settings for the SERVER01 DNS server
-
Click the Finish button to close the wizard.
Implementing DNS Security
The Windows Server 2003 DNS service contains enhanced security features to protect the DNS infrastructure. You can modify the security settings to control the access to a DNS server. The three levels of security are:
-
Low-level security: Deploys DNS without configuring its security measures. For example, zone transfers are configured as low-level security, but this security configuration does not ensure that the client requesting the zone transfer is authentic. You can employ this security level in private networks.
-
Medium-level security: Uses the DNS security features without running DNS servers on the domain controllers.
-
High-level security: Deploys the same configuration settings as medium-level security. High-level security eliminates the interaction between DNS and the Internet.
| Note | A domain controller is a server in an Active Directory forest that contains a copy of the Active Directory database and controls access to the network resources. |
DNS Threats
An intruder with administrative privileges can modify the zone information for an authoritative DNS server. As a result, you need to secure the DNS authentication process. The various threats to the DNS infrastructure are:
-
Footprinting: The process by which a hacker obtains the DNS zone data that provides the DNS domain names, the computer names, and IP addresses for the network resources. A hacker uses the DNS zone data to obtain the location or function of the domains and the computers on a network.
-
Denial of service attack: Occurs when a hacker attempts to deny the availability of network services. This happens when a DNS client sends a recursive query to a DNS server, so that the server responds to the query. The DNS server receives continuous recursive queries that swamp the CPU. As a result, the network services that use DNS are not available to the network users.
-
Data modification: Occurs when a hacker accesses and modifies data transmitted over a network. A hacker creates IP packets and refers to these packets using the IP addresses that already exist on the network. These packets then appear to be a part of a valid IP address in the network. This process is called IP spoofing. A hacker can access a network and destroy data within the network using a valid IP address.
-
Redirection: Occurs when a hacker redirects queries for a DNS server to another server, which is under the control of the hacker. The redirection process helps the hacker to corrupt the DNS cache of a DNS server with erroneous data.
Securing DNS
The DNS authentication process ensures that only limited number of administrators can make changes to a zone. This process prevents the content of the zones from being exposed to unauthorized individuals. To secure the DNS servers on a network:
-
Examine and configure the default security settings of DNS server, such as interfaces and root hints.
-
Control the access permissions using the Discretionary Access Control List (DACL) for DNS servers that are configured as domain controllers. You can control permissions for the Active Directory users and groups that control the DNS zones.
-
Use the New Technology File System (NTFS) for the DNS servers that run on Windows Server 2003 operating system. NTFS provides various security features, such as file encryption and permissions, for individual files.
By default, a DNS server is configured to receive DNS queries from all IP addresses. You can configure the Interfaces default settings of a DNS server to allow the DNS server to respond only to the queries that originate from its allocated IP addresses.
To allow a DNS server to respond to selected IP addresses:
-
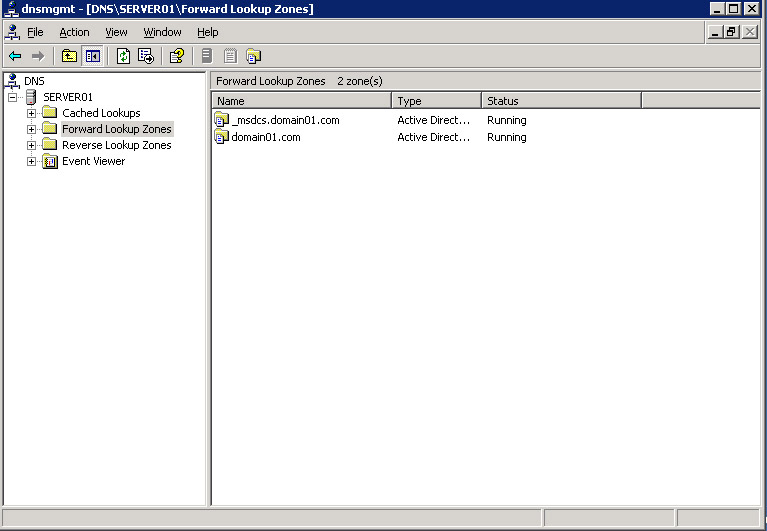
Select Start->Settings->Control Panel->Administrative Tools->DNS. The DNS console appears, as shown in Figure 14-13-13:
-
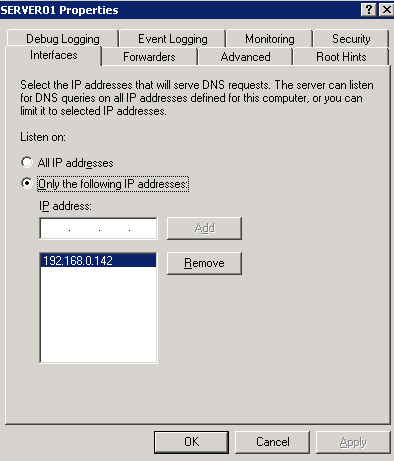
Right click the SERVER01 node in the console tree and select the Properties option from the shortcut menu. The SERVER01 Properties dialog box appears, as shown in Figure 14-13-14:
-
Click the Interfaces tab. In the SERVER01 Properties dialog box, select Only the following IP addresses.
-
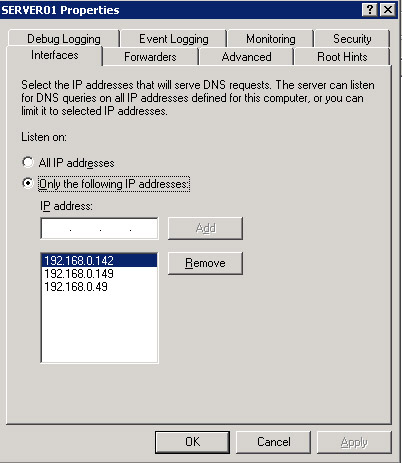
Type the IP address, 192.168.0.49 in the IP address text box. Click the Add button to add the specified IP address to the list of DNS clients.
Figure 14-13-15 shows the IP addresses to which the DNS server responds:
Securing DNS Server Cache
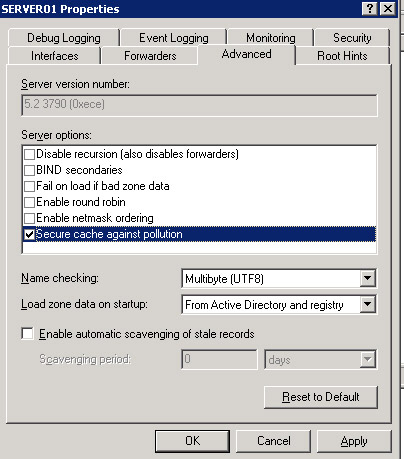
The default settings of DNS prevent an attack on the DNS server. By default, the DNS server is secured from cache pollution. Cache pollution is a security threat that occurs when responses to DNS queries contain non-authoritative or malicious data.
A hacker cannot corrupt the cache of a DNS server with the resource records that were not requested by the DNS server. Caching enables DNS server to store information about the domain name mappings that it accepts from a DNS client. If a query occurs for a domain name that occurred previously, DNS server uses the cached data. The Secure cache against pollution option in the DNS server properties prevents a hacker from polluting the cache with malicious data.
To secure DNS server cache against domain name pollution:
-
Select Start->Settings->Control Panel->Administrative Tools->DNS.
-
Right-click the SERVER01 node in the console tree and select the Properties option from the shortcut menu. The SERVER01 Properties dialog box appears.
-
Click the Advanced tab on the SERVER01 Properties dialog box. The Advanced tab appears, as shown in Figure 14-13-16:
-
In the Server options list, select the Secure cache against pollution option. Click OK to apply these settings.
Updating Root Hints
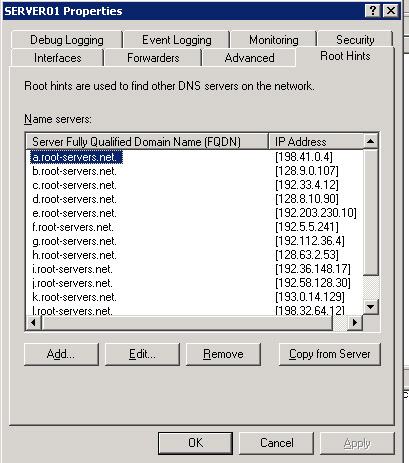
To secure a DNS server, you also need to update the root hints on the DNS server. The Cache.dns file located in the systemroot\System32\Dns folder stores root hints. You can view a sample of the Cache.dns file that is available under the %systemroot%\system32\dns\samples folder.
| Note | You can configure the root hints of DNS servers to prevent the servers from sending private information over the Internet. To update the root hints on a DNS server: |
-
Select Start->Settings->Control Panel->Administrative Tools->DNS to open the DNS window.
-
Right click the SERVER01 node in the console tree and select the Properties option from the shortcut menu. In the SERVER01 Properties dialog box that appears, click the Root Hints tab on the SERVER01 dialog box. The Root Hints tab appears, as shown in Figure 14-13-17:
-
Modify the DNS server root hints using one of the following methods:
-
Click the Add button to add a root server to the Name servers list. The New Resource Record dialog box appears. Specify the name and IP address of the server in the text boxes located on the New Resource Record dialog box.
-
Select a root server in the Name servers list and click the Edit button. The Edit Record dialog box appears. Specify the name and IP address of the root server that is to be modified in the text boxes located on the Edit Record dialog box.
-
Select a root server in the Name servers list and click the Remove button to remove the server from the Name servers list.
-
Click the Copy from Server button to copy the root hints from the DNS server. You need to specify the IP address of the DNS server from which you want to copy a list of the root servers.
-
Managing DNS Servers
DNS console is a tool that you use to manage Windows Server 2003 DNS servers. Managing a DNS server involves administrative functions, such as modifying its security settings and root hints. You can use the DNS console only after installing DNS on a computer. The DNS console helps you to configure a new DNS server, manage an existing DNS server, and modify the security permissions for a specific zone. In addition, you can use the DNS console to add, remove, and update resource records in a zone.
You can configure a DNS server with different zone types depending on the function of DNS server in the network. There are three types of zones in Windows Server 2003:
-
Primary: Creates and manages resource records. A primary zone is the authoritative copy of the DNS zone.
-
Secondary zones: Stores its zone information in a read-only file on the DNS name server. You cannot change the resource records available in the secondary zones.
-
Stub zones: Contains only the resource records that are necessary to identify the authoritative DNS server for that zone. It is a copy of a zone.
Resource records store different types of data and can be classified based on the data they store. These resource record types are:
-
Address (A): Resolves a DNS domain name to the corresponding IP address.
-
Pointer (PTR): Finds the DNS name corresponding to an IP address.
-
Start Of Authority (SOA): Identifies the DNS name server for a zone and specifies information, such as refresh interval required for the replication process.
-
Service (SRV) Record : Identifies the Active Directory domain controllers.
-
Nameserver (NS): Facilitates delegation by identifying DNS servers for each zone.
-
Alias (CNAME): Refers to another host name.
Adding Remote Server to the DNS Console
DNS console helps add remote DNS servers to the console tree. These remote DNS servers are known as secondary servers. You add a secondary server to provide redundancy if the primary DNS server does not respond to client queries. You can also use a secondary server to reduce the network traffic in a zone, which needs to respond to several queries.
To add a remote server to the DNS console:
-
Select Start->Control Panel->Administrative Tools->DNS. The DNS window appears.
-
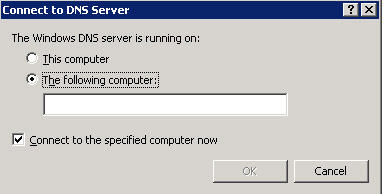
Select Action->Connect to DNS Server from the DNS window. The Connect to DNS Server dialog box appears, as shown in Figure 14-13-18:
-
Select the option, The following computer and type the IP address of the remote server, 192.168.0.240 in the text box provided.
-
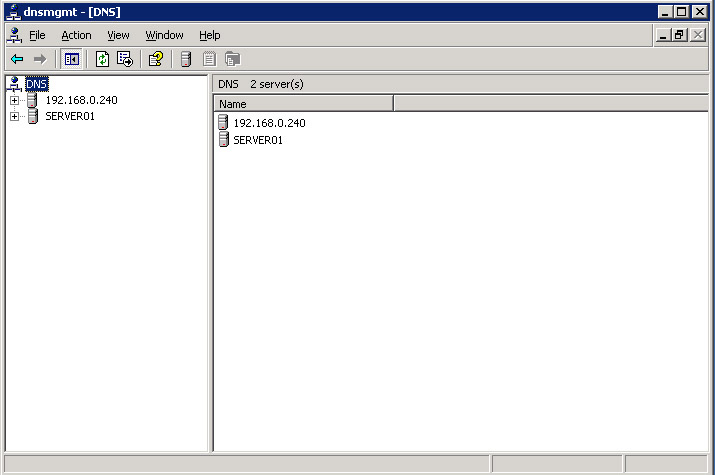
Click OK. The DNS console contains the remote server added to it, as shown in Figure 14-13-19:
Removing Server from the DNS Console
You can remove a DNS server from the console tree. To remove a server from the DNS console:
-
Select Start->Control Panel->Administrative Tool->DNS. The DNS window appears.
-
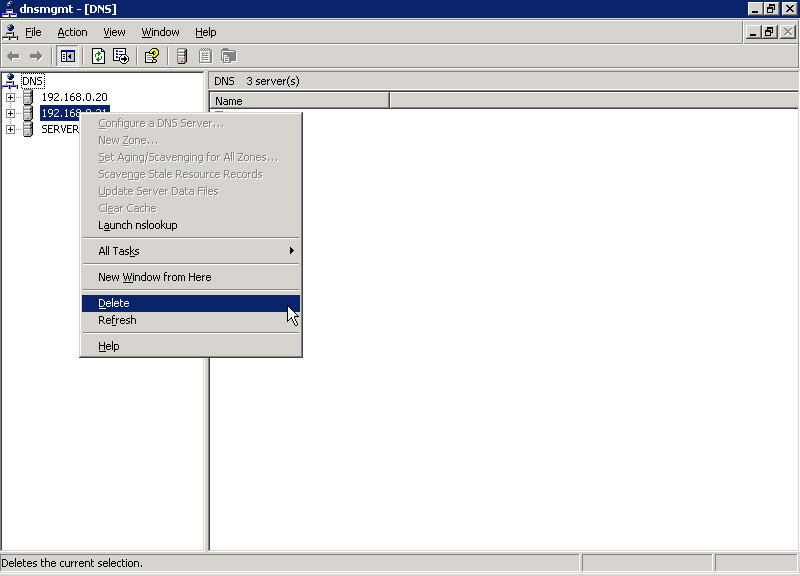
Right click the DNS server that you need to remove from the console tree. The shortcut menu appears, as shown in Figure 14-13-20:
-
Select the Delete option from the shortcut menu. A message appears, as shown in Figure 14-13-21:

Figure 14-13-21: The Confirmation Message to Delete a Server -
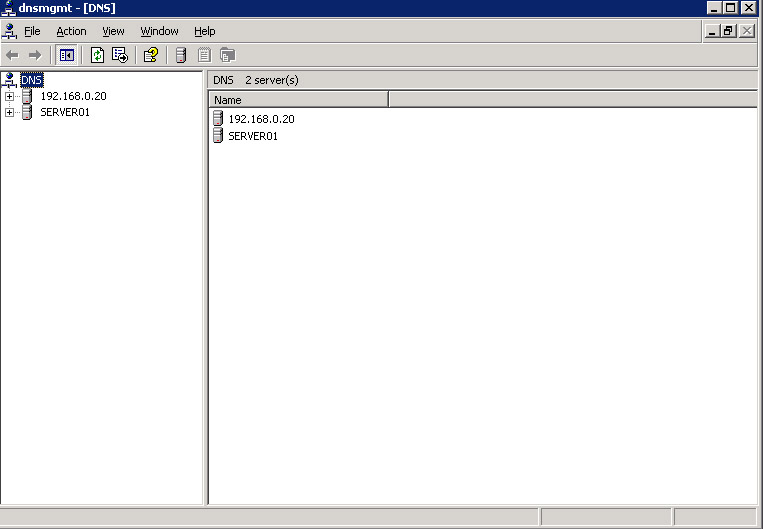
Click the Yes button to remove the specified DNS server from the DNS console, as shown in Figure 14-13-22:
ntegrating DNS Server
To deploy DNS server with Active Directory, you should ensure that DNS locates the domain controllers that run on the Windows Server 2003 operating system. You should also ensure that DNS servers that run on Windows Server 2003 use Active Directory to store and replicate the zone file.
WINS is a network service that translates a computer Network Basic Input/Output System (NetBIOS) name to the corresponding IP address. NetBIOS is a program that helps the applications on different computers to communicate within a LAN.
WINS is similar to DNS except that WINS translates a NetBIOS name while DNS translates a domain name to IP address. NetBIOS name is 16-character long and the 16th character is a special character that specifies the network service. NetBIOS name is recognized by WINS, which then maps the NetBIOS name to an IP address.
| Note | The nbtstat command is a utility that you can use to obtain information about the NetBIOS name. |
A WINS server enables a client to locate other users and services on the network. DNS servers use WINS servers to search domain names that are not found in the domain namespace. WINS servers perform a lookup of the NetBIOS namespaces that they manage.
To use WINS lookup with DNS, you should add two types of resource records to a zone, WINS and WINS-R. If a DNS server does not find a resource record that matches the specified domain, it forwards the query to a WINS server, which is configured in the WINS resource record. For reverse look up zones, you can select the WINS-R resource record.
Active Directory Integration
A DNS zone stored in Active Directory is called the Active Directory integrated DNS zone. The Active Directory Installation wizard used for installing Active Directory provides an option to automatically install and configure a DNS server. Active Directory uses DNS for locating domain controllers. Active Directory also enables computers on a network to obtain the IP addresses of the domain controllers. While installing Active Directory, the SRV and A resource records are registered with DNS.
To locate a domain controller in a domain, the client queries the DNS server for the SRV and A resource records of the domain controller. The DNS server provides the domain name and IP address of the domain controller to the client. The characteristics of Active Directory integration with DNS are:
-
Active Directory and DNS contain the same hierarchical structure for domain namespace.
-
DNS zone files can be stored in Active Directory so that it can be replicated to other domain controllers.
-
DNS serves as a locator service for Active Directory to resolve domain, site, and service names to the corresponding IP addresses.
Describing the Advantages of Active Directory Integration
Active Directory integrates with DNS. However, there is a difference between these two services. DNS is a name resolution service that does not require Active Directory for performing its functions. An Active Directory client queries DNS for locating a domain controller. Active Directory requires DNS to perform its functions. The advantages of integrating Active Directory with DNS are:
-
Provides DNS updates and enhanced security of resource records in a zone file. Active Directory uses a multimaster update model to perform dynamic updates to DNS. A dynamic update is a process that helps DNS clients to update their resource records in zones, which are maintained by DNS servers that can accept and process messages for dynamic updates.
-
The Active Directory database stores a master copy of the zone file, which replicates to all domain controllers. The primary server for the Active Directory integrated zone updates the zone when it receives a request from DNS clients. Active Directory integration helps you to use Access Control List (ACL) to provide a secure access either to a zone or a particular resource record in a zone.
-
Providing an automatic zone replication for each new domain controller in an Active Directory domain. Storing and managing zones is easy because Active Directory integrated zones are stored on each domain controller.
-
Simplifying database replication for a network. If the DNS namespaces and Active Directory domains are replicated separately, you need to design and implement different replication topologies. This creates complexities in designing a network. Integrating DNS zone database with Active Directory simplifies the storage management and replication process.
-
Replicating data changes in a fast and efficient manner as compared to DNS zone transfers. This is because the Active Directory replication process replicates only the relevant changes instead of the entire data.
Configuring Active Directory Integrated DNS Zones
You can configure Active Directory integrated DNS zones for secure dynamic updates.
To configure Active Directory integrated DNS zones:
-
Select Start->Control Panel->Administrative Tools->DNS. The DNS window appears.
-
Right-click the zone, examplezone in the DNS console. The shortcut menu appears.
-
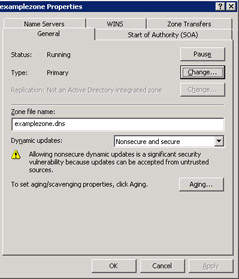
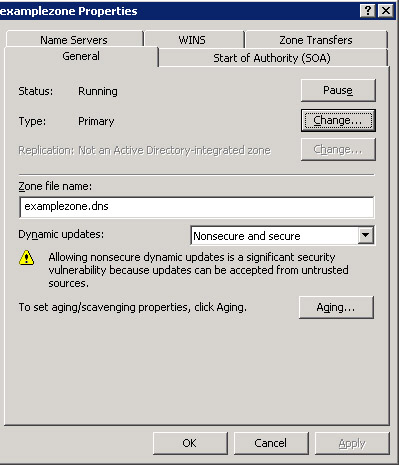
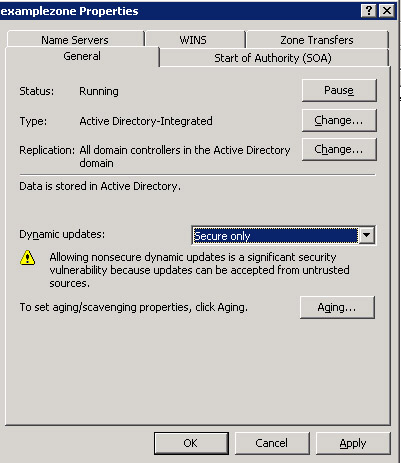
Select the Properties option from the shortcut menu. The examplezone Properties dialog box appears, as shown in Figure 14-13-23:
-
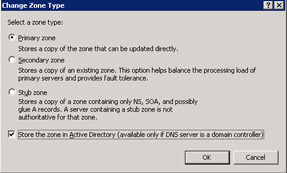
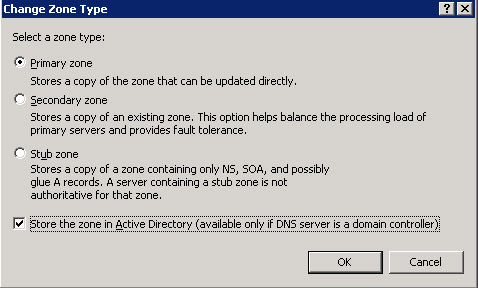
Click the General tab and then click the Change button on the zone Properties dialog box. The Change Zone Type dialog box appears.
-
In the Change Zone Type dialog box, select the option, Store the zone in Active Directory (available only if DNS server is a domain controller), as shown in Figure 14-13-24:
-
Click OK. A confirmation message appears, as shown in Figure 14-13-25:

Figure 14-13-25: The Confirmation Message to Configure a Zone as Active Directory Integrated Zone
-
Click Yes on the confirmation message dialog box. The Properties dialog box reappears.
-
Select the Secure only option from the Dynamic updates drop down list in the Properties dialog box, as shown in Figure 14-13-26:
-
Click OK to close the zone Properties dialog box.
WINS Lookup Integration
DNS performs a combined name search with WINS in both the domain namespaces when it does not find a domain name in its zone file. As a result, a new record called the WINS record is defined as a part of a zone file. Integrating DNS with WINS helps the DNS clients to perform host name lookups using the existing NetBIOS entries in WINS.
Forward Lookup Integration
To integrate DNS forward lookup zones with WINS:
-
Select Start->Control Panel->Administrative Tools->DNS. The DNS window appears.
-
Right click a specific forward lookup zone and select the Properties option from the shortcut menu. The Properties dialog box for the specified zone appears.
-
Click the WINS tab on the zone Properties dialog box.
-
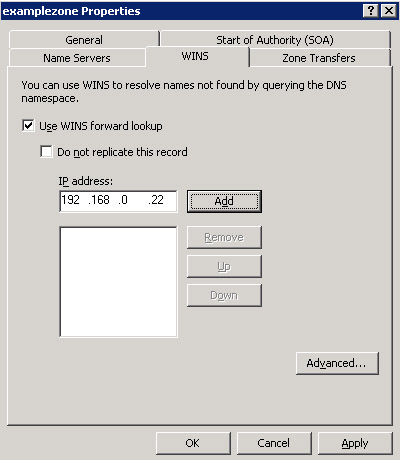
Select the option, Use WINS forward lookup, to use WINS lookup.
-
Type the IP address of a WINS server that is to be used for resolving the host names, which are not found in DNS.
Figure 14-13-27 shows the IP address of a WINS server:
-
Click the Add button to add the IP address of the WINS server to the list of servers.
-
In the Properties dialog box, select the option, Do not replicate this record. This prevents the WINS records from being replicated to other servers during zone transfers.
-
Click OK on the Properties dialog box to close it.
| Tip | Click the Advanced tab on the Properties dialog box to adjust the Cache time-out and Lookup time-out values in the Advanced dialog box. The cache time-out values determine how long the DNS servers and clients can cache information returned through the WINS lookup integration. The lookup time-out specifies the period of time for which a DNS server waits to obtain a response from a WINS server. If the DNS server does not obtain a response within this time, it returns the message string, name not found to the client. |
To resolve a client query using WINS lookup:
-
The DNS client queries its DNS server to look up the address for the host, server01.example.com.
-
The DNS server for the example.com zone receives query for the server01 host and checks if there is a matching A resource record in its configured zone. If there is no A resource record matching the specified host name, it performs WINS lookup.
-
The DNS server splits the FQDN specified in the query and separates the host name, server01 from it.
-
The DNS server then requests the WINS server to find the IP address corresponding to server01.
-
The WINS server resolves the host named server01 and sends its IP address to the DNS server.
-
The DNS server finds the A resource record for server01 using the IP address returned by the WINS server.
-
The DNS server returns the A record for server01 to the preferred DNS server, which had been queried by the client.
-
The preferred DNS server, then, returns the A resource record to the client.
Reverse Lookup Integration
In addition to integrating a DNS forward lookup zone with WINS, you can also integrate a reverse lookup zone. The DNS server cannot request the WINS server to retrieve a computer name based on its IP address. This is because a WINS database is not indexed by an IP address. The DNS server sends a node adapter status request to the IP address specified in the reverse query.
The node adapter status request helps to find a valid NetBIOS name, which is necessary to establish a connection to the remote host. The node status response, in turn, provides the NetBIOS name to the DNS server. The DNS server adds the NetBIOS name to the DNS domain name and sends the response to the client.
To integrate DNS reverse lookup zones with WINS:
-
Select Start->Control Panel->Administrative Tools->DNS. The DNS window appears.
-
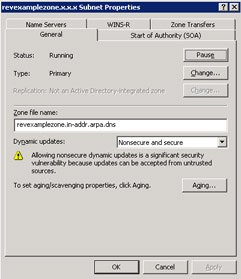
Right click the name of a specific reverse lookup zone and select the Properties option from the shortcut menu. The Properties dialog box for the specified zone appears, as shown in Figure 14-13-28:
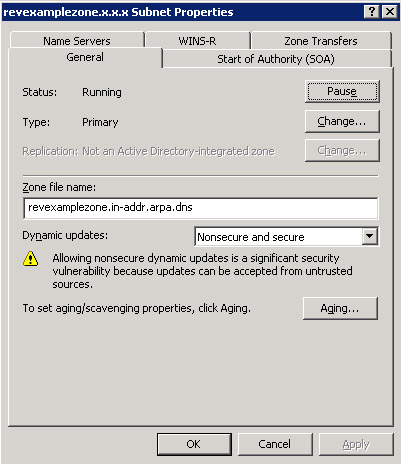
Figure 14-13-28: The revexamplezone.x.x.x. Subnet Properties Dialog Box -
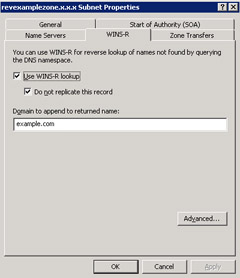
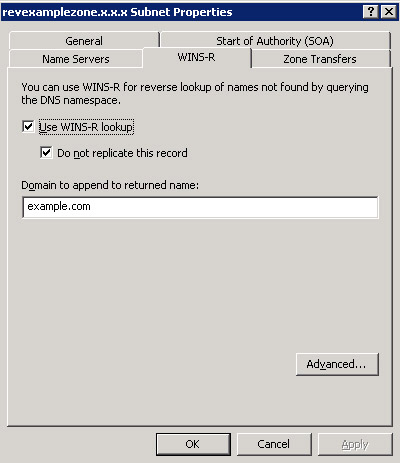
Click the WINS-R tab on the zone Properties dialog box and select the option, Use WINS-R lookup on the zone Properties dialog box.
-
Type the name of a WINS server in the textbox, Domain to append to returned name: present on the zone Properties dialog box. This WINS server is used for resolving the host names that are not found in DNS namespace.
-
Select the option, Do not replicate this record, from the Properties dialog box, as shown in Figure 14-13-29:
This prevents the WINS records from being replicated to other servers during zone transfers.
-
Click OK on the Properties dialog box.
| Note | It is optional to select the option, Submit DNS domain as NetBIOS name scope on the Advanced dialog box. If this option is selected, the host name is passed as the NetBIOS name to the WINS server for resolution. |

