Working with DHCP Options
DHCP options are configuration parameters that the DHCP server dynamically assigns to the DHCP clients, along with the IP address. The DHCP options increase the networking functionality of the DHCP clients by providing additional configuration data, such as Time Offset, Router, and Time Server, for the DHCP clients. The DHCP options are classified as server options and scope options.
The server options are applied at the server level and the scope options are applied at the scope level. The server options affect all the DHCP clients of a DHCP server in a network. The scope options affect all the DHCP clients present in a scope.
The server options take precedence over the scope options. In addition, the range of the server options is greater than the range of the scope options. This is because the server options affect all the DHCP clients associated with a DHCP server. The scope options only affect the DHCP clients that are present in the scope on which the scope options are applied.
Configuring DHCP Server Options
You can use the DHCP server to change the properties of the DHCP server options. To configure DHCP server options:
-
Open the DHCP console window.
-
Expand the server01 node.
-
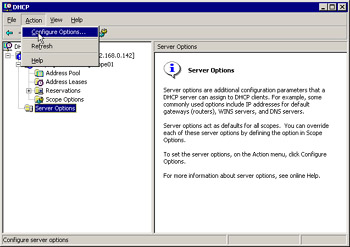
Select the Server Options node from the console tree of server01. Select Action -> Configuration Options, as shown in Figure 14-11-27:
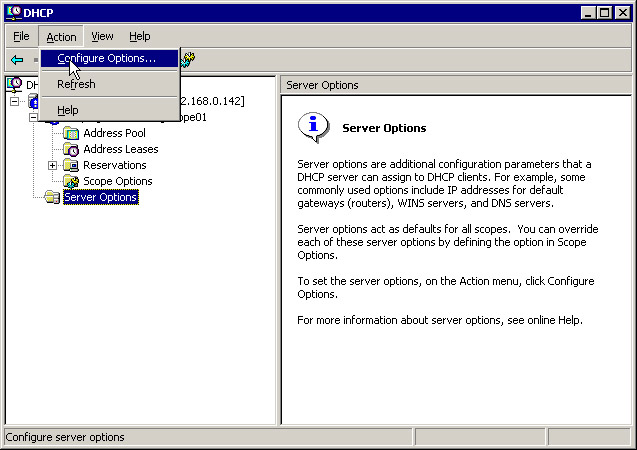
Figure 14-11-27: Selecting the Configuration Options OptionThe Server Options dialog box appears when the Configuration Options option is selected.
-
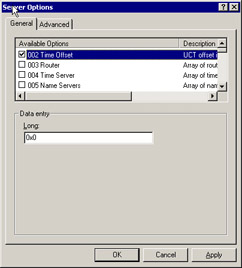
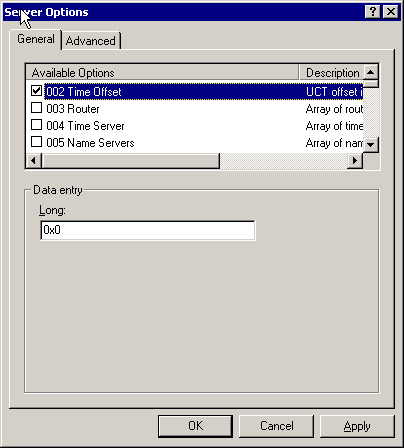
Select the option you want to configure from the Available Options list in the Server Options dialog box. Enter the information for the selected option in the Data Entry box to configure it, as shown in Figure 14-11-28:
-
Click OK to apply the changes.
Configuring DHCP Scope Options
In Windows Server 2003, you can change the DHCP scope options to affect all the DHCP clients that are part of a scope. To configure the DHCP scope options:
-
Open the DHCP console window and expand the server node from the console tree.
-
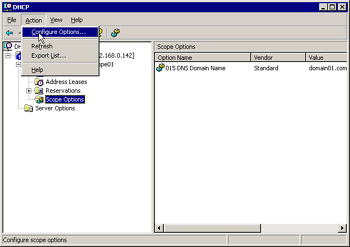
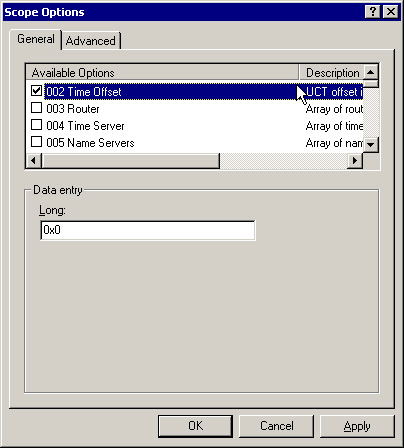
Select the Scope Options node from the console tree of server01. Select Action -> Configuration Options, as shown in Figure 14-11-29:
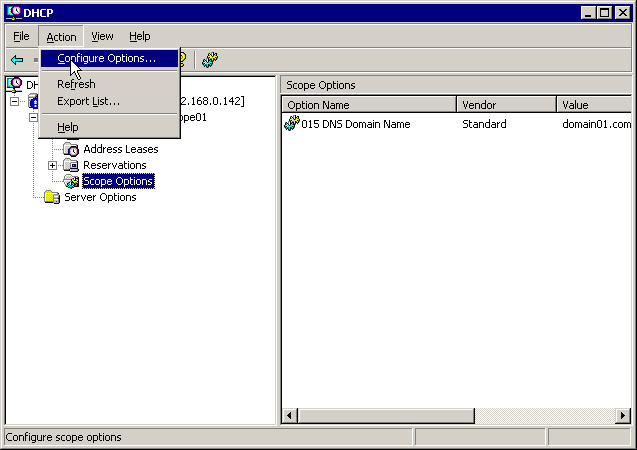
Figure 14-11-29: Configuring Scope OptionsThe Scope Options dialog box appears when the Configuration Options option from the Action menu is selected.
-
Select the option you want to configure from the Available Options list. In the Data Entry box, enter the information required to configure this option, as shown in Figure 14-11-30:
-
Click OK to apply the changes.
Integrating DHCP with DNS Server
A DNS server maps the TCP/IP address assigned by the DHCP server to a DHCP client with its Fully Qualified Domain Name (FQDN). A FQDN ends with a period, which provides a reference to the root node in the hierarchal domain name tree. The mapping of an IP address to a domain name requires that a change in either the address or the name of a DHCP client should be followed by an update in the DNS server also. When the DHCP server changes the IP address of a DHCP client, the DHCP server does not automatically update the DNS server. To enable a DHCP server, running on Windows Server 2003, to update the DNS server, the DCHP clients and the DHCP server need to register with the DNS server. The DHCP server updates the DNS pointer (PTR) and the address (A) resource records for the DHCP clients on the DNS server. You need to provide the credential information, such as the user name and password of the DHCP clients, to the DHCP server. The DHCP server uses the credential information to dynamically update the DNS server.
Configuring DNS Dynamic Update Credentials
You can change the credential information that the DHCP server supplies when you register the names of a DHCP client using DNS dynamic updates. To configure the DNS dynamic update credentials:
-
Open the DHCP console window.
-
Select the DHCP server node from the console tree.
-
Select Action -> Properties to configure the properties of the DHCP server. The Server Properties dialog box appears.
-
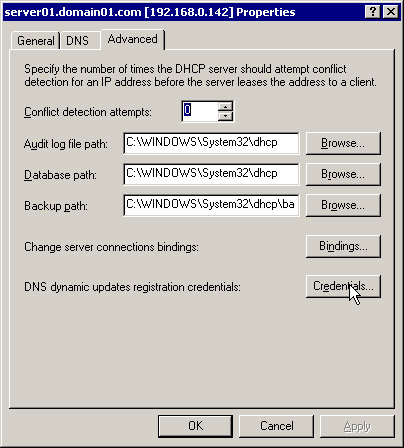
Select the Advanced tab from the Server Properties dialog box, as shown in Figure 14-11-31:
-
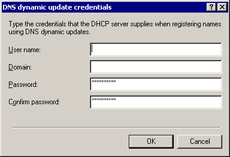
Click the Credentials button to update the credential details. The DNS dynamic update credentials dialog box appears, as shown in Figure 14-11-32:
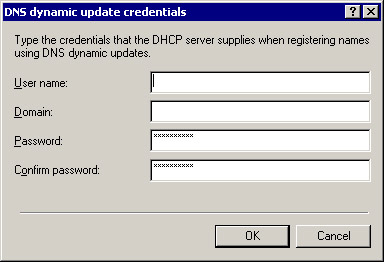
Figure 14-11-32: The DNS Dynamic Update Credentials Dialog Box
-
Enter the user name, domain name, and the password that the DHCP server uses when registering the DHCP client with the DNS server.
-
Click OK.
Enabling DNS Dynamic Update
You need to configure DHCP to dynamically update the DNS server after configuring the DNS dynamic update credentials. To configure DHCP to dynamically update the DNS server:
-
Open the DHCP console window and select the server01 node from the console tree.
-
Select Action -> Properties to configure the properties of the server. The Server Properties dialog box appears.
-
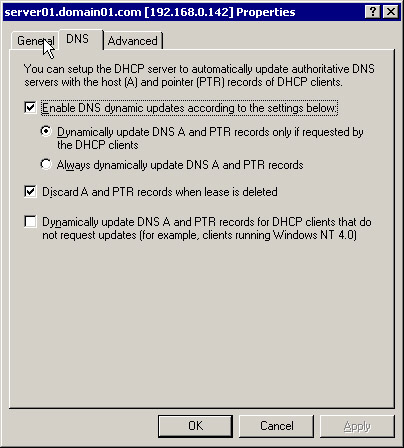
Select the DNS tab of the Server Properties dialog box, as shown in Figure 14-11-33:
-
Select from the following options to enable the DHCP server to update the DNS server dynamically:
-
Enable DNS dynamic updates according to the settings below
-
Discard A and PTR records when the lease is deleted
-
-
Click OK.
Introducing the DHCP Database
The DHCP server uses its database to store information about the DHCP clients. The database is dynamically updated when a new DHCP client is assigned an IP address, or when a DHCP client releases the assigned IP address. The DHCP database also contains the DHCP configuration data associated with each client, such as scopes, reservations, and options. Windows Server 2003 stores the DHCP database in the %systemroot%\System32\DHCP folder. The DHCP database is automatically backed up after every hour in the %systemroot%\System32\DHCP\Backup\New folder.
Backing Up the DHCP Database
You can manually back up the DHCP database to save the recent changes or the current state of the DHCP database. To back up the DCHP database:
-
Open the DHCP console window.
-
Select the server node from the console tree.
-
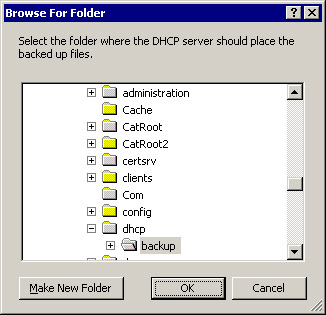
Select Action -> Backup to back up the DHCP database. The Browse For Folder dialog box appears.
-
Select the location where you want to save the backup file of the DHCP database. Figure 14-11-34 shows the Browse For Folder dialog box:
-
Click OK to start the backup.
| Note | The default location where the database backup file is stored is system_root\System32\Dhcp\Backup. The automatic backup overwrites the manual backup if the manual backup is stored in the system_root\System32\Dhcp\Backup folder. |
Restoring a DHCP Database
Restoring is the process of using the backup file of the database. You use the restoring process when the backup file of a DHCP database needs to be moved from one server to another. To restore a DHCP database:
-
Open the DHCP console window and select the server01 node from the console tree to configure its properties.
-
Select Action -> Restore to restore the DHCP database. The Browse For Folder dialog box appears.
-
Select the folder that contains the backup of a DHCP database.
-
Click OK to restore the database.
Moving the DHCP Database to Another Server
In Windows Server 2003, you can move a DHCP database from one DHCP server to another. You use the backup and restore processes to move a DHCP database from one DHCP server to another. To move a DHCP Database from one DHCP server to another:
-
Back up the DHCP database of the source DHCP server.
-
Right-click the server01 node to open a shortcut menu.
-
Select the Stop option from the shortcut menu to stop the DHCP server service. This prevents the source DHCP server from assigning new IP address leases to the DHCP clients.
-
Copy the folder that contains the backup of the source DHCP database to the destination DHCP server computer.
-
Restore the DHCP database at the destination DHCP server using the restore process.

