Dynamic Host Configuration Protocol (DHCP) is an Internet Protocol (IP) standard that helps in administering Transmission Control Protocol/IP-based (TCP/IP) networks. You use DHCP to dynamically assign IP addresses to the clients. As a result, you do not need to manually manage the IP addresses and the configuration options of the computers on the network. A DHCP server also interacts with a Domain Name System (DNS) server to map an IP address to the corresponding domain name.
In a TCP/IP network, you can configure more than one DHCP server to store the TCP/IP configuration information about the DHCP clients, in the DHCP server database. In Windows Server 2003, you can backup and restore this database from one DHCP server to another.
This ReferencePoint introduces DHCP and explains how to install and configure DHCP servers in Windows Server 2003. It also describes how to integrate DHCP and DNS, and save and restore the DHCP configuration. It explains how to manage the DHCP scopes, address pools, leases, and reservations in Windows Server 2003. In addition, it describes how to back up and restore a DHCP database, and move it to another DHCP server.
Introducing DHCP
Every computer on a TCP/IP network has a unique IP address, which identifies that computer on the network. Manually assigning an IP address to each computer on a large network is time consuming. DHCP overcomes this disadvantage by enabling a DHCP server to dynamically assign the IP addresses to the DHCP client on the network. The DHCP server assigns an IP address to a DHCP client from a scope at run time. A scope represents a range of consecutive IP addresses.
DHCP uses the client-server model to help each DHCP server to handle requests from more than one DHCP client. You need to install and configure a DHCP server on a network that contains the DHCP clients. The DHCP clients obtain their IP addresses and configuration parameters, such as the DNS server name, dynamically from the DHCP server each time they boot up and connect to a network.
DHCP Components
In Windows Server 2003, using DHCP requires the following components:
-
DHCP servers
-
DHCP clients
-
DHCP relay agents
A DHCP server is implemented by a service, known as DHCP server service, which assigns the IP addresses to the DHCP clients. The DHCP server registers a DHCP client by initializing the TCP/IP configuration parameters for the DHCP client. The TCP/IP configuration parameters are:
-
IP address: Identifies each computer uniquely from the other computers present on a network.
-
Subnet mask: Separates the network identifier bits from the host identifier bits of an IP address. Network identifier bits identify a network. Host identifier bits identify a client. For example, if the subnet mask is 255.255.0.0 and the IP address is 192.168.0.142, then 192.168 is the network identifier and 0.142 is the host identifier.
-
Router: Connects one network to another to enable data transfer between them. Routers are also known as default gateways.
-
Additional configuration parameters: Refers to optional parameters that are assigned to the DHCP clients, such as the IP address of a DNS server or a Windows Internet Name Service (WINS) server, which assigns user-friendly names to the computers instead of the IP addresses.
A DHCP client interacts with the DHCP server to receive a unique IP address. All current versions of Windows operating systems support the implementation of a DHCP client. The operating systems that you can use to implement a DHCP client are:
-
Windows Server 2003
A DHCP server uses a database that stores information about all the available IP addresses. The database also contains the configuration information associated with each IP address, such as the subnet mask, gateways, and DNS server address. The DHCP server uses this database to automatically assign the IP addresses for the DHCP clients when they boot up.
A DHCP relay agent is the third component required to implement a DHCP standard. A DHCP relay agent is a computer or router that automatically forwards the broadcast messages from one subnet to another. Routers, by default, do not forward the broadcast messages from one subnet to another. You need to configure a router or the computer working as a router to work as a DHCP relay agent. To transfer the broadcast messages from one DHCP server to another, a DHCP relay agent stores the IP addresses of all the DHCP servers of different networks. The DHCP relay agent initially examines the data packet that contains the message, performs some changes to it, such as modifying the source IP address, and then transfers the packet to a DHCP server on a different network.
DHCP Allocation Methods
The DHCP allocation methods define the manner in which the DHCP servers assign IP addresses to the DHCP clients present on a network. The three IP address allocation methods are:
-
Dynamic Allocation
-
Automatic Allocation
-
Manual Allocation
Dynamic Allocation
Dynamic allocation is the default method used by the Windows Server 2003 DHCP server. In dynamic allocation, the DHCP server leases an IP address to a DHCP client for a specified period. A lease, which the network administrator configures, is the period for which a DHCP client can use the assigned IP address. To use the dynamically assigned IP address continuously, each client needs to either periodically update the lease or obtain a new lease from the DHCP server.
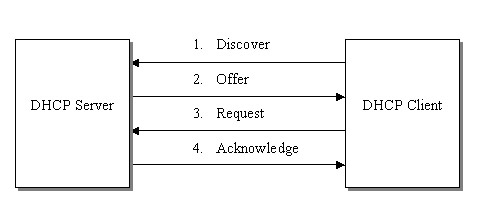
When a DHCP client boots up, it sends a request for a new IP address to the DHCP server. The DHCP server selects one IP address from a pool of available IP addresses and assigns it to the requesting DHCP client, along with some TCP/IP configuration information, such as the subnet mask. This process of assigning a new IP address and configuration data when a DHCP client boots up is called the DHCP lease generation process. The actions involved in the assignment of an IP address by a DHCP server to a DHCP client are:
-
DHCP Discover: A DHCP client broadcasts a DHCPDISCOVER packet to search the DHCP server.
-
DHCP Offer: The DHCP server sends a DHCPOFFER packet to offer an address to the DHCP client.
-
DHCP Request: The DHCP client accepts the DHCPOFFER packet and sends a request for an IP address by sending a DHCPREQUEST packet to the DHCP server.
-
DHCP Acknowledge: The DHCP server accepts the DHCPREQUEST packet and assigns an IP address to the DHCP client by updating its database. The DHCP server sends a DHCPACK packet to complete the process of address assignment.
| Note | The DHCP server and clients interact with each other using User Datagram Protocol (UDP). UDP is an unreliable, connection-less protocol, as it does not guarantee that the data packet will be delivered to the destination computer. |
Figure 14-11-1 shows the interaction between a DHCP server and a DHCP client:
The DHCP client makes a request to the DHCP server to update the lease either after half of the previously assigned lease expires or when the DHCP client is restarted. The DHCP client sends the lease renewal request by sending a DHCPREQUEST packet to the DHCP server. When the DHCP server receives the DHCPREQUEST packet, it increases the lease by sending a DHCPACK packet. This process of renewing the IP address and configuration information is called the DHCP lease renewal process.
If the DHCP client does not need to use the IP address in future, it sends a DHCPRELEASE packet to the DHCP server to release the IP address and the associated configuration data. The lease expires and the IP address is returned to the address pool for reassignment. You use dynamic allocation when the IP addresses are limited.
Automatic Allocation
In automatic allocation, the DHCP server permanently assigns an IP address to a client. A reservation is a permanent IP address assignment to a specific DHCP client. In Windows Server 2003, automatic allocation is equivalent to dynamic allocation with infinite lease. When the DHCP server assigns an IP address to a DHCP client, the only way to change the IP address of that computer is to change it manually. Automatic allocation reduces the network traffic because this method removes the periodic lease renewal messages.
Manual Allocation
In manual allocation, the network administrator manually enters the IP configuration information, such as the IP address, subnet mask, and default gateway, on each DHCP client separately. Using manual allocation, you can assign an IP address to a computer permanently. The limitations of manual allocation are:
-
It is a time consuming process.
-
It has a high probability of typographical errors because you need to provide the configuration information manually. Typographical errors can result in duplication of IP addresses.
In addition, the network administrator needs to update the IP address of a computer whenever it is relocated in a network. Moving computers from one location to another increases the workload of the network administrator.
Installing and Authorizing a DHCP Server
A network can contain one or more DHCP servers to manage the DHCP clients. To install a DHCP server on a network:
-
Install and authorize the DHCP server service on the server.
-
Configure the DHCP server service by specifying the range of IP addresses or the scope that the DHCP server can assign.
-
Configure various DHCP options to apply the configuration parameters, such as the name of the DNS server and the subnet mask.
-
Activate the scope of the DHCP server. Every new scope needs to be activated. Scope activation makes the IP address present in a scope available for lease distribution to the DHCP clients.
To install a DHCP server, you first need to install and authorize the DHCP server service. DHCP authorization is a process of registering the DHCP server service in the Active Directory domain to support the DHCP clients. Active Directory prevents the unauthorized DHCP servers from assigning the IP addresses to the DHCP clients. If the DHCP server is not registered with Active Directory, a DHCP server service cannot start or cannot assign the IP addresses dynamically to the DHCP clients. To install and authorize a DHCP server service:
-
Log on as administrator to the computer running on Windows Server 2003. The Administrator logon has the required permissions to install and authorize a DHCP server.
-
Select Start->Settings->Control Panel to open the Control Panel window.
-
Select the Add or Remove Programs option from the Control Panel window to display the Add and Remove Program Window.
-
Click the Add/Remove Window Components option in the left frame of the Add and Remove Programs window. The Windows Components Wizard dialog box appears.
-
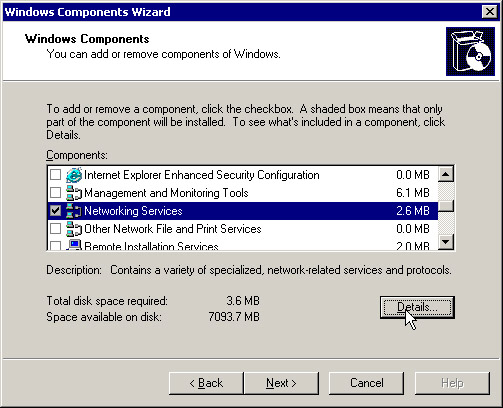
Scroll down and click the Networking Services option on the Components box of the Windows Components Wizard dialog box to select it. Do not change the default status of the Networking Services option, as shown in Figure 14-11-2:
-
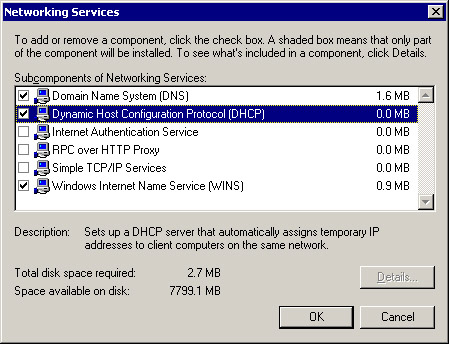
Click the Details button on the Windows Components screen to open the Networking Services dialog box.
-
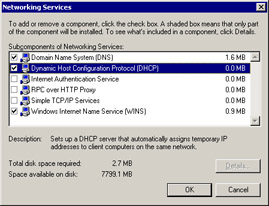
Select the Dynamic Host Configuration Protocol (DHCP) option, as shown in Figure 14-11-3:
-
Click OK on the Networking Services dialog box to open the Windows Components screen again.
-
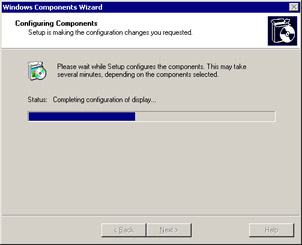
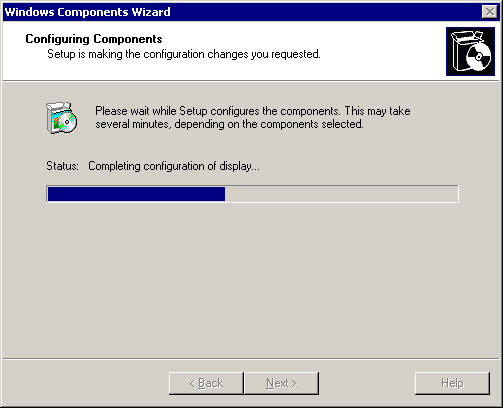
Click Next on the Windows Components screen. The Configuring Components screen appears, which shows the progress of the configuration process, as shown in Figure 14-11-4:
-
Click Finish on the Completing The Windows Component screen to complete the installation and close the Add and Remove Programs window.
-
Select Start->Settings->Control Panel to open the Control Panel window. In the Control Panel window, select the Administrative Tools option to open the Administrative Tools window.
-
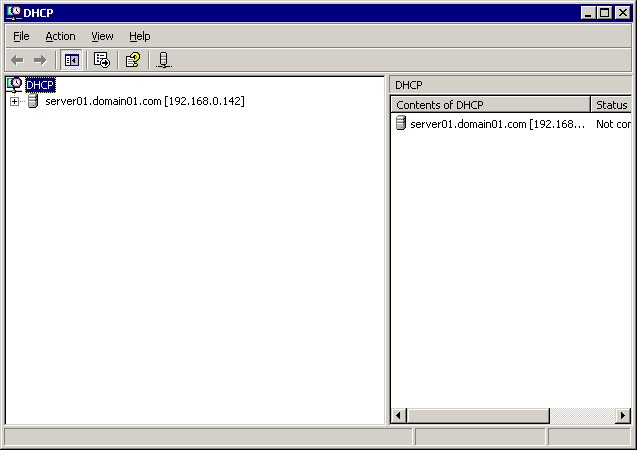
Select DHCP from the Administrative Tools window. The DHCP console window appears, which contains the server01.domain01.com node in the console tree. The server01.domain01.com node represents the name of the Windows Server 2003 computer where the DHCP server is installed. Figure 14-11-5 shows the DHCP console window:
-
Select the server01.domain01.com node from the console tree to authorize the server01.domain01.com server.
-
Select Action -> Authorize. The Authorization process begins and automatically registers the DHCP server service in Active Directory domain to support DHCP clients.
-
Close the DHCP console window. The DHCP server service is installed and authorized.
Working with Scope, Reservation, and Relay Agent
You can configure a DHCP server in Windows Server 2003 by creating scopes and reservations, and configuring relay agents.
Working with a DHCP Scope
A DHCP server dynamically assigns an IP address from a scope to a DHCP client when the DHCP client boots up. A scope needs to be activated before a DHCP server can assign an IP address to a DHCP client from it. You can exclude some IP addresses from a scope while creating the scope, and the remaining IP addresses present in the scope form an address pool. When you activate the scope, the IP addresses present in a scope are available for lease distribution to the DHCP clients. A DHCP server can contain more than one scope. The properties of a scope are:
-
Name: Identifies a scope.
-
Network IP address range: Specifies the range of IP addresses available in a scope.
-
Subnet mask: Specifies the number of bits to separate the network identifier from the host identifier.
-
Lease duration: Specifies the time interval for which the DHCP server assigns an IP address to a client.
-
Router: Specifies the IP address of the router.
-
Exclusion range: Specifies the range of IP addresses that are not included in the scope.
You can use Windows Server 2003 to create a new DHCP scope. To create a new DHCP scope:
-
Open the DHCP console window.
-
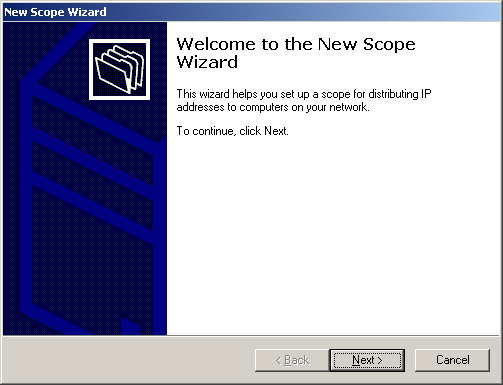
Select the server01.domain01.com node from the console tree and select the New Scope option from the Action menu. The New Scope Wizard appears, as shown in Figure 14-11-6:
-
Click the Next button to open the Scope Name screen.
-
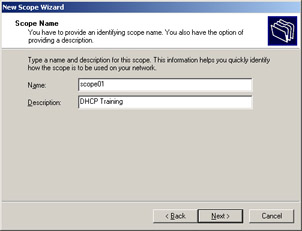
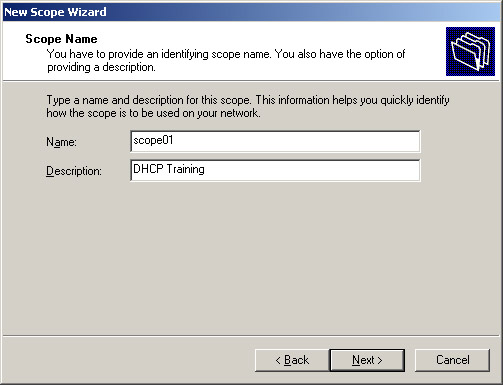
Enter the name of the scope in the Name text field, and description in the Description text field, as shown in Figure 14-11-7:
-
Click the Next button to open the IP Address Range screen.
-
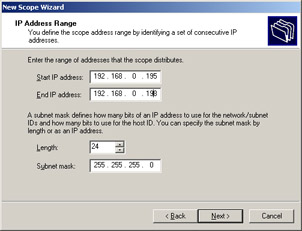
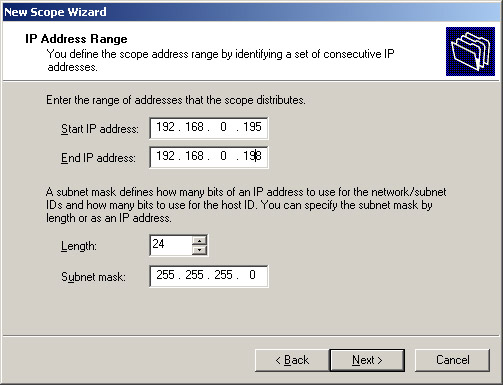
Enter the first IP address of the scope in the Start IP Address text field, and the last IP address of the scope in the End IP Address text field, as shown in Figure 14-11-8:
-
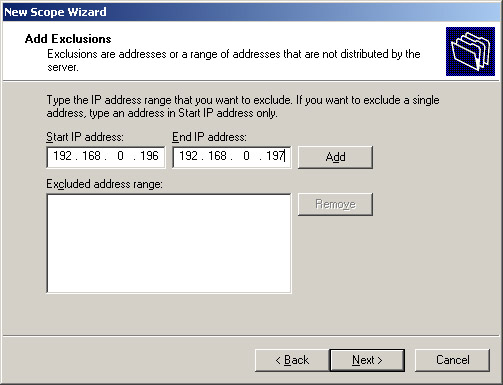
Click the Next button. The Add Exclusions screen appears in which you can specify the IP addresses that you do not want to include in the scope.
-
Enter the starting IP address in the Start IP address text field and the last IP address in the End IP address text field, as shown in Figure 14-11-9:
-
Click the Add button to add an exclusion range, and click the Next button. The Lease Duration screen appears.
-
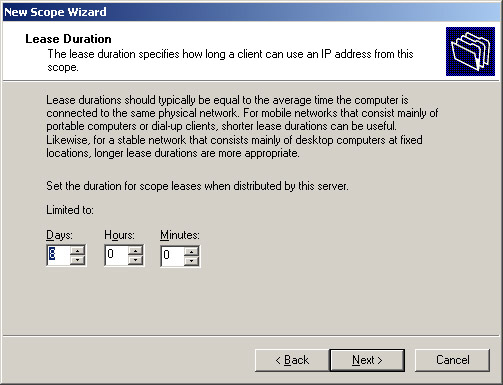
Enter the time interval, for which the client can use the IP address from this scope, in the Lease Duration screen, as shown in Figure 14-11-10:
-
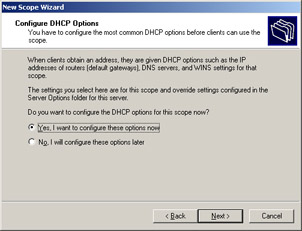
Click Next to open the Configure DHCP Options screen. Select the Yes option to configure the DHCP options while creating the scope. Select the No option if you want to configure the DHCP options later. Figure 14-11-11 shows the Configure DHCP Options screen:
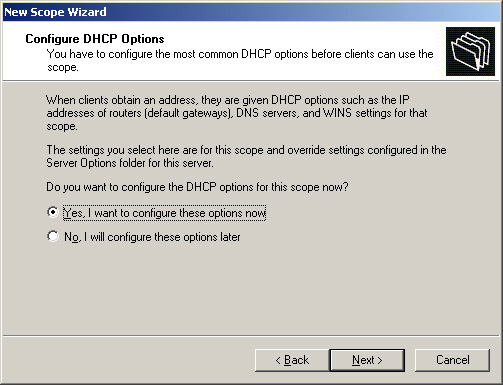
Figure 14-11-11: The Configure DHCP Options ScreenTo configure the DHCP options while creating a new scope:
-
Click Next to open the Router (Default Gateway) screen.
-
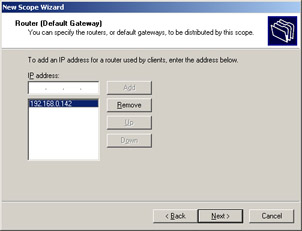
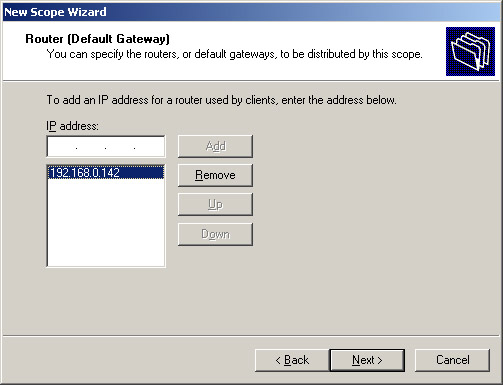
Enter the IP address of the router in the IP address text field and click the Add button. Figure 14-11-12 shows the Router (Default Gateway) screen:
-
Click Next to open the Domain Name and DNS Servers screen.
-
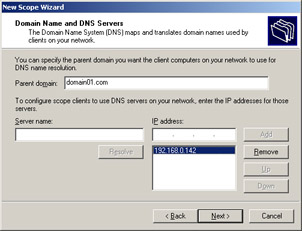
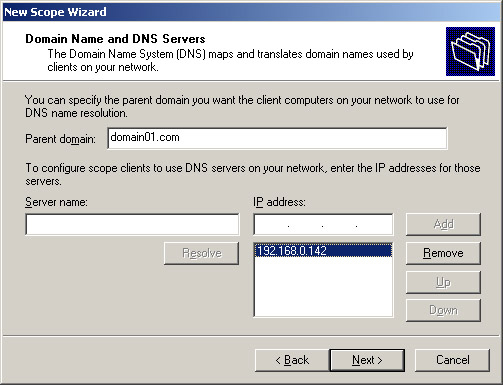
Enter the domain name in the Parent Domain text field and the IP address of the DNS server in the IP address text field. You can also specify the host name, which the DNS server uses to resolve its IP address, in the Server Name text field. Figure 14-11-13 shows the Domain Name and DNS Servers screen:
-
Click Next to open the WINS Servers screen.
-
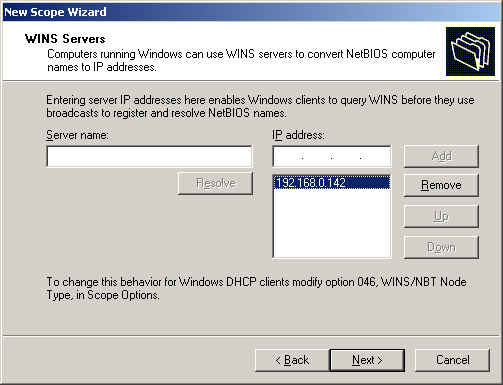
Enter the IP address of the WINS server in the IP address text field, as shown in Figure 14-11-14:
-
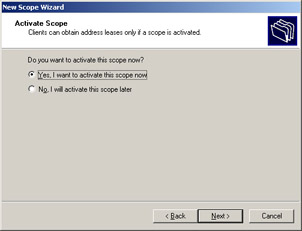
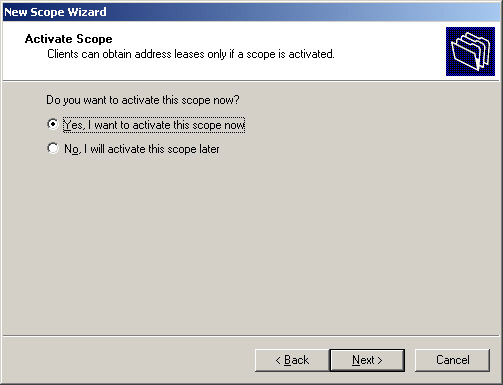
Click Next to open the Activate Scope screen. Select the Yes, I want to activate this scope now option to activate the scope. If you want to activate the scope later, select the No, I will activate this scope later option. Figure 14-11-15 shows the Activate Scope screen:
-
Click Next to open the Completing the New Scope screen.
-
-
Click Finish to complete the configuration of the DHCP scope, scope01.
Working with DHCP Reservation
Reservation prevents the DHCP server from reassigning a reserved IP address to more than one DHCP client. Reservations are used for the computers that need to have the same IP address permanently, such as the Web servers.
A reservation requires a unique identifier to identify the network adapter of the reserved computer, such as a Web server. This unique identifier is called the Media Access Control (MAC) address or the Ethernet address. A unique sequence of hexadecimal numbers separated by hyphens represents a MAC address. For example, 00-0X-9B-7C-AV-7Y represents a MAC address.
| Note | Run the ipconfig/all command at the command prompt to obtain the MAC addresses on Windows NT-based clients. The Physical Address field represents the MAC address of the computer. |
You need to create a new reservation from the DHCP console to assign an IP address permanently to a computer. To create a new DHCP reservation:
-
Open the DHCP console window and expand the console tree of the server.
-
Click the Reservations node.
-
Select Action->New Reservation from the Action menu. The New Reservation dialog box appears.
-
Select the type of clients that can use the reservation by selecting DHCP Only, BOOTP Only, or Both, in the New Reservation dialog box. You also need to enter the following information:
-
The name of the reservation in the Reservation Name text field.
-
The IP address of the computer that needs a permanent IP address in the IP address text field.
-
The MAC address of the computer that needs to have a permanent IP address, without hyphens, in the MAC address text field.
-
The description of the reservation in the Description text field.
Figure 14-11-16 shows the New Reservation dialog box:
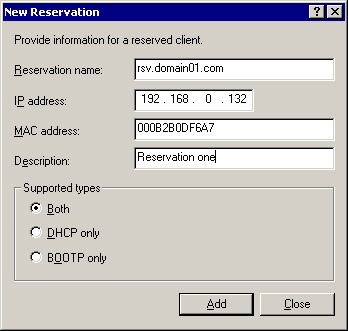
Figure 14-11-16: The New Reservation Dialog BoxNote Bootstrap Protocol (BOOTP) is a host configuration protocol. DHCP is an improved version of BOOTP.
-
-
Click the Add button to add the reservation in the console tree of the server, server01.domain01.com.
Working with DHCP Relay Agent
Routers do not forward broadcast messages from one subnet to another automatically. You need to configure a router to work as a relay agent and transfer the broadcast messages from one subnet to another. The relay agent receives the broadcast messages from the DHCP clients and transfers the messages to the DHCP servers present on different networks. Consequently, a relay agent transfers the local DHCP client requests to the remote DHCP servers, and returns the remote DHCP server responses to the local DHCP clients.
The DHCP relay agents are important in implementing the DHCP lease generation process. The DHCP lease generation process fails if the router that cannot forward the broadcast messages is placed between the remote DHCP server and the local DHCP client. The lease generation process also fails if the remote DHCP server cannot receive the lease renewal requests. The DHCP relay agent helps in implementing the DHCP lease generation process by transferring the lease renewal requests from the local DHCP clients to the remote DHCP server. The steps involved in renewing a lease using a relay agent are:
-
The DHCP client broadcasts a DHCPDISCOVER packet over the network to locate the DHCP server.
-
The DHCP relay agent present on the network of the DHCP client subnet forwards the DHCPDISCOVER packet to the destination DHCP server using unicasting. Unicasting is a broadcasting method in which there is only one sender, the DHCP relay agent, and one receiver, the DHCP server.
-
The DHCP server sends an IP address for the DHCP client by sending a DHCPOFFER packet to the DHCP relay agent.
-
The DHCP relay agent broadcasts the DHCPOFFER packet to the subnet of the DHCP client.
-
The DHCP client accepts the DHCPOFFER packet and sends a request for an IP address by broadcasting a DHCPREQUEST packet over the network.
-
The DHCP relay agent accepts the DHCPREQUEST packet and forwards it to the destination DHCP server using unicasting.
-
The DHCP server accepts the DHCPREQUEST packet and assigns the IP address to the DHCP client by updating its database. The DHCP server unicasts a DHCPACK packet to the DHCP relay agent to complete the process of address assignment.
-
The DHCP relay agent transfers the DHCPACK packet to the subnet of the DHCP client.
The hop count value of the DHCP relay agent represents the maximum number of routers to which a DHCP relay agent can transmit a data packet. If the hop count value is smaller than the actual number of routers present between the DHCP client and the destination DHCP server, the packet cannot reach the destination DHCP server.
In addition to the hop count, the boot threshold value is another important parameter associated with a DHCP relay agent. It represents the maximum number of seconds that a DHCP relay agent waits before sending the DHCPDISCOVER packet to the remote DHCP server. The boot threshold value ensures that the DHCP relay agent is fault tolerant and is used when the local DHCP server does not respond to the DHCP client requests.
If the local DHCP server is present on the same subnet as the DHCP relay agent, the local DHCP server responds to the DHCP client request earlier than the remote DHCP server. If the local DHCP server cannot respond to the DHCP client requests, the DHCP relay agent waits for the time specified in the boot threshold value, and forwards the request to the remote DHCP server when the boot threshold value expires. Consequently, the boot threshold value makes the DHCP server fault tolerant.
To broadcast the DHCP client messages from one subnet to another, you need to add a relay agent on the DHCP server. You also need to define an interface on the router computer to enable the router to receive the messages from the DHCP server. To add a relay agent on the DHCP server:
-
Select Start -> Settings -> Control Panel to view the Control Panel window.
-
Select the Administrative Tools option in the Control Panel window. The Administrative Tools window appears.
-
Select the Routing and Remote Access Service (RRAS) option from the Administrator Tools window to open the Routing and Remote Access Service console window.
-
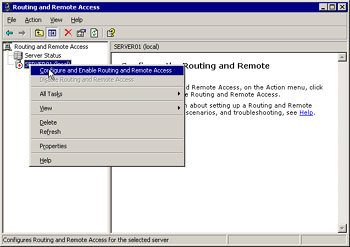
Right-click the server01 node to open a shortcut menu. Select the Configure and Enable Routing and Remote Access option from the shortcut menu, as shown in Figure 14-11-17:
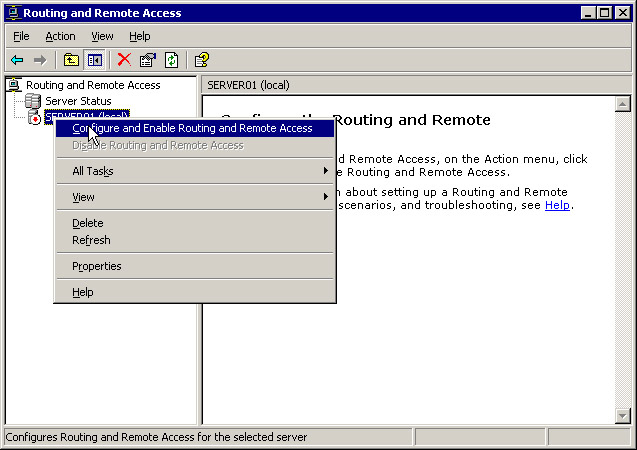
Figure 14-11-17: Selecting the Configure and Enable Routing and Remote Access Option
-
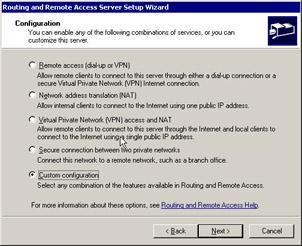
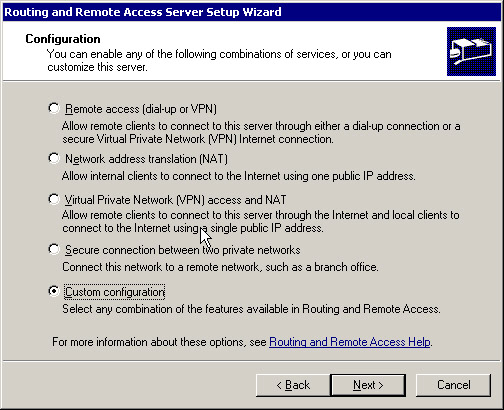
Click Next to start the setup of RRAS. The Configuration screen appears, where you can select the Custom configuration radio button, as shown in Figure 14-11-18:
-
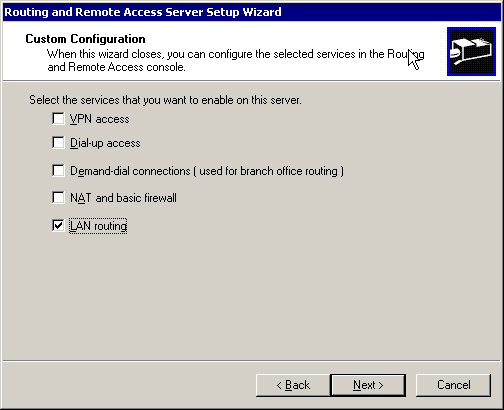
Click Next to open the Custom Configuration screen.
-
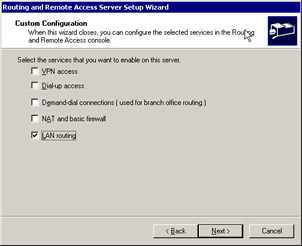
Select the LAN routing option in the Custom Configuration screen, as shown in Figure 14-11-19:
-
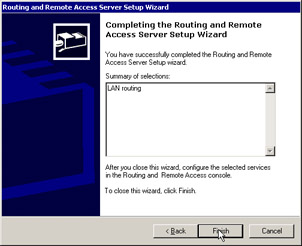
Click Next to open the Completing the Routing and Remote Access Server Setup Wizard screen, as shown in Figure 14-11-20:
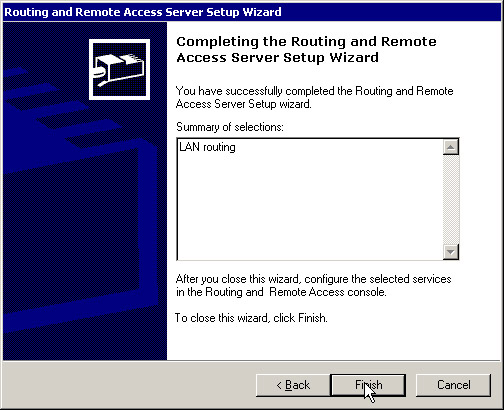
Figure 14-11-20: The Completing the Routing and Remote Access Server Setup Wizard Screen
-
Click the Finish button to complete the process of adding a relay agent. The Routing and Remote Access dialog box appears, as shown in Figure 14-11-21:
-
Click the Yes button on the Routing and Remote Access dialog box to start RRAS. The RRAS console window reappears.
-
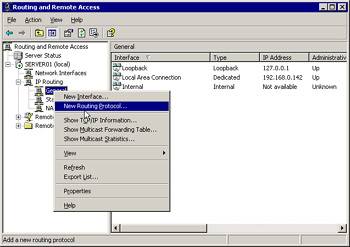
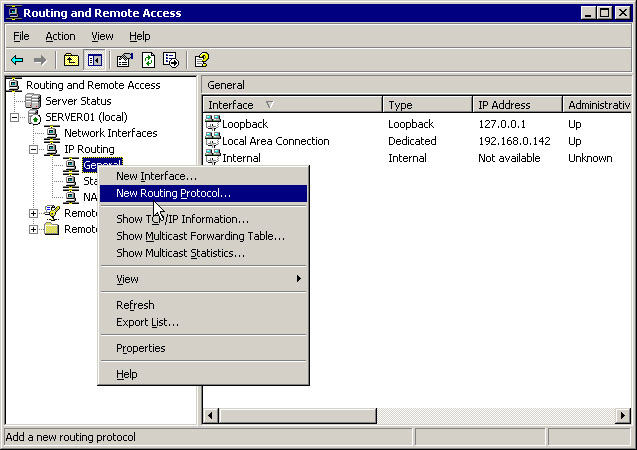
Expand the server node, then the IP routing node from the RRAS console tree, and right-click on the General option. A shortcut menu appears.
-
Select the New Routing Protocol option from the shortcut menu, as shown in Figure 14-11-22:
-
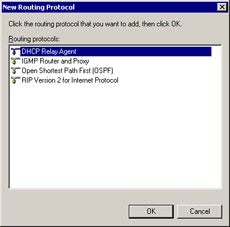
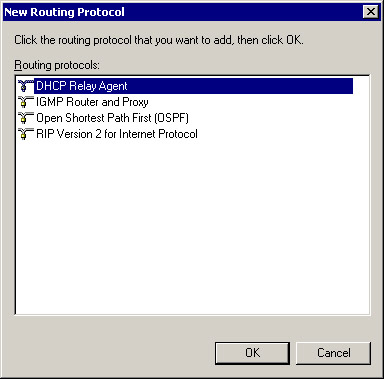
Select the DHCP Relay Agent option from the New Routing Protocol dialog box, as shown in Figure 14-11-23:
-
Click the OK button to add the relay agent to the RRAS console tree.
After adding the relay agent in the RRAS console tree, you can configure the properties of the relay agent. For example, you can specify an IP address of the DHCP server to which the DHCP relay agent can transmit the messages.
To configure a DHCP relay agent:
-
Open the RRAS console window and expand server01.
-
Select the DHCP Relay Agent node from the console tree.
-
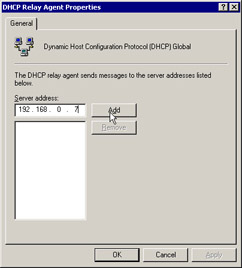
Right-click on the DHCP Relay Agent node to open a shortcut menu. Select the Properties option from the shortcut menu to open the DHCP Relay Agent Properties dialog box.
-
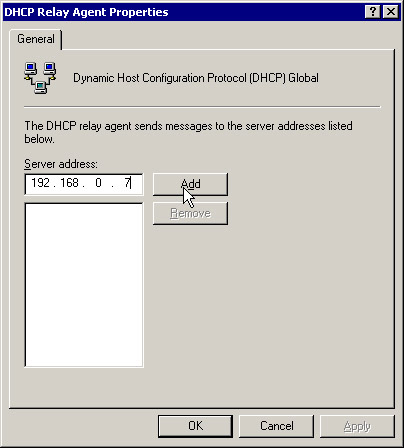
Enter the IP address of the DHCP server that you want to forward your request to, in the Server address text field, as shown in Figure 14-11-24:
-
Click the Add button to add the server, represented by IP address 192.168.0.7, in the server name list.
-
Click the OK button to configure the DHCP relay agent.
After adding and configuring the DHCP relay agent properties, you can configure the DHCP relay agent on the router computer. To configure the DHCP relay agent on the router interface:
-
Open the RRAS console window and select the server, server01 node.
-
Expand the server node from the console tree.
-
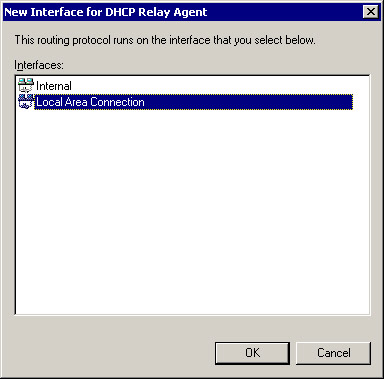
Right-click the DHCP Relay Agent node in the console tree to open a shortcut menu. Select the New Interface option from the shortcut menu to open the New Interface for DHCP Relay Agent dialog box.
-
Select the interface, such as Local Area Network, which you want to apply on the DHCP relay agent, as shown in Figure 14-11-25:
-
Click the OK button to open the DHCP Relay Properties – Local Area Connection Properties dialog box.
-
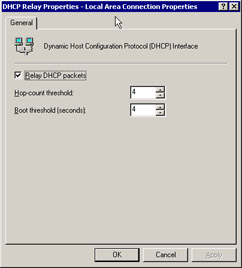
Verify that the Relay DHCP packets option is selected in the DHCP Relay Properties – Local Area Connection Properties dialog box, as shown in Figure 14-11-26:
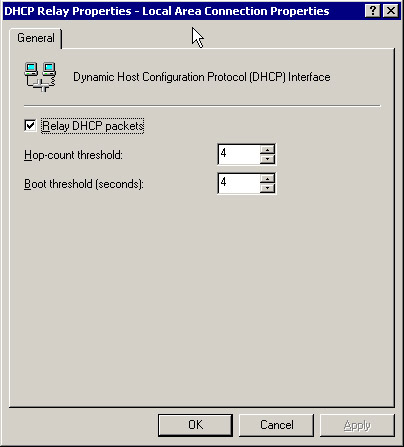
Figure 14-11-26: The DHCP Relay Properties – Local Area Connection Properties Dialog Box
-
Enter the hop-count threshold and boot threshold value in the DHCP Relay Agent – Local Area Connection Properties dialog box.
-
Click the OK button to complete the process of configuring the relay agent.

