Organizational Unit (OU) is a collection of objects such as computers, printers, or user accounts. You can design an OU to group these objects into a single unit.
A group is a collection of end users on a network, and helps to manage the end users collectively. A group structure represents the structure or model of the groups in a network.
Active Directory, a network-based service that stores the information about the objects on a network, contains the OUs and group structures. OUs and group structures enable you to administer the functioning of different departments of a company in an efficient manner.
This ReferencePoint introduces OUs and groups, and describes how to design them in Active Directory. It describes the functional design models of OUs and groups and explains Group Policy Objects and Group Policy Inheritance. In addition, it describes how to create and modify the group policy objects, and how to create links between multiple Group Policy Objects.
Introducing Organizational Unit
An OU is a collection of objects in Active Directory, such as user accounts, computers, printers, and other services that may be part of different networks. The collection can include similar objects, such as computers, or different objects, such as computers and printers.
Objects in an OU are stored in two folders, the User folder and the Computer folder. The User folder contains a list of all the end users and groups. The Computer folder contains a list of all the computers on a network. You can access any object of the OU using Lightweight Directory Access Protocol (LDAP).
| Note | LDAP defines how a client accesses a directory on the server to query and modify the information stored in a client directory. |
Comparing Administrative Requirements in Windows NT and Windows Server 2003
Defining the attributes of user accounts is one of the important administrative requirements in managing the user accounts. You can define the attributes by specifying the user names and passwords to access the hardware and other shared resources on a network. You need to have the access permissions to access the resources on a network.
You can assign access permissions to a single domain, which are consequently applied to all the members of the domain. In Windows NT, you can grant the access permission to only one domain. As a result, a company with more than one department needs to create a separate domain for each department. The Active Directory structure, which allows more than one domain, ensures that access permissions on the department-specific information are restricted to the end users of that specific department.
Alternatively, you can use OUs in Windows Server 2003 to avoid creating separate domains for each department. In Windows Server 2003, you can create an Active Directory structure with a single domain. Separate OUs, which correspond to the different departments of the company are created within the domain. Each OU acts as a subdomain, which specifies access permissions on the department-specific information.
For example, you need to administer different departments within a company, such as Marketing, Human Resources, and Software independently. The Human Resources department needs to restrict access to confidential information. The end users in the Software department require access level permissions to access the network resources on the server. Using Windows NT, you require a separate domain for each department to implement this structure.
If you use Windows Server 2003 for the above scenario, you need to create a single domain representing the entire company. You can create separate OUs for each department within the domain to specify the access permissions. After creating an OU on your network, you need to implement the Active Directory structure with this OU to administer the entire company using a single domain.
Creating an Organizational Unit
Before creating an OU, you need to create a domain when installing Active Directory. To create an OU in an existing domain, such as thegreatdomain.com:
-
Select Start -> Administrative Tools -> Active Directory Users and Computers to open the Active Directory Users and Computers window.
-
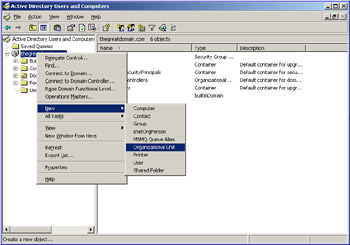
Right-click the thegreatdomain.com node to display a shortcut menu. Select New -> Organizational Unit from the shortcut menu, as shown in Figure 14-2-1, to open the New Object dialog box:
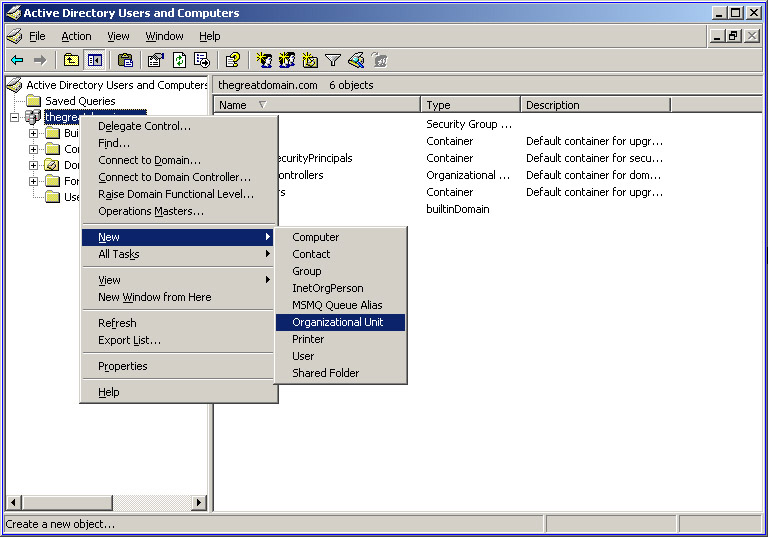
Figure 14-2-1: The Active Directory Users and Computers Window -
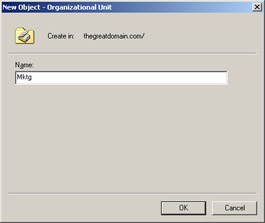
Type Mktg in the Name text box of the New Object-Organizational Unit dialog box to specify the name of the OU, as shown in Figure 14-2-2:
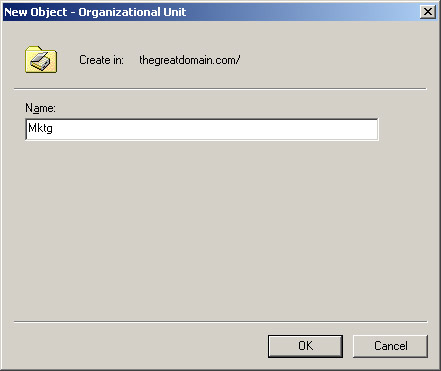
Figure 14-2-2: The New Object-Organizational Unit Dialog Box -
Click OK to create the Mktg OU.
Moving the Objects to the OU
You can move end users, computers, or other objects from the User or Computer folder to the OU, after you have created the OU. When you move these objects to the OU, a hierarchical structure of the company is created within the domain. To add an end user in the Active Directory to the Mktg OU:
-
Select the User icon in the left pane of the Active Directory Users and Computers window. This displays a list of all the end users of the greatdomain.com domain in the right pane of the Active Directory Users and Computers window.
-
Right-click the icon of an end user in the right pane of the Active Directory Users and Computers window to open a shortcut menu.
-
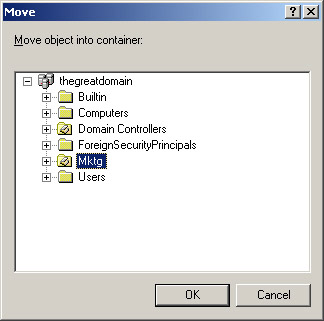
Select Move from the shortcut menu to open the Move dialog box.
-
Select the Mktg node in the Move dialog box, as shown in Figure 14-2-3:
-
Click OK to move the end user to the Mktg OU.
Administering the Objects of Active Directory
You can use an OU structure to administer the objects of Active Directory. You can grant access permissions to the administrators of Active Directory, so that the administrators can access the objects of an OU. You can also create custom tasks on OUs to assign access permissions and perform administrative tasks, such as adding or removing an object from an OU.
Authorizing Access Permission
Administering the objects of Active Directory involves authorizing access permissions to individual administrators, or to all the members of an administrative group collectively. To authorize access permissions on the resources:
-
Open the Active Directory Users and Computers window.
-
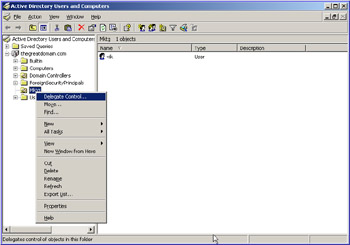
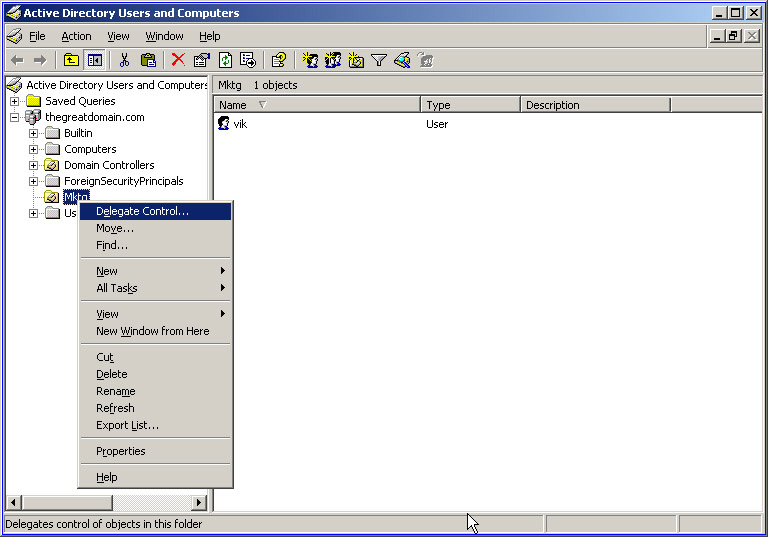
Right-click the Mktg node in the left pane of the Active Directory Users and Computers window to open a shortcut menu, as shown in Figure 14-2-4:
-
Select the Delegate Control option to open the Welcome screen of the Delegation of Control wizard.
-
Click Next on the Welcome screen to open the Users or Groups screen.
-
Click Add to open the Select the Users, Computers, or Groups dialog box.
-
Click the Object Types button to open the Select Object Type dialog box.
-
Select the User icon and click OK to select the type of object.
-
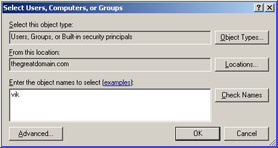
Enter the object name in the Enter the object names to select text box, as shown in Figure 14-2-5:
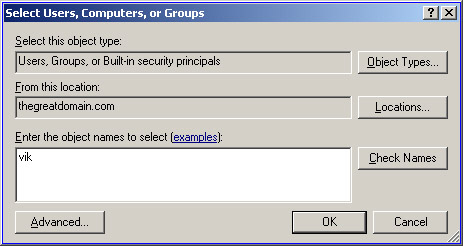
Figure 14-2-5: The Select Users, Computers, or Groups Dialog Box -
Click OK to add the name of the object to the list of Users and Groups, and display the Users and Groups screen again.
-
Click Next to open the Tasks to Delegate screen.
-
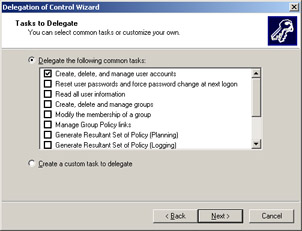
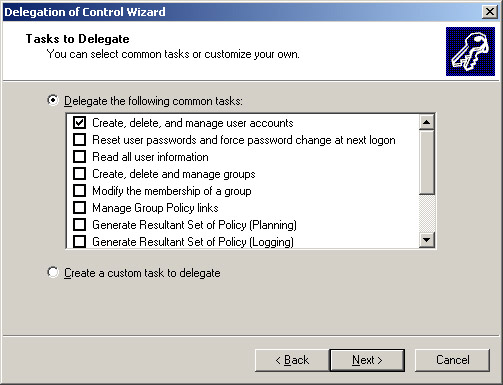
Select the task you want to authorize from the Delegate the Following Common Tasks list on the Tasks to Delegate screen, as shown in Figure 14-2-6:
-
Click Next to open the Completing Delegation of Control Wizard screen.
-
Click Finish to close Delegation to Control Wizard.
Tip You must grant access permissions to a group collectively rather than to individual end users. Granting access permissions to groups prevent you from changing the access permissions of an individual end user.
Creating and Enabling Custom Tasks on OU
Custom tasks are defined by an end user. To create a custom task:
-
Open the Users or Groups screen of the Delegation of Control wizard to open the Tasks to Delegate screen.
-
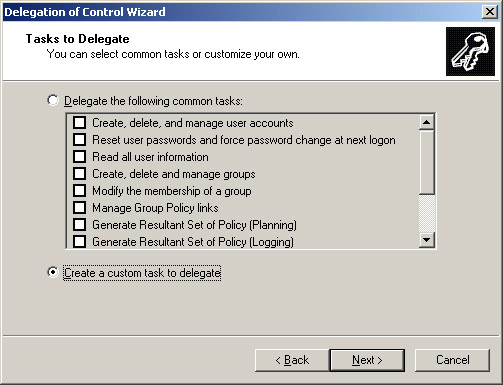
Select the Create a custom task to delegate option in the Tasks to Delegate screen, as shown in Figure 14-2-7:
-
Click Next on the Tasks to Delegate screen to open the Active Directory Object Type screen.
-
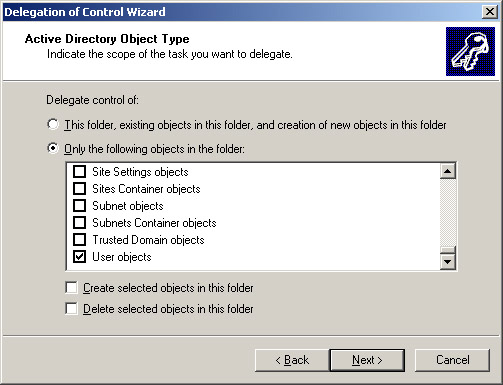
Select the Only the following objects in the folder and the User objects options to specify that the task will be performed for the user objects, as shown in Figure 14-2-8:
-
Click Next to open the Permissions screen.
-
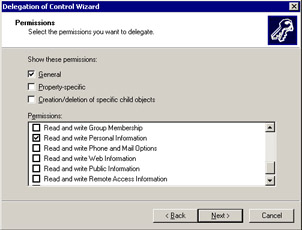
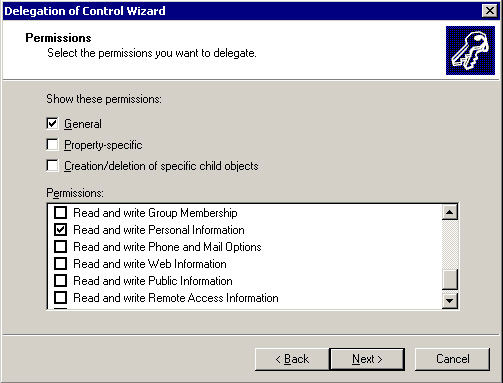
Select the Read and write Personal Information option in the Permissions list box, as shown in Figure 14-2-9:
-
Click Next to open the Completing the Delegation of Control Wizard screen.
-
Click Finish to close Delegation of Control wizard.
Introducing Groups
You need to create a group to administer the objects of Active Directory collectively, and change the security privileges of the objects. Organizing the groups in Active Directory forms a group structure. The group structure and OU are similar, but there are differences between them, which are listed in Table 14-2-1:
| Organizational Units | Group Structures |
|---|---|
| Access to the objects of an OU is restricted to administrators. | Access to the object of Group Structures is also available to the end users involved in domain activities. |
| An end user can be a part of only one OU. | An end user can become a member of more than one group at a time. |
| OUs do not have associated Access Control Entries (ACEs), so you cannot use OUs to apply security on the objects in the OUs. | Each security group in Active Directory has a unique Security ID (SID) associated with it. You can apply security to the end users of the group using the SID. |
| Note | Active Directory automatically assigns the SID, which is a unique identification number, to the objects when they are created. ACE is an item of the Access Control List (ACL) that grants permission and specifies the security settings for a user or group. |
Groups can either be directory-based or local to a computer. The directory-based groups are objects of Active Directory that are placed in a domain as objects of an OU. The local groups are not a part of Active Directory, but exist on a local computer and are accessible to the end users of the local computer. The groups in Active Directory perform the following tasks:
-
Assign access permissions to the entire group to access the network resources.
-
Assign user rights and add members with same rights to a group.
-
Create e-mail distribution lists.
Types of Groups
Active Directory of Windows Server 2003 contains the following types of groups:
-
Distribution groups: Creates e-mail distribution lists. You can use distribution groups with various e-mail applications, such as MS Exchange, to send e-mail messages to a group. The distribution groups are not security-enabled because they are not a part of Discretionary Access Control List (DACL). DACL contains a list of end users and groups that are assigned or denied access permissions on an object.
-
Security groups: Assigns access permissions to access the network resources of a computer. Security groups provide access permissions to other groups of Active Directory to access the network resources. You can establish a security group for each department of a company to administer the groups. Security groups have a unique SID associated with them.
You can convert a security group to a distribution group and a distribution group to security group. When you change a distribution group to a security group, a security policy is applied to it. When a security group is converted to a distribution group, the security policy of the group is removed.
A distribution group does not have SIDs associated with it, and consequently, cannot be used for granting security permissions. It means that you can create a distribution group in place of a security group, if you do not need to apply a security policy to a group.
Group Scope
The level at which a group is created in a domain tree or a forest is called the scope of a group. You can characterize a security or distribution group on the basis of the scope of the group. The three main group scopes are:
-
Domain local group scope: Represents a domain tree in which the groups are placed either in a domain of Active Directory, or in a domain that is not a part of Active Directory. In the domain local group scope, different groups are created for each network resource, and then other user accounts or groups are added to the domain local group scope. As a result, all the groups in the domain local group scope can access the network resources.
-
Global group scope: Represents a domain tree in which groups in Active Directory can access the network resources of the particular Active Directory only.
-
Universal group scope: Represents a domain tree, in which groups of a domain outside Active Directory can also access the network resources of the Active Directory. The groups in the universal group scope are available in Windows 2000 and Windows Server 2003.
Note Domain tree is an inverted hierarchical structure of domains. A collection of domain trees forms a forest.
Working with Groups
You need to follow naming standards to name a group in Active Directory, so that the end users and administrators can identify the groups. When naming an object, you need to specify the type of object, assign a numeral to specify its identity, and the type of group to which the object belongs. For example, if the name of a group is Printer 3DL, it represents an object, printer, in the domain local group. The numeral, 3, specifies that the object is the third printer on the network.
You can create nested groups and design distribution groups by establishing a naming convention. Nested groups reduce the administrative overheads of a company. You can create nested groups depending on the domain functionality of Windows Server 2003. Windows 2000 mixed, Windows 2000 native, Windows Server 2003 interim, and Windows Server 2003 are the four domain functional levels. The default domain functional level is Windows 2000 mixed.
| Note | Domain functionality is the functional level of an Active Directory domain that contains one or more domain controllers. The functional level is a utility to secure Active Directory. A domain controller is a server running Windows Server 2003, and contains a copy of the Active Directory database. |
The domain groups set to Windows 2000 native or the distribution groups in a domain set to Windows 2000 mixed, contain members from the following groups:
-
Groups in the universal group scope
-
Groups in the global group scope
-
Groups in the domain local group scope
Groups cannot be nested when the functional level of groups is set to Windows NT Mixed or Interim. A group in the domain local group scope can be nested with another group in the same scope in the Native mode. A group in the global group scope cannot be nested with the other group in the same scope.
Group Design Models
You can implement an OU or group on a network in the form of models called group design models. There are two models for designing a group, the business function design model and the geographical design model. In the business function design model, different OUs and groups are created for different departments of a company. In the geographical design model, different OUs and groups are created for different branches of a company, which may be separated by geographical locations.
Business Function Design Model
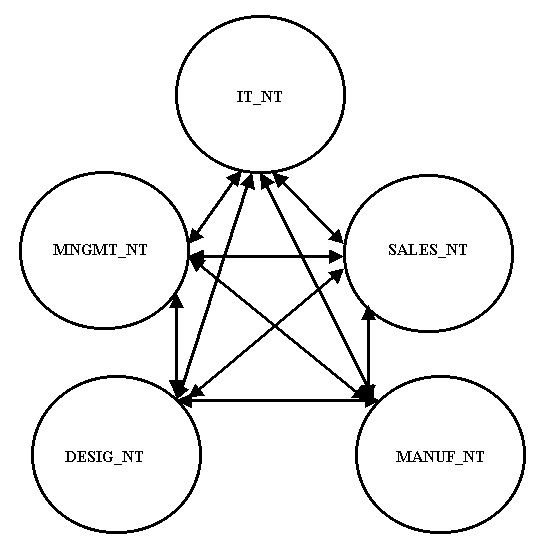
You can use the business function design model to administer each department of a company independently, through a separate domain. The domains in the business function model are inter-connected through a two-way trust.
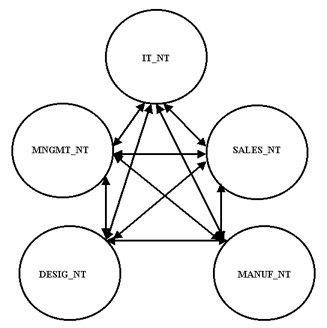
For example, if there are five departments in a company, you can create the following domains to represent them:
-
IT_NT: Represents the domain for the IT department.
-
SALES_NT: Represents the domain for the sales department.
-
MANUF_NT: Represents the domain for the manufacturing department.
-
DESIG_NT: Represents the domain for the designing department.
-
HR_NT: Represents the domain for the HR department.
Figure 14-2-10 shows the business function design model representing the domains for the five departments:
When the business function model is implemented on Windows Server 2003, a single domain is created for the company. You can create different OUs for different departments in that domain. For example, you can create five separate OUs representing the departments within a company in a single Active Directory domain, Org_A.
In the business function model, you need to create groups, which contain the administrator accounts for each department with the global scope to assign administrative rights. You use the Delegation of Control wizard to assign administrative rights to these groups. To implement the business function model, a group in the domain local scope is created, which contains the following groups corresponding to the five departments:
-
IT Global
-
Sales Global
-
Manufacturing Global
-
Design Global
-
HR Global
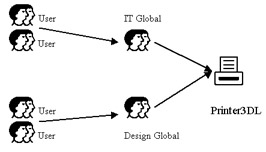
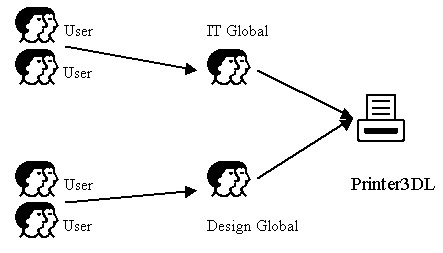
After creating the groups, you can assign access permission on the network resources to the group in the domain local group scope. The group in the domain local group scope can be named as Printer3DL. You need to assign access permissions on the resources to the group in the domain local scope. You can then add the groups in the global scope as members of the group in the domain local group scope. For example, if you want the end users of the IT and Design department to access Printer3, you can add the IT global and Design global groups to the Printer3DL group, and assign access permission on Printer3.
When you assign access permissions to two or more departments of a company simultaneously, you do not need to grant the access permissions to individual groups in a domain. As a result, you can nest the groups in the global and domain local group scopes.
Figure 14-2-11 shows the nesting of the groups in the global group and domain local group scopes with the Printer3DL group:
Geographical Design Model
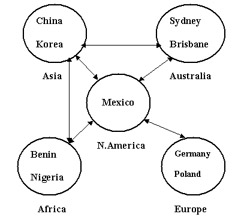
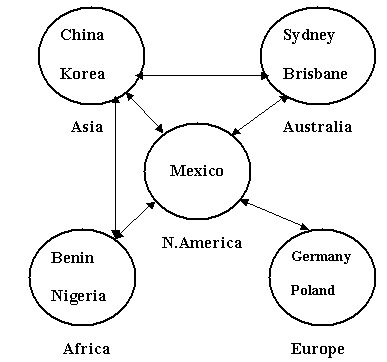
In the geographical design model, you can create domains for geographically dispersed locations. Each domain in the geographical design model is administered independently. For example, Org_B, is an international company with its head office in Mexico, and has branches in Asia, Australia, Africa, and Europe.
Figure 14-2-12 shows the geographical design model of the domains representing the branches of Org_B:
You need to create OUs for each geographical region to administer the branch offices in the region remotely. For example, you can create an OU, Asia, for the end users in China and Korea, and an OU, Europe, for the end users in Germany and Poland. These OUs form the Active Directory domain for Org_B, as shown in Figure 14-2-13:
In geographical design model, you can also create groups in the domain local group scope, and grant access permission to them on the resources of each OU by using the Delegation of Control wizard. For example, you can create a group, Australia OU DL, in the domain local group scope to apply security to the OU of Australia.
You also need to create groups in the global group scope for the end users corresponding to the different branch offices. For example, create Germany IT Global and Poland IT Global groups, and group the end users of the IT department corresponding to the different branch offices. You can do the same to the OUs in other branch offices.
Working with Group Policies
You use group policies to assign a security policy to the end users in a group and manage a network. Group Policy is an element of Intellimirror, a collection of technologies defined in the Change and Configuration tool.
You can use OUs to assign group policies to particular groups and computers. Using group policies, you can also change the default settings, such as the desktop settings and the location of a folder of the groups. You can also install applications on remote computers using the group policies.
| Note | Change and Configuration Management is a tool in Windows Server 2003 that helps you update the operating system and applications. |
Introducing Group Policy
Group policy depends on the structure of Active Directory to function because it is stored in Active Directory. Group policy provides various options to configure the desktop settings or security settings on a computer with Windows XP or Windows Server 2003. Group policies in Windows Server 2003 allow the administrators to control the working of the following:
-
Domain Name System (DNS): Assigns unique domain names and translates them into numeric IP addresses.
-
Control Panel: Changes the settings of the operating system or a computer.
-
Terminal Server: Connects multiple computers to a LAN through one network connection.
-
User profiles: Contains a list of files and settings that an end user creates and defines.
-
Wireless Configuration: Contains an option, such as computer name or IP address that connects one computer to the other computer.
You can use the group policies to configure the policy settings in Windows Server 2003 computers. You can use the group policies to perform the following tasks:
-
Apply the policies to sites, domains, or OUs.
-
Apply the policies through domain security groups.
-
Provide administrative control throughout a user environment.
-
Write the policies to secure a section of Registry.
-
Delete and rewrite a policy whenever the settings of a policy change.
| Note | System Policies are used with Windows NT, ME, and 98, while group policies are used with Windows 2000 and later. |
Introducing Group Policy Objects
Group Policy Object (GPO) is a collection of group policies applied to a domain or OU. A GPO linked to a domain is applied to all the objects in the domain, and a GPO linked to an OU is applied to all the objects in the OU. In addition, child objects in the Active Directory hierarchy can also inherit the GPO settings from the parent objects. This process is called GPO Inheritance. There are two types of GPOs in a Group Policy, Non-local GPO and Local GPO. A Non-local GPO is an object in which the group policy settings are stored on a domain controller in Active Directory. A Local GPO is an object in which the group policy settings are stored on individual computers.
Non-local GPOs are stored in Group Policy Container (GPC) and Group Policy Template (GPT) in Active Directory. These GPOs are named using a Globally Unique Identifier (GUID), which synchronizes two different locations of Active Directory. A GPC is a storage area in Active Directory that stores the GPO settings of the user and computer group policies. A GPT is a template created to store a GPO. The GUID of a GPO specifies its name. A GUID is a hexadecimal number that uniquely identifies the hardware or software of a computer.
Local GPOs are stored in the \winnt\system32\Group Policy directory on the local disk of a local computer. Local GPOs are not stored in Active Directory. As a result, features of Active Directory, such as changing the location of a folder and installing software remotely are not available in the GPO Editor window. A computer with Windows can have only one local GPO linked to it at one time.
You can modify the settings of a GPO in the GPO Editor window. The increase in the number of GPOs results in a change of GPO settings. If a GPO setting changes, any GPO setting applied later overrides the settings applied earlier. For example, if the GPO settings in a domain conflict the GPO settings in an OU, the GPO settings in the domain override the GPO settings in the OU. If there are multiple group policies linked to the same object, you can process them starting from the bottom of the object hierarchy.
Group polices in Windows Server 2003 can be compared to the system policies in Windows NT. You can use the system policies to configure the settings for users and computers. The configuration is based on the groups in Windows NT and 9x computers. You use the system policies to perform the following tasks:
-
Apply the policies to the domains only.
-
Apply the policies through the NT domain security groups.
-
Write the policies to a secure location in the Registry.
-
Apply restrictions to access the system files of a computer.
Creating Group Policy Objects
You need to create a GPO to apply the group policies to domains or OUs. You can create a GPO through the Active Directory Users and Computers console. To create a GPO:
-
Select Start -> Administrative Tools -> Active Directory Users and Computers, to open the Active Directory Users and Computers window.
-
Right-click the thegreatdomain.com node to open the shortcut menu.
-
Select Properties from the shortcut menu to open the Properties dialog box.
-
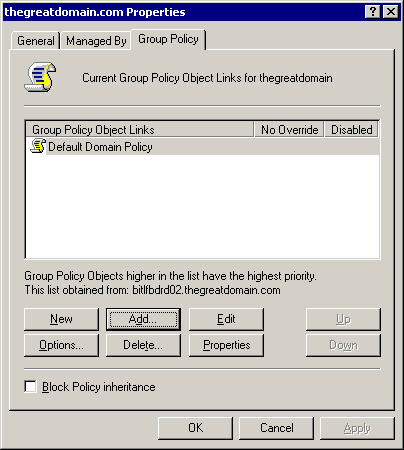
Click the Group Policy tab of the Properties dialog box, as shown in Figure 14-2-14:
-
Click New to create a new GPO. A text box appears in the Group Policy Object Links pane of the Properties dialog box.
-
Change the default name of GPO to GPO1 in the text box.
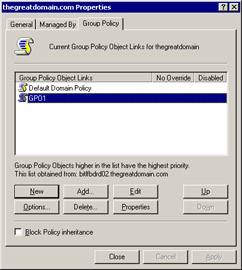
Figure 14-2-15 shows the new GPO, GPO1, in the Group Policy Object Links pane:
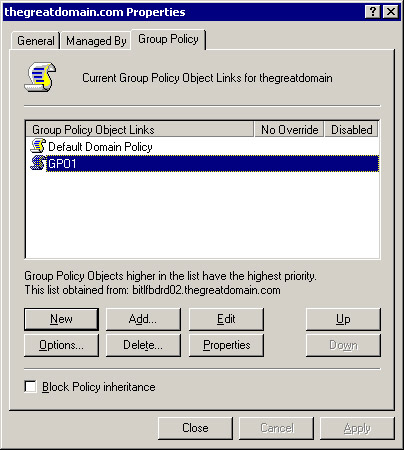
Figure 14-2-15: The thegreatdomain.com Properties Dialog Box -
Click Close to close the Properties dialog box.
Modifying Group Policy Objects
After you have created a GPO, you need to modify it and define its settings using the GPO Editor window. You can open the GPO Editor window as a standalone console, or through the Edit button in the Group Policy tab.
Using Standalone Console to Modify a GPO
You can open the standalone console by using the mmc command. To modify a GPO using the standalone console:
-
Click Start -> Run to open the Run dialog box.
-
Enter the MMC /A command in the Open field to open a new Microsoft Management Console (MMC).
-
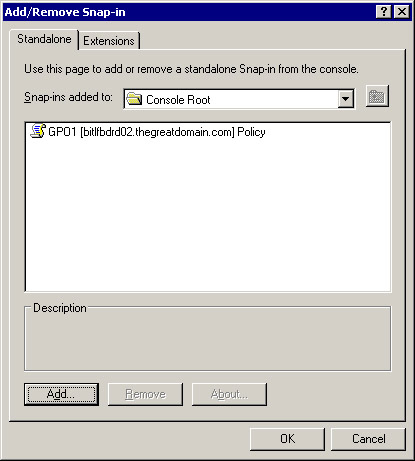
Select File -> Add/ Remove Snap-in to open the Add/ Remove Snap-in dialog box.
-
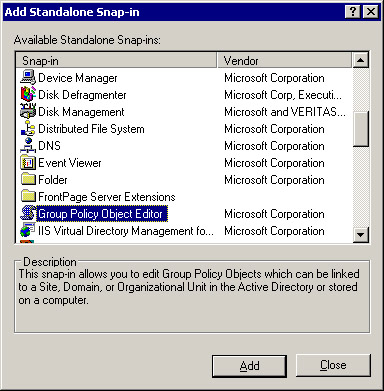
Click the Add button in the dialog box to open the Add Standalone Snap-in dialog box.
-
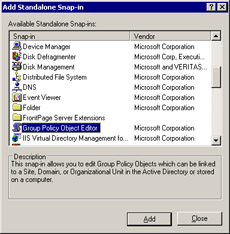
Select the Group Policy Object Editor option, as shown in Figure 14-2-16:
-
Click Add to open the Select Group Policy Object dialog box again.
-
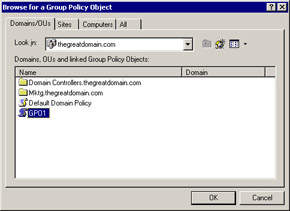
Click Browse to open the Browse for a Group Policy Object dialog box.
-
Select GPO1, as shown in Figure 14-2-17:
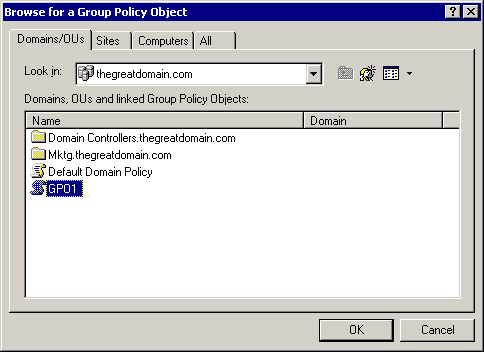
Figure 14-2-17: The Browse for a Group Policy Object Dialog Box -
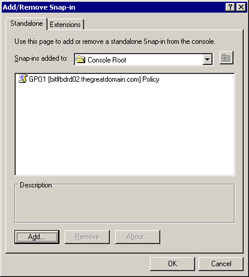
Click OK and Finish to add the selected GPO to the Console Root, as shown in Figure 14-2-18:
-
Save the GPO console in the form of a file, so that you can modify the GPO from the console when required.
Using the Group Policy Tab to Modify a GPO
You can also use the Edit button in the Group Policy tab of the Properties dialog box of a domain or OU to access the GPO Editor. To modify a GPO using the Group Policy tab:
-
Open the Active Directory Users and Computers dialog box.
-
Click the Group Policy tab of the Properties dialog box of an OU to open the Group Policy tab page.
-
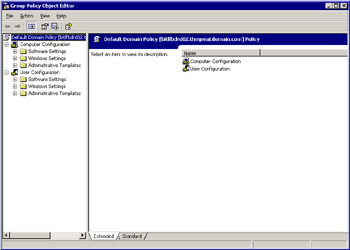
Click the Edit button in the Properties dialog box to open the GPO Editor, as shown in Figure 14-2-19:
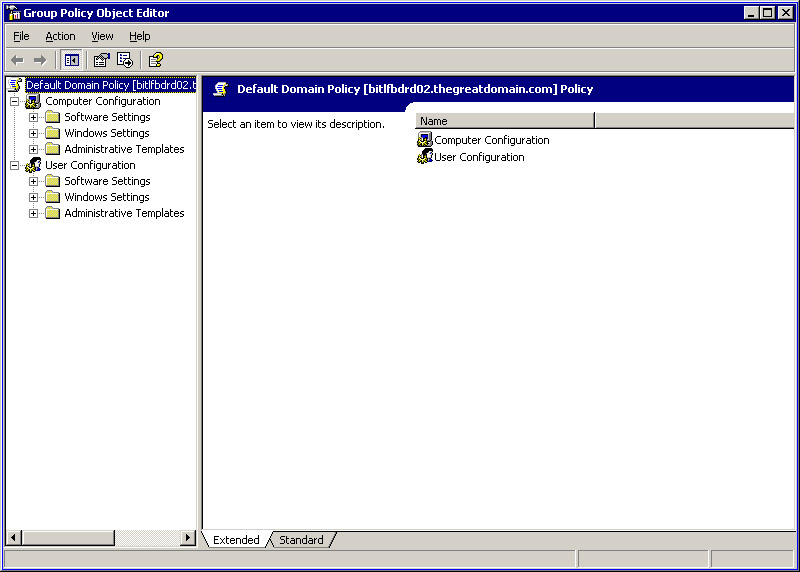
Figure 14-2-19: The Group Policy Object EditorA GPO Editor has the following components:
-
Root Container: Displays the GPO that you want to modify and the Fully Qualified Domain Name (FQDN) of the domain controller from which you are modifying the GPO. bitlfbdrd02.thegreatdomain.com represents the GPO that you want to modify.
-
Computer Configuration: Specifies the policies of the computer object. By default, the policies of the Computer object are processed before the policies of the User object.
-
User Configuration: Specifies the settings of the user policies.
-
Software Settings: Specifies Software Installation settings under the Computer Configuration and User Configuration options, for the computer and user objects.
-
Windows Settings: Specifies script and security settings, along with other policy settings that affect the working of Windows.
-
Administrative Templates: Specifies the settings for controlling the properties of a desktop, and restricting access to applications and applets.
-
Linking a Group Policy Object
You can apply the settings defined in a GPO to other GPOs by linking the GPOs. To link the GPOs, you need to create a link between the group policy and the container, such as a domain or OU. You require the Read/ Write or Full Control permissions to link a GPO. To link a GPO to an OU or domain:
-
Open the Active Directory Users and Computers dialog box.
-
Click the Group Policy tab of the Properties dialog box of OU.
-
Click the Add button to open the Add a Group Policy Object Link dialog box.
-
Select a domain or OU from the Domains/ OU tab, or a site from the Site tab.
-
Click OK to add the link to the domain.
You can link a domain or an OU to more than one GPO and can link multiple domains or OUs with a single GPO. You can also create GPOs in one domain and apply them to the user and computer objects in other domains or forest.
Inheriting Group Policy
There are two options for changing the type of Group Policy inheritance, Block Policy Inheritance and No Override. Block Policy Inheritance is applied to the domains or OUs. No Override is applied to the GPO links.
Enabling Block Policy Inheritance
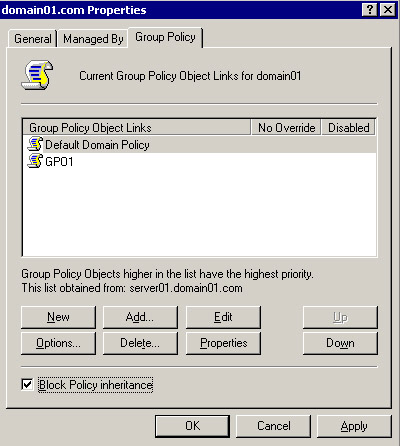
In Block Policy Inheritance, you can prevent the settings of a group policy to be inherited from the higher level of Active Directory to the lower levels. For example, you can prevent a domain policy from applying the settings to an OU, by selecting the Block Policy Inheritance option. To enable Block Policy Inheritance:
-
Open the Active Directory Users and Computers dialog box.
-
Click the Group Policy tab to open the Group Policy tab page.
-
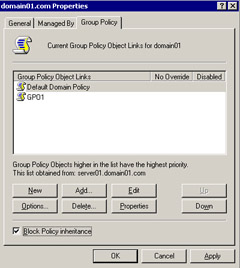
Select the Block Policy Inheritance option on the lower left corner of the dialog box to enable Block Policy Inheritance.
Figure 14-2-20 shows the domain01.com Properties dialog box.
-
Click Apply -> Close to apply the Block Policy Inheritance.
Enabling No Override
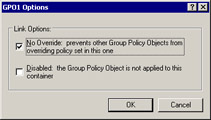
No Override prevents overwriting the policies of the higher level of domains in the lower level of domains. To enable No Override:
-
Open the Active Directory Users and Computers dialog box.
-
Click the Group Policy tab to open the Group Policy tab page.
-
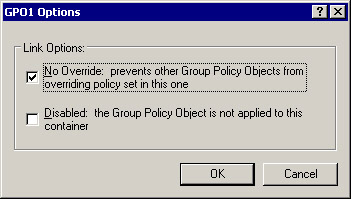
Select GPO1, the GPO to be configured, and click Options to open the Options dialog box.
-
Select the No Override option to enable No Override, as shown in Figure 14-2-21:
-
Click OK -> Apply -> Close to apply the settings.
Filtering Group Policy
A GPO contains different policy settings. When you separate a set of policy settings for a specific object, it is called filtering a group policy. The process of filtering affects the entire GPO. This means that all the settings of a GPO are filtered and applied to a security group. Alternatively, you can disable the Computer Configuration or the User Configuration options to prevent a GPO from being applied.
Describing the Filtering Process
The process of filtering involves the following functions:
-
Separating the objects of a domain or OU, to which you do not want to apply the policies, through the security groups.
-
Removing the objects from the DACL. You need to remove the objects from DACL when you want to separate the objects using the security groups.
-
Allowing or denying the access for users and computers to a GPO. The access permission is based on the membership of an object in the security groups because DACL contains a list of users and groups that are assigned or denied access permissions on an object.
The Read and Apply Group Policy permissions are required for a GPO to apply the filtered policy settings on an object. To prevent a group policy from being applied to an object, you can revoke the Read permission for that object. You can also revoke the Apply Group Policy permission to speed up the process of filtering.
Disabling the Computer Configuration or User Configuration Settings
You can speed up the process of filtering a group policy by disabling the Computer Configuration or User Configuration option of a GPO. To disable the Computer Configuration or User Configuration option:
-
Open the Active Directory Users and Computers window to open the Properties dialog box.
-
Click the Group Policy tab of the Properties dialog box of an OU to disable the Computer Configuration or User Configuration settings.
-
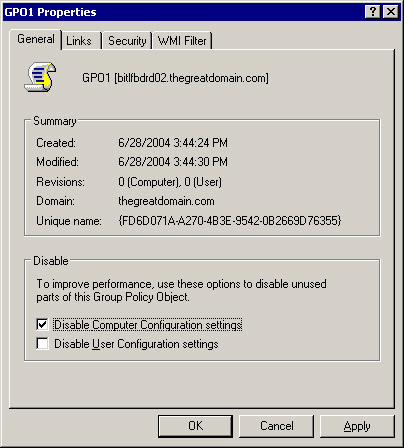
Select the GPO1 option and click Properties to open the GPO1 Property dialog box.
-
Select the Disable Computer Configuration settings or Disable User Configuration settings option to disable an object of GPO, as shown in Figure 14-2-22:
ser or Group Dialog Box
-
Click OK to add the security group to the User Rights Assignment policy.
Importing Security Templates into Group Policy
You can import and apply the security templates, which are a set of group policies, to specific objects in Active Directory. When you implement a group policy, you need to create and apply the security templates on the object on which the group policy is implemented. You can create a security template using Microsoft Management Console (MMC) snap-in Security Templates.
You can import a security template to be applied using the GPO Editor or the MMC. After you have imported the template, you can analyze the template to verify if the imported template matches the required security settings.
Using the Group Policy Object Editor
If you want to use the existing security templates in Windows Server 2003, such as rootsec.inf or securedc.inf, you can import these templates using the GPO Editor. To import a security template using the GPO Editor:
-
Open the Active Directory Users and Computers dialog box.
-
Click the Group Policy tab to open the Group Policy tab page.
-
Select the policy that you want to apply and click the Edit button to open the GPO Editor.
-
Select Computer Configuration -> Windows Settings -> Security Settings to open the Security Settings window.
-
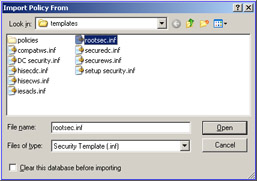
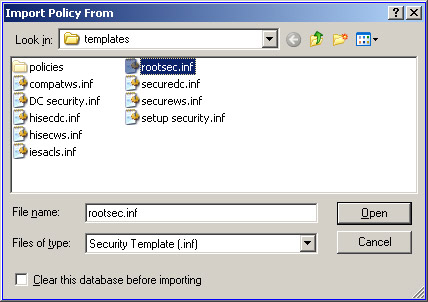
Select Action -> Import Policy to open the Import Policy From dialog box, as shown in Figure 14-2-26:
-
Navigate to C:\Windows\Security\templates.
-
Select the rootsec.inf option and click Open to open the selected security template.
-
Select File -> Exit to import the security template.
Using the Security Configuration and Analysis Option
You can also import the security templates using the Security Configuration and Analysis option in the MMC window. To import a security template using the MMC window:
-
Click Start -> Run to open the Run dialog box.
-
Enter the mmc command in the Open text box and click OK to open the MMC window.
-
Select File -> Add/ Remove Snap-in to open the Add/ Remove Snap-in dialog box.
-
Click Add to open the Add Standalone Snap-in dialog box.
-
Select Security Configuration and Analysis from the list in the Add Standalone Snap-in dialog box.
-
Click Add and then click Close to close the Add Standalone Snap-in dialog box and add the Security Configuration and Analysis option to the Console Root, as shown in Figure 14-2-27:
-
Select the Security Configuration and Analysis option in the left pane of the MMC window.
-
Select Action -> Open Database to open the Open Database dialog box.
-
Enter bost_database as the new file name in the File Name text box to select a file whose content is to be displayed.
-
Click Open to open the Import Template dialog box.
-
Select the rootsec.inf option and click Open to import the template.
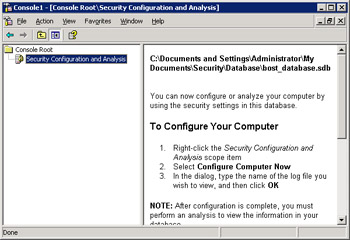
Figure 14-2-28 shows the content of the bost_database file displayed in the right pane of the Console window:
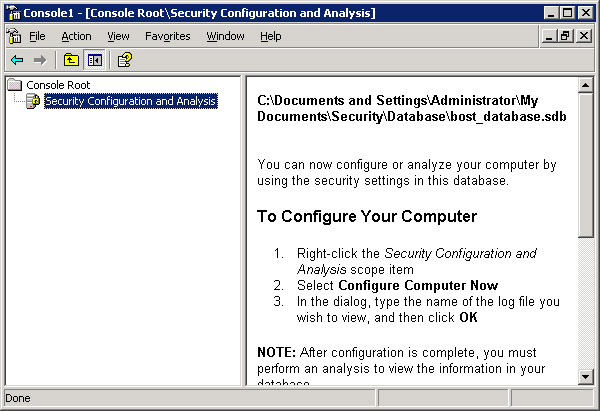
Figure 14-2-28: The Template Applied to a File in the Console Window
Analyzing the Security Templates
An error log file is created when you analyze the template. The log file stores the result of the analysis. To analyze the imported template:
-
Select the Security Configuration and Analysis option in the left pane of the MMC window.
-
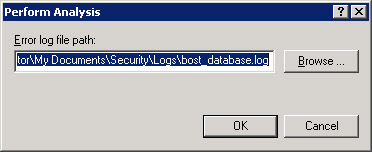
Select Action -> Analyze Computer Now to open the Perform Analysis dialog box, as shown in Figure 14-2-29:
-
Click Browse to open the Open dialog box.
-
Select the location for the log file and click Open to specify the location of the log file.
-
Click OK to perform the analysis.
-
Expand the section headings nodes to view the results of the analysis.
Applying a Security Template
You can apply a security template after you have imported it. A security template is applied to make an object secure. To apply the security template:
-
Select the Security Configuration and Analysis icon in the left pane of the MMC window.
-
Select Action -> Configure Computer Now to open the Configure System dialog box.
-
Click OK to accept the default location of the error log file.
-
Select File -> Exit from the MMC window to close the MMC window.
Group policies are hierarchical in nature. A Group Policy may be applied at the local computer level, the domain level, or the OU level. When you implement a security template, you modify the computer-level group policy, and other group policies are not affected directly.

