Terminal services in Windows Server 2003 provide remote access to the Windows desktop of a remote computer, which is a terminal server. The services allow the client computer of the terminal server to act as a terminal agent, which communicates with the terminal server. You can use Remote Desktop Connection tool in Windows Server 2003 to connect to a terminal server.
When a remote computer is connected to a terminal server using the terminal client, the terminal server keeps track of information pertaining to all the sessions running on the remote computer. An end user needs the information pertaining to all the sessions to connect to an existing session. All the information related to the session is stored in a database on a terminal server called session directory. If a request to an existing session is made, the session directory redirects the request to the corresponding server using the information stored in a session directory.
This ReferencePoint explains how to install and enable terminal services in Windows Server 2003. It describes the architecture of session directory and explains the installation and configuration of session directories in Windows Server 2003. It also explains load balancing using terminal server and explains how to configure a Remote Desktop Connection to connect to a remote desktop.
Introducing Terminal Services
You can use Windows-based programs of a terminal server on the client by implementing terminal services in Windows Server 2003. Multiple end users can access the desktop of a terminal server running on Windows Server 2003, to run programs, save files, and access network resources. Terminal services in Windows Server 2003 help in:
-
Sharing applications and desktops over the network.
-
Centralizing and managing applications.
-
Managing and controlling a computer by the system administrator.
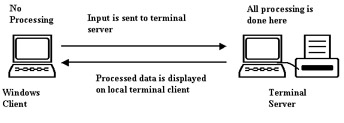
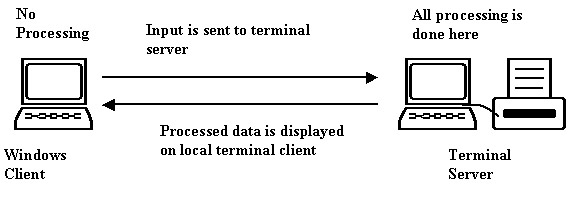
Terminal services provide access to the remote desktop of a terminal server using the thin-client relationship. In the thin-client relationship, the local computer has memory and an operating system, but all the processing is done on the remote computer, which is a terminal server. When an end user executes an application on a local computer, it is processed on the terminal server, and only information the end user inputs is transmitted over the network. Using the thin-client relationship, terminal services provide a server-based multi user environment in Windows Server 2003.
Figure 14-15-1 shows the Terminal Server thin-client relationship:
The advantages of terminal services in Windows Server 2003 are:
-
Rapid, centralized application deployment: Distributes Windows-based applications that are repeatedly updated or used. It manages the devices connected to the computers across the network.
-
Low-bandwidth access to data: Reduces the bandwidth of the network required to access the data remotely.
-
Windows anywhere: Enables the end user to access the applications on any device running the non-Windows operating system.
Installing Terminal Services
You need to install terminal services in Windows Server 2003 to share the resources between the local computer and terminal server using the thin-client relationship. To install terminal services:
-
Select Start->Settings->Control Panel to open the Control Panel window.
-
Double-click the Add or Remove Programs icon in the Control Panel window.
-
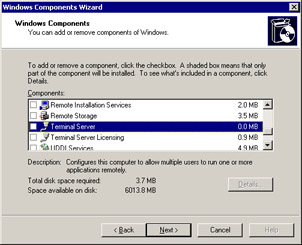
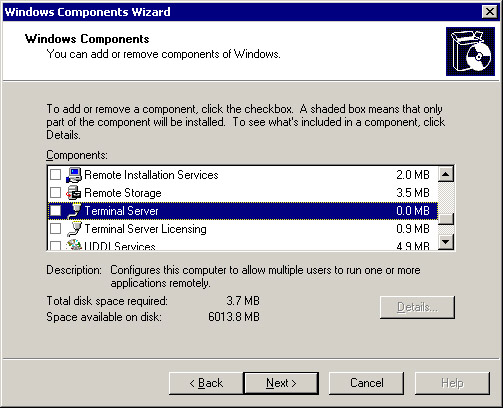
Click Add/Remove Windows Component button in the left pane of the Add or Remove Programs window to start the Windows Component wizard, as shown in Figure 14-15-2:
-
Select the Terminal Server option from the Components list box. A Configuration Warning dialog box appears, as shown in Figure 14-15-3:
-
Click Yes to return to the Windows Components screen.
-
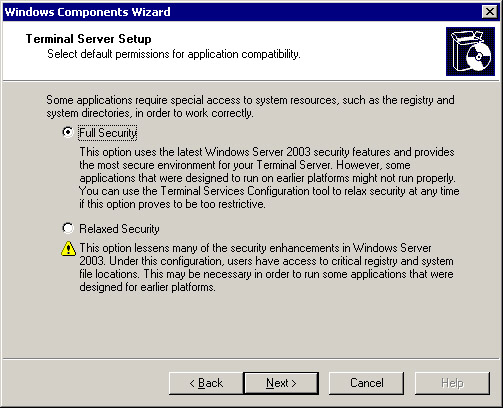
Click Next to open the Terminal Server Setup screen, as shown in Figure 14-15-4:
-
Select the Full Security option to specify the level of security in terminal services.
-
Click Next to configure the Terminal Server component.
-
Click Next to open the Completing the Windows Components screen.
-
Click Finish to complete the installation of the Terminal Server component.
By default, all applications are not compatible with terminal services. As a result, you need to reinstall and configure applications after installing the Terminal Server to make them compatible with the terminal services. To install applications for terminal services compatibility:
-
Open the Control Panel window.
-
Double-click Add or Remove Programs icon in the Control Panel Window to open the Add or Remove Programs window.
-
Select the application to be installed.
-
Select Install option to start the installation of the application.
-
Select Change User -> All Users with Common Application Settings for Universal Access option.
-
Continue the installation process to install the application compatible with terminal services.
| Note | The process of installing each application depends on the type of the application. |
You can enable or disable terminal services to increase or decrease the performance of a system. When you enable the terminal services, you can connect and access to terminal server remotely, increasing the performance of the system. When an application compatible with terminal services is installed, you can change the state of terminal services to ON or OFF to enable or disable the terminal service. By default, the terminal services are enabled in Windows Server 2003. To disable terminal services without uninstalling the application:
-
Open Add or Remove Programs window from the Control Panel window.
-
Select Add/ Remove Windows Component option on the left side of Add or Remove Programs window to open the Windows Components wizard.
-
Select the Terminal Server option from the Components list box in the Windows Components screen.
-
Clear the Terminal Server check box and click OK to disable terminal services.
Configuring Terminal Services
You need to configure terminal services to support a link between a terminal server and a client session through Terminal Services Connections tool. The properties of Terminal Services Connections tool determine how and where terminal services are used. To configure terminal services:
-
Select Start-> Settings-> Administrative Tools to open the Administrative Tools window.
-
Double-click the Terminal Services Configuration option in the Administrative Tools window to open the Terminal Services Configuration/Connections (TSCC) window.
-
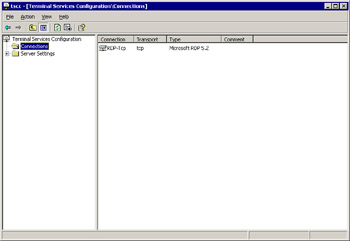
Select the Connections folder in the left pane of the TSCC window to display a list of connections in the right pane of the TSCC window, as shown in Figure 14-15-5:
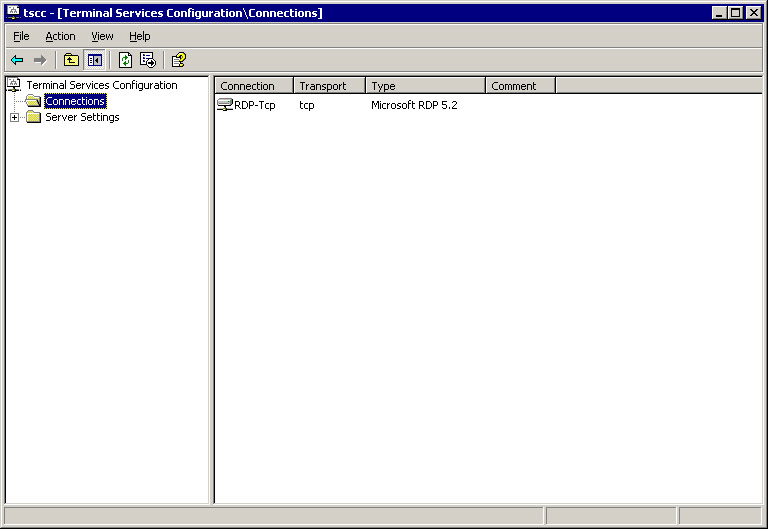
Figure 14-15-5: The Terminal Services Configuration/Connections WindowRemote Desktop Protocol-Transmission Control Protocol (RDP-Tcp) is a type of connection shown in the window.
-
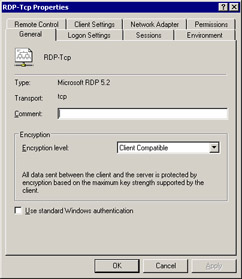
Double-click the RDP-Tcp icon on the right pane of the TSCC window to open the RDP-Tcp Properties dialog box, as shown in Figure 14-15-6:
-
Set the properties to Terminal Services using different tabs and click OK.
You can configure terminal services through the options in each tab of the RDP-Tcp Properties dialog box. The RDP-Tcp Properties dialog box consists of various tabs, such as General, Network Adapter, Permissions, Logon Settings, Sessions, and Environment.
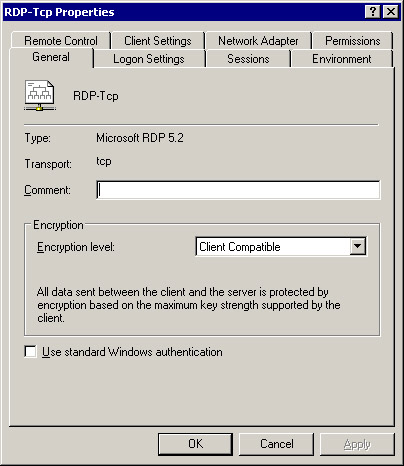
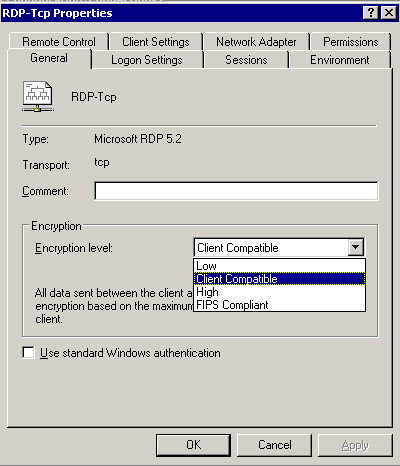
The General tab of the RDP-Tcp Properties dialog box identifies the RDP version and the transport used for communication. The TCP is the default transport protocol. The administrator can also add comments about the installation in the Comment field of the General tab. The encryption level selected from the Encryption Level drop-down list in the General tab protects the data sent between the client and terminal server.
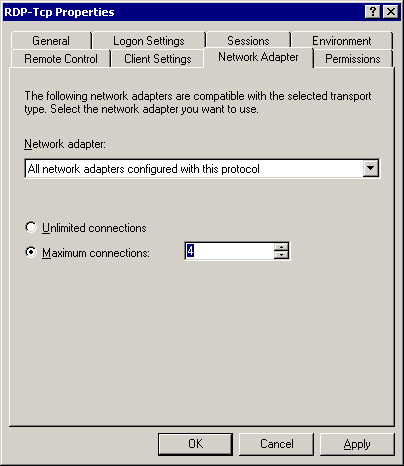
The Network Adapter tab of the RDP-Tcp Properties dialog box provides options to select the network adapter that is compatible with the type of transport you select. You can also specify the maximum number of connections in the Maximum connections box, to allow multiple end users to log on to a computer simultaneously.
Figure 14-15-7 shows the Network Adapter tab of the RDP-Tcp Properties dialog box:
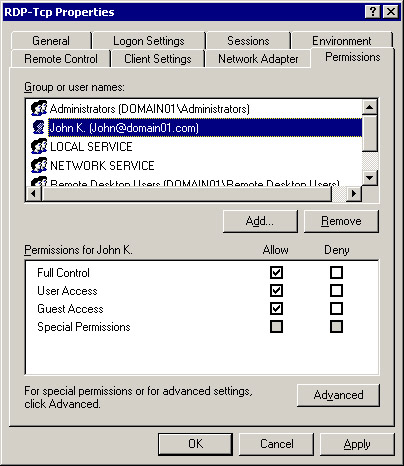
You can define the access permissions for an end user or a group using the Permissions tab of the RDP-Tcp Properties dialog box. You can specify the access permissions for Full Control, User Access, or Guest Access. You can also add or remove end users or groups using the Add button or the Remove button.
Figure 14-15-8 shows the Permissions tab of the RDP-Tcp Properties dialog box:
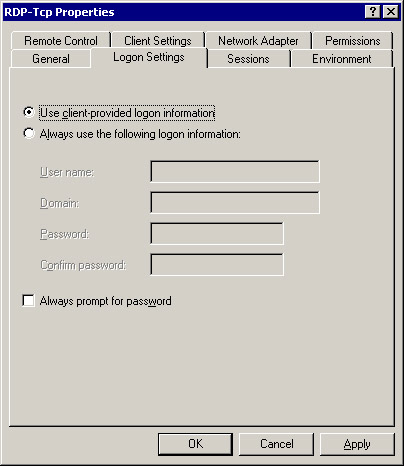
In the Logon Settings tab of the RDP-Tcp Properties dialog box, you can select the Use client-provided logon information option to use the logon information provided by the end user on a client computer. You can also select the Always use the following logon information option and provide the user name and password to logon.
Figure 14-15-9 shows the Logon Settings tab:
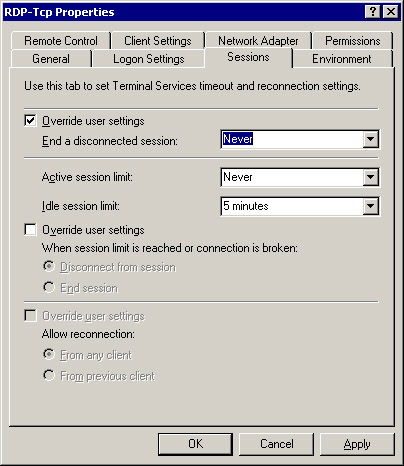
In the Sessions tab of the RDP-Tcp Properties dialog box, you can set the timeout and reconnection settings of terminal services. You can specify the time for which a client can remain idle, maximum length of a session, and that whether a client can reconnect or not.
Figure 14-15-10 shows the Sessions tab:
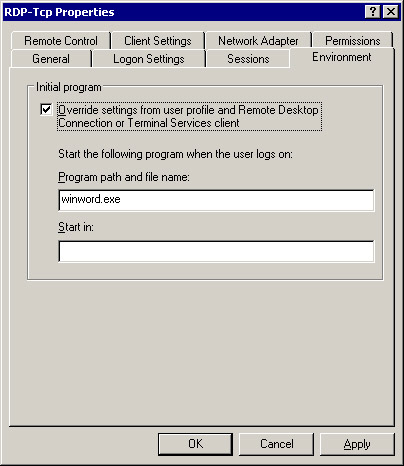
In the Environment tab of the RDP-Tcp Properties dialog box, you can select the Override settings from user profile and Remote Desktop Connection or Terminal Services client option, to override the settings of a client.
Figure 14-15-11 shows the Environment tab:
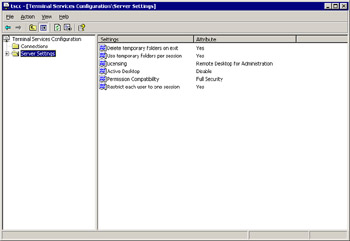
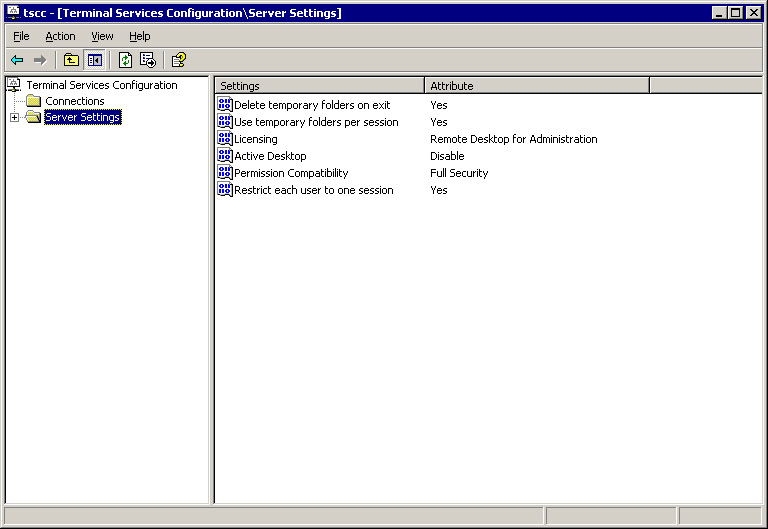
You need to configure the server settings, which determine how terminal services are applied in Windows Server 2003, after configuring terminal services Connections.
Figure 14-15-12 shows the list of the server settings in the right pane of the TSCC window:
The default server settings for terminal services are:
-
Delete temporary folder on exit: Determines that the temporary folders are deleted on exit.
-
Use temporary folder per session: Determines the location for temporary folders created during a session.
-
Licensing: Defines the license, which a client needs to connect to a terminal server.
-
Active desktop: Defines whether the Microsoft Active Desktop is enabled or disabled.
-
Permission compatibility: Sets the security of terminal services as Full or Relaxed.
-
Restrict one user to one session: Enables or disables restriction on end user sessions.
| Note | Microsoft Active Desktop is a utility in Windows that helps you place a Web page on a desktop. |
Administrating Terminal Services
An administrator can monitor the terminal servers, sessions, end users, and processes remotely using terminal services in Windows Server 2003. This service also enables centralized deployment of applications, access to devices on network, and disk management. The centralized deployment of applications means that you install the software on the terminal server and can access the software from a remote site. The administrator of the terminal server can also manage applications available to the end users, logon permissions, and security of the applications. The tools and features of terminal services used for administration are:
-
Terminal Services Manager
-
Active Directory Users and Computers and the Local Users and Groups tool
-
Task Manager Additions
-
Client Software generation and installation
-
Common Commands
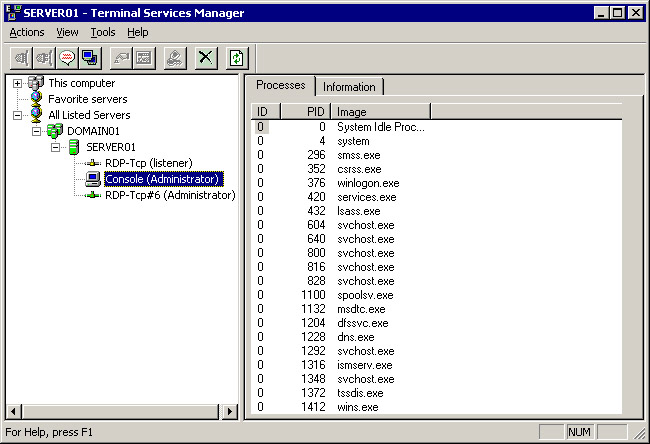
The Terminal Services Manager tool enables you to view and administer active sessions, users, and processes in the terminal server on the network. To open the Terminal Services Manager tool:
-
Open the Control Panel window.
-
Double-click the Administrative Tools icon in the Control Panel to open the Administrative Tools window.
-
Double-click the Terminal Services Manager icon to open the Terminal Services Manager window.
-
Select All Listed Servers -> Console (Administrator) in the left pane of the Terminal Services Manager window to display a list of processes in the right pane of the Terminal Services Manager window, as shown in Figure 14-15-13:
You can connect or disconnect to a session using options in the Action menu of the Terminal Services Manager window. You can also view and manage the list of sessions and the processes by expanding the folders in the left pane of the Terminal Services Manager window.
The Active Directory User and Computers and Local Users and Groups tool enables you to control the settings of terminal services for each end user. You can also use group policy settings of terminal services to control these features. You can use Active Directory User and Computers and Local Users and Groups tool in terminal services for:
-
Setting the path to terminal services user profile for each end user.
-
Enabling or disabling the user logons.
-
Setting time limits on sessions.
Remote Desktop Connection
Remote Desktop is a feature of terminal services in Windows Server 2003 that enables you to connect to remote computers from any computer and perform administrative tasks. In addition to this, the features of terminal services that you can use to administer remote computers are:
-
Remote Desktop for Administration: Enables you to administer a server from any computer on the network. You do not need a license for up to two simultaneous remote connections.
-
Remote Desktops Microsoft Management Console (MMC) Snap-in: Enables you to create remote connections to the console server of multiple terminal servers and the computers running on Windows 2000 or Windows Server 2003 operating system.
-
Remote Desktop Connection tool: Enables you to create and configure a connection, save the settings of a connection in a file, and open and edit the saved connections. This tool is installed by default, on Windows Server 2003 operating system.
Creating a New Connection
You need to have a remote desktop connection access applications running on a remote computer from a local computer. To create a new remote desktop connection:
-
Select Start Settings Control Panel to open the Control Panel window.
-
Double-click the Administrative Tools icon in the Control Panel window to open the Administrative Tools window.
-
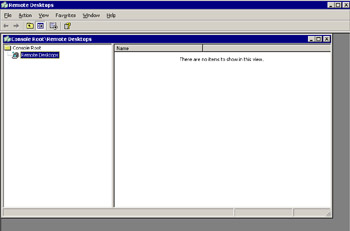
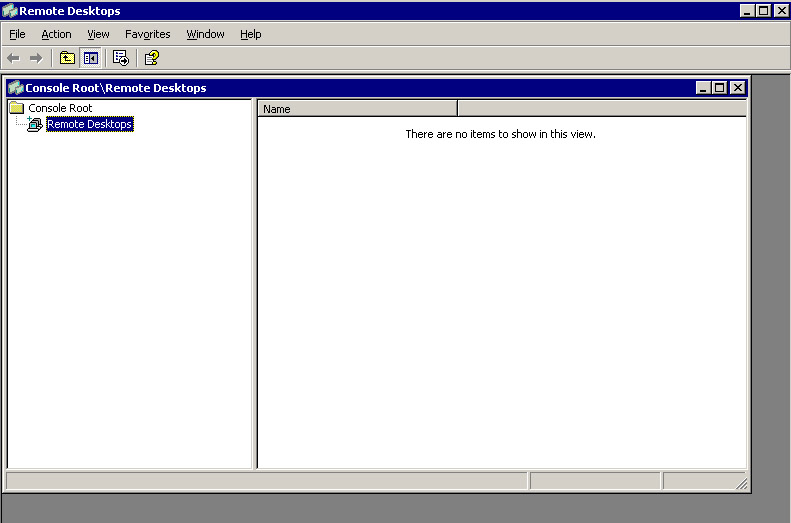
Double-click the Remote Desktops icon in the Administrative Tools window to open the Remote Desktop console, as shown in Figure 14-15-29:
-
Right-click on the Remote Desktops icon in the left pane of the Remote Desktop window to open a shortcut menu.
-
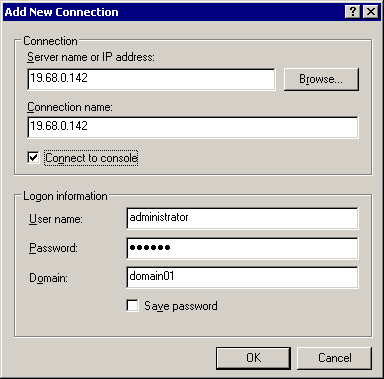
Select Add a New Connection option from the shortcut menu to open Add New Connection dialog box.
-
Enter the name or IP address of the server in the Server name or IP address field of the Add New Connection dialog box, as shown in Figure 14-15-30:
-
Click OK to create a new remote desktop connection.
To connect to a remote computer using remote desktop connection:
-
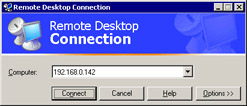
Select Start Programs Accessories Communication Remote Desktop Connection to open the Remote Desktop Connection dialog box.
-
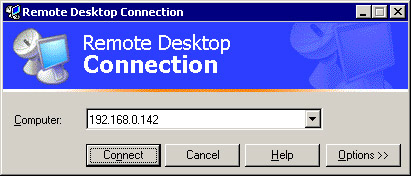
Enter the computer name or IP address in the Computer field of the Remote Desktop Connection dialog box as shown in Figure 14-15-31:
-
Click Connect to connect to the remote computer. A Log on to Windows dialog box appears.
-
Enter the Windows user name and password in the dialog box and click OK.
You can also re-establish a prior desktop connection that has been disconnected. Select the computer name or IP address from the Computer drop-down list and click Connect to connect to the remote desktop.
To save your connection settings to a file:
-
Open Remote Desktop Connection dialog box.
-
Click Options Save As to open the Save As dialog box.
-
Enter the file name in File Name field of the dialog box and click Save to save the settings in the file.
You can provide information for automatic logon, reconnect if the connection is dropped and also improve the performance of the remote connection. To provide information for automatic logon:
-
Open Remote Desktop Connection dialog box.
-
Click Options and select the General tab.
-
Enter the domain name to which you want to log on, in the Domain text box.
-
Enter the password in the Password field and click Connect.
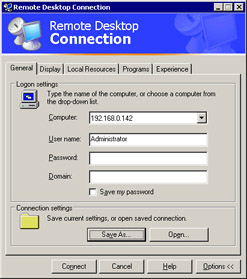
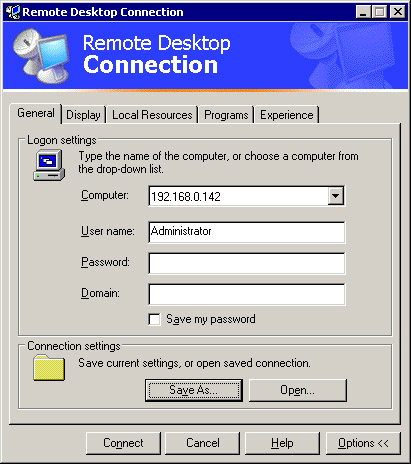
Figure 14-15-32 shows the General tab of the Remote Desktop Connection dialog box:
To reconnect if the connection is dropped:
-
Open Remote Desktop Connection dialog box.
-
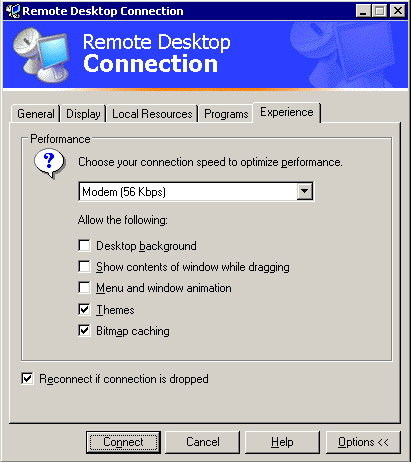
Click Options and select the Experience tab.
-
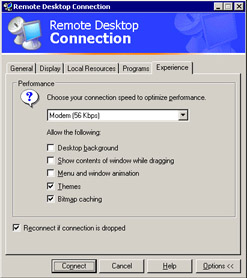
Select the Reconnect if the connection is dropped option on the lower side of the Remote Desktop Connection dialog box, as shown in Figure 14-15-33:
Using Remote Desktop for Administration
You can use terminal services administrative tools to configure Remote Desktop for administration. In addition, you can also use the standard Windows tools to configure Remote Desktop. To configure Remote Desktop using the standard Windows tool:
-
Select Start Settings Control Panel to open the Control Panel window.
-
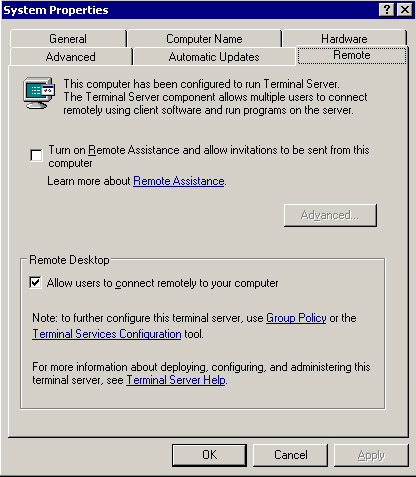
Double-click System icon in the Control Panel widow, to open System Properties dialog box.
-
Click the Remote tab.
-
Select the Allow users to connect remotely to your computer option. A warning message appears, Click OK.
Figure 14-15-34 shows the Remote tab of System Properties dialog box:
-
Click OK to save the settings.
When you connect to a remote site, you need to protect the data from unauthorized transmission to and from the remote site. You can protect the data by using the Encryption technique. The four levels of encryption are:
-
Low: Provides 56-bit encryption.
-
Client Compatible: Provides the highest level of encryption that the client supports.
-
High: Provides 128-bit encryption in both directions.
-
FIPS Complaint: Provides Federal Information Processing Standard validated methods.
If a terminal server client accesses a Windows Server 2003 server remotely, you can set the encryption level of the remote session to Client Compatible. The Client Compatible level of encryption provides the highest level of encryption to the remote session supported by the client. To change the encryption level:
-
Open the Administrative Tools window.
-
Double-click Terminal Services Configuration icon in the Administrative Tools window to open the TSCC window.
-
Select Connections to display a list of all the connections in the right pane of the TSCC window.
-
Right-click the RDP-Tcp icon to open a shortcut menu.
-
Select Properties option from the shortcut menu to open RDP-Tcp Properties dialog box.
-
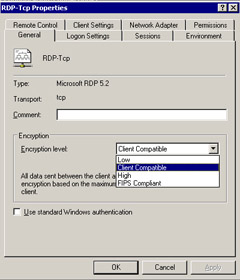
On the General tab of the dialog box select the Client Compatible encryption level from the Encryption level drop down list.
Figure 14-15-35 shows the General tab in Properties dial box:
-
Click OK to apply the Client Compatible encryption level.
Remote Desktop Protocol
Remote Desktop Protocol (RDP) is a protocol used by terminal services and Remote Desktop to communicate between two remote sites. The protocol determines the data transferred between client and server. RDP supports maximum of 64,000 separate channels for transmitting the data. The main features of RDP are:
-
Encryption
-
Bandwidth reduction
-
Roaming disconnect
-
Clipboard mapping
-
Remote Control
-
NLB
RDP uses Rivest, Shamir, and Adleman (RSA) algorithm used for data encryption, to encrypt small amounts of data for secure communication over network.
RDP supports mechanisms, such as data compression, to reduce the amount of data transmitted over a network connection. As a result, it reduces the bandwidth of data transfer.
An end user can manually disconnect from a session without logging off. The end user is automatically connected to the disconnected session when the end user logs back on the session.
An end user can cut, copy, and paste the text or images among the applications executing on the local computer and the remote computer.
The support person can view and control a terminal server session. The support person can detect and resolve the problems remotely if the input and the display graphics are shared between two terminal server sessions.
RDP also uses the concept of NLB to balance the communication between two terminal server sessions.
In addition to the protocols of Remote Desktop, you can use RDP-TCP connection to work with Remote Desktop Connections. RDP-TCP is the only connection required for configuring clients to connect them to a server using Remote Desktop Connection. Only one RDP-TCP connection can be configured for each network adapter. Additional network adapter needs to be installed for every additional RDP-TCP connection.
You can re-configure the properties of RDP-TCP connection using terminal services. The configuration properties of RDP-TCP connection includes, limiting the client session time on the server, setting the level of protection for encryption, and selecting the permissions for users and groups.
In addition to configuring the RDP-TCP connection, terminal services configures settings for the temporary folders, default connection security and licensing of the remote connection.
-
Enabling or disabling control of a terminal server remotely.
-
Specifying a program to run when an end user logs on a terminal server.
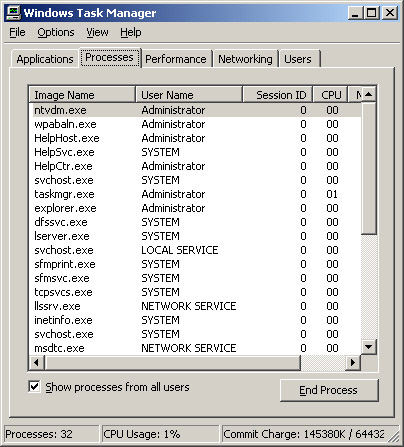
The Task Manager Additions tool enables you to monitor and administer terminal services. Press ALT, CTRL, and DELETE and select Task Manager to open the Windows Task Manger window, as shown in Figure 14-15-14:
The Add or Remove Programs option in the Control Panel ensures that the applications are installed in a multi-session environment. Installing an application in a multi-session environment means that an application can be executed in more than one session simultaneously.
Terminal services also provides command-line functions, which are:
-
Change logon: Disables terminal service logons temporarily.
-
Change port: Shifts the Communication (COM) port mappings required by MS-DOS programs.
-
Change user: Executes changes to the .ini policies file, which are mapped to a current end user.
-
Cprofile: Deletes individual files linked to an end user's profiles.
-
Dbgtrace: Enables or disables debug traces, which helps in debugging.
-
Flattemp: Enables or disables temporary directories in the operating system.
-
Logoff: Terminates the client session.
-
Msg: Sends message to a single end user or to multiple end users.
-
Query process: Displays information about a process on terminal services.
-
Query session: Displays terminal services session data on the prompt.
-
Query termserver: Displays a list of network terminal servers.
-
Register: Registers an application with execution characteristics, in the system.
-
Reset session: Deletes a session and reestablishes a connection.
-
Shadow remotely: Monitors and controls an end user session.
-
Tscon: Connects an end user to other Terminal Server sessions.
-
Tsdiscon: Disconnects a terminal services session of the end user.
-
Tskill: Destroys a terminal services session.
-
Tsprof: Copies an existing configuration and modifies the profile path of an end user.
-
Tsshutdn: Shuts down the terminal services server.
Introducing Session Directories
Session Directory is a database that records the sessions on the terminal server and provides the information to end users to connect them to the existing sessions. When a client sends a connection request again to a terminal server after the connection is dropped, the terminal server in turn checks if the client has an existing connection on any other server. The session directory provides the information regarding the sessions and if the connection exists, the session directory directs the client to the appropriate terminal server that contains the existing session. If the client does not have an existing session, then the session is launched from the server, which received the request. The session directory is updated after the connection is made through an existing connection or a new connection.
Session Directory Architecture
The session directory of terminal services allows a group of terminal servers to reconnect to the disconnected sessions. All the sessions on the terminal server are stored as records in a central database. The terminal servers update this database when an end user logs on, logs off, or disconnects from a session.
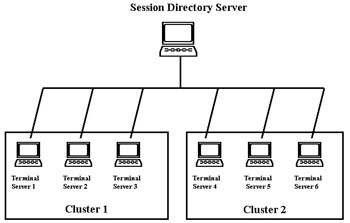
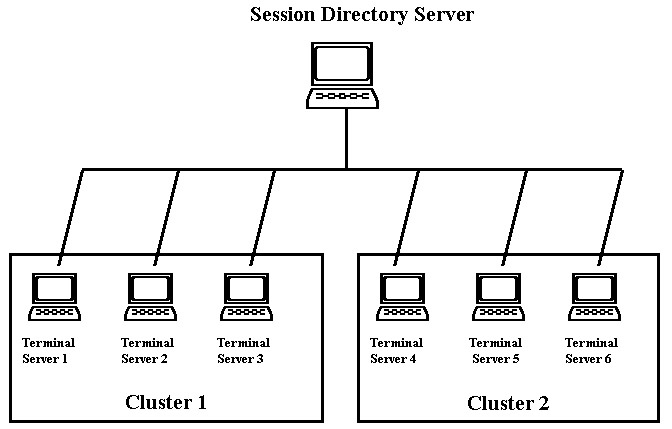
Each session directory manages more than one cluster, which is a collection of more than one terminal server.
Figure 14-15-15 shows the structure of a session directory:
The database in session directory server stores information regarding the sessions including a description of a disconnected session.
| Session Directory Database Field | Description |
|---|---|
| source-server-ID | Stores the name of the terminal server on which the session resides. |
| session-ID | Stores the session ID determined by the terminal server on which the session originates. |
| Username | Stores username of end user logged on to the session. |
| Domain | Stores domain name of a domain on which the username resides. |
| TS-protocol | Stores the protocol that helps you to connect through the session on the server. |
| session-creation-date-and-time | Stores time and date when the session was created. |
| disconnection-date-and-time | Stores time and date when the session disconnects. |
| application-type | Differentiates between types of applications. |
| resolution-width | Stores the resolution width of a terminal server, which can be set at the server or the client level. |
| resolution-height | Stores the resolution height of a terminal server, which can be set at the server or the client level. |
| color-depth | Stores the color depth of a terminal server, which can be set at the server or the client level. |
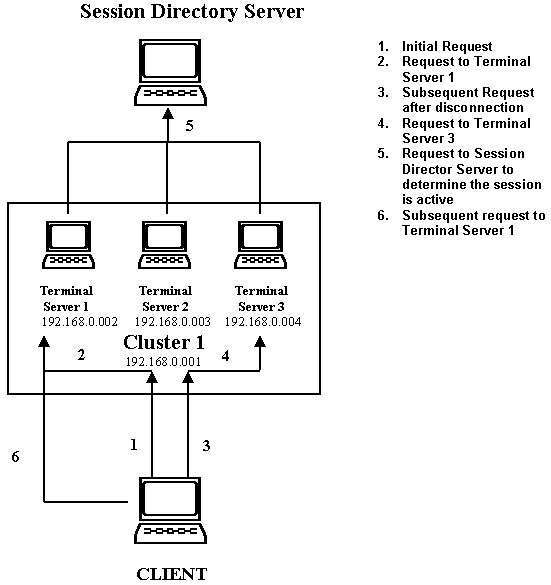
In the session directory, when a request is sent to a terminal server, the server verifies whether the client has an existing connection on any other server of the cluster. The process of connecting a client to a terminal server cluster is as follows:
-
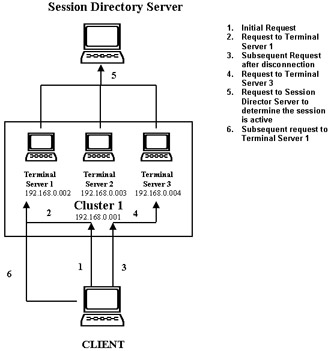
A client sends IP address request to the Cluster1 cluster.
-
The Cluster 1 cluster directs the request to the IP address of one of the terminal servers in the Cluster 1 cluster.. For example, Terminal Server 1, of the Cluster 1 cluster receives the request from the client to establish a connection.
-
When the client disconnects from Terminal Server 1, it tries to reconnect to Cluster 1 and the request is directed to any terminal server in Cluster1.
-
The client is then connected to the terminal server, which sends a request to the session directory server to check if the previous connection exists.
-
A previous connection of the client with Terminal Server 1 exists, so the session directory responds to the terminal server, which received the request to redirect the client connection request to Terminal Server 1.
-
The client is then connected to Terminal Server 1 directly.
Figure 14-15-16 shows an example of connecting to a Terminal Server IP address:
Installing and Configuring Session Directories
Session Directory is not installed by default so you need to install and configure it. There are two main components, session directory server and client server, which are installed along with session directory. Session Directory server is a server that executes the services of session directory. Client server is a terminal server that requests data from the session directory server. To start session directory services:
-
Open the Control Panel window.
-
Double-click Administrative Tools icon in the Control Panel to open the Administrative Tools window.
-
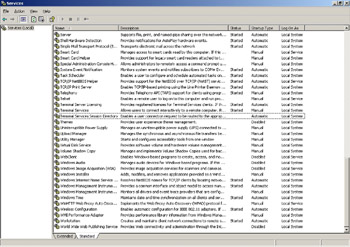
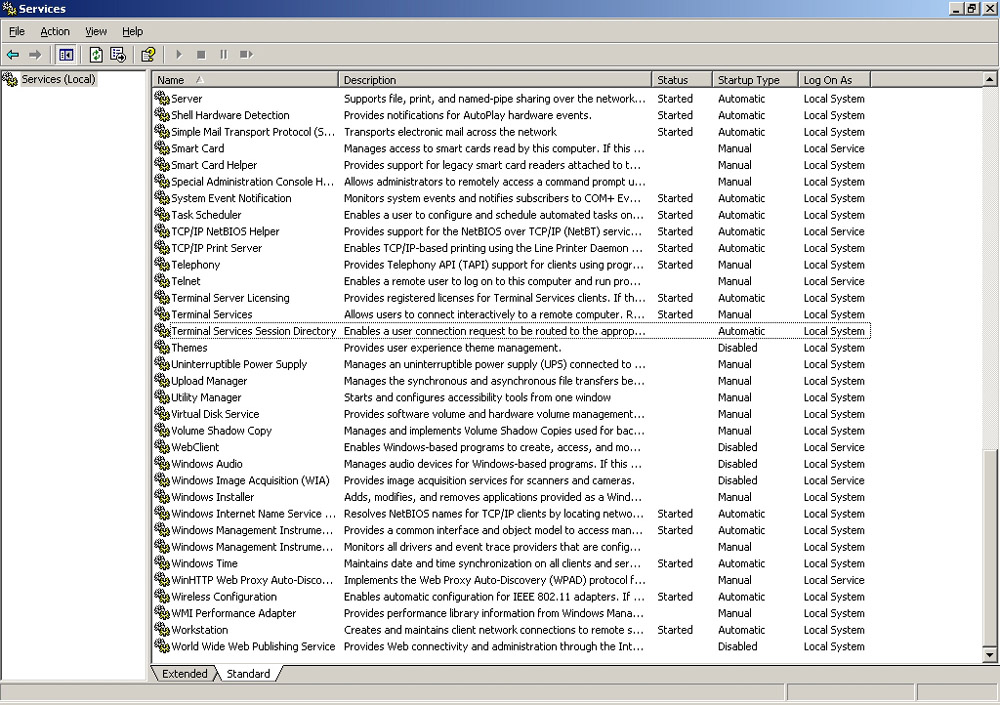
Double-click the Services icon in the Administrative Tools window to open the Services window, as shown in Figure 14-15-17:
-
Right-click the Terminal Services Session Directory service to open a shortcut menu.
-
Select the Start option from the shortcut menu to start the Terminal Services Session Directory services.
-
Close the Services window.
When you have started the session directory services, you need to configure session directory server and a client server. To configure session directory server:
-
Select Start ->Programs ->Administrative Tools ->Active Directory Users and Computers to open the Active Directory Users and Computers window.
-
Right-click the User folder in the left pane of the Active Directory Users and Computers window, to open a shortcut menu.
-
Select Delegate Control option from the shortcut menu to open the Delegation of the Control wizard.
-
Click Next on the Welcome screen to open the Users or Groups screen.
-
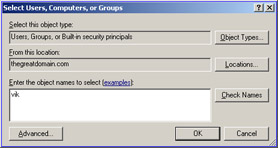
Click Add to open the Select Users, Computers, or Groups dialog box.
Figure 14-15-18 shows the Select Users, Computers, or Groups dialog box:
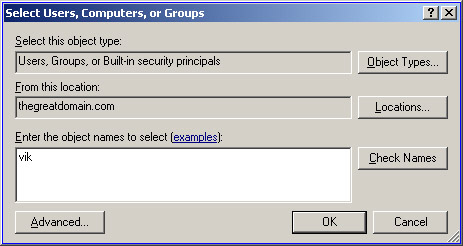
Figure 14-15-18: The Select Users, Computers, or Groups Dialog Box
-
Click the Object Types button to open the Object Types dialog box.
-
Select the Computers option to add the computers object to which you want to give permissions.
-
Click OK and continue the Delegation of the Control wizard.
To configure session directories client-server settings using Group Policies:
-
Open the Active Directory Users and Computers dialog box.
-
Click the Group Policy tab of the Properties dialog box of the domain to open the Group Policy tab page.
-
Click the Edit button to open the Group Policy Object Editor Window.
-
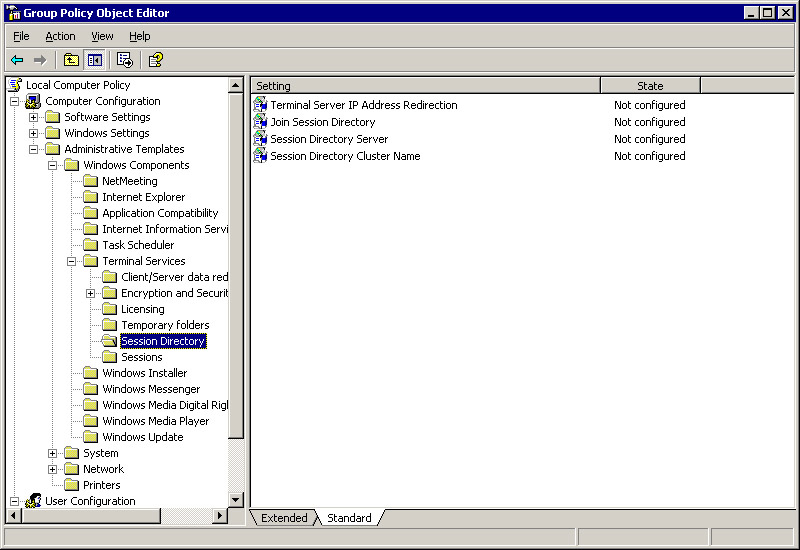
Select Computer Configuration ->Administrative Templates -> Windows Components ->Terminal Services ->Session Directory to expand the Session Directory folder.
Figure 14-15-19 shows the settings of Session Directory folder in Group Policy Object Editor window.
-
Right-click the Terminal Server IP Address Redirection icon in the right pane of the Group Policy Object Editor window, to open a shortcut menu.
-
Select Properties option from the shortcut menu to open Terminal Server IP Address Redirection Properties dialog box.
-
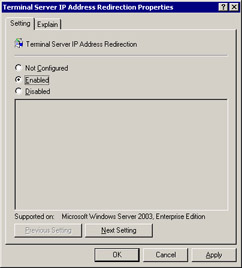
Select the Enabled option in the Setting tab of the Terminal Server IP Address Redirection Properties dialog box.
Figure 14-15-20 shows the Terminal Server IP Address Redirection Properties dialog box:
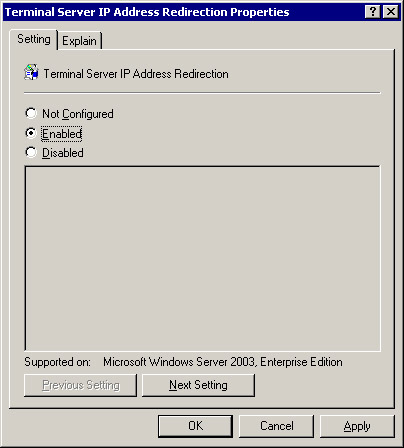
Figure 14-15-20: The Terminal Server IP Address Redirection Properties Dialog Box
-
Click OK to enable the Terminal Server IP Address Redirection settings.
-
Enable the Join Session Directory settings.
-
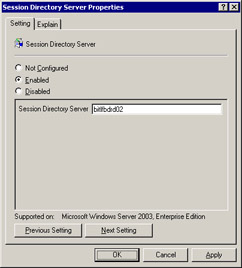
Enable the Session Directory Server settings and enter the name of the server, where the session directory service executes, in the Session Directory Server field.
Figure 14-15-21 shows the Session Directory Server Properties dialog box:
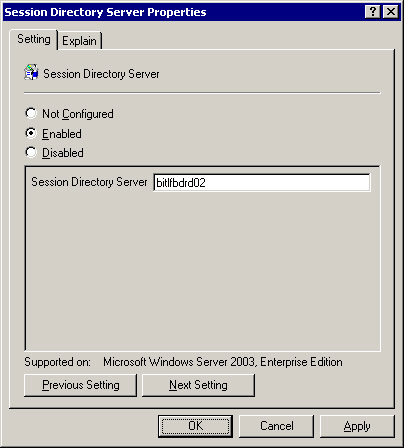
Figure 14-15-21: The Session Directory Server Properties Dialog Box
-
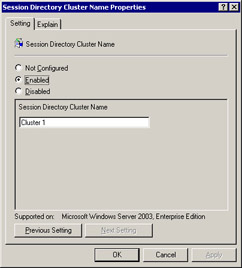
Enable the Session Directory Cluster Name settings and enter the name of the cluster, to which the terminal server belongs, in the Session Directory Cluster Name field.
Figure 14-15-22 shows the Session Directory Cluster Name Properties dialog box:
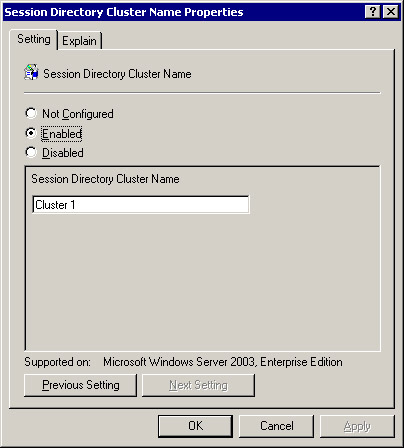
Figure 14-15-22: The Session Directory Cluster Name Properties Dialog Box
Network Load Balancing using Terminal Server
Network Load Balancing (NLB) is a type of Windows Clustering technology that contains multiple servers connected together to form a cluster. If one terminal server or cluster in this set up fails, an end user can access another terminal server.
There are two types of clustering technologies in Windows Server 2003 server clusters and NLB clusters. The server cluster is a group of independent computers or nodes working together as a single system. You can have maximum of eight nodes or servers in a server cluster. All the nodes in a server cluster that has more than two nodes can run only one operating system, Windows Server 2003- Enterprise Edition.
In NLB clusters, you can have maximum of 32 nodes with no specific hardware requirements. Each server in an NLB cluster is independent of other, but works the same way as the other. The servers in NLB cluster do not share storage space. A client sends a request to a cluster with more than one IP addresses shared by all the members of the cluster. When a cluster receives a request from a client, only one member of the cluster responds to each request. NLB determines which member of the cluster responds to a specific request from the client based on a set of rules. The rules defined to determine which member of the cluster made the request are:
-
The offline members cannot respond to a request.
-
If a known client receives the request then the member assigned for that client responds to the request.
-
If a new client receives the request then the least busy member of the cluster with highest priority responds to the request.
To create a new NLB cluster in Windows Server 2003:
-
Select Start Settings Control Panel to open the Control Panel window.
-
Double-click the Administrative Tools icon in the Control Panel window to open the Administrative Tools window.
-
Double-click the Network Load Balancing Manager icon in the Administrative Tools window to open the Network Load Balancing Manager console window.
-
Select Cluster New to open Cluster Parameter screen.
-
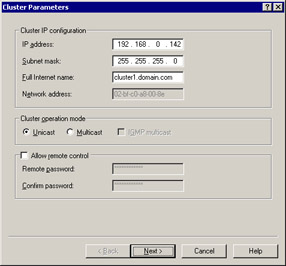
Enter an IP address in the IP address field, a subnet mask in the Subnet mask field, and a name for the new cluster in the Internet name field, as shown in Figure 14-15-23:
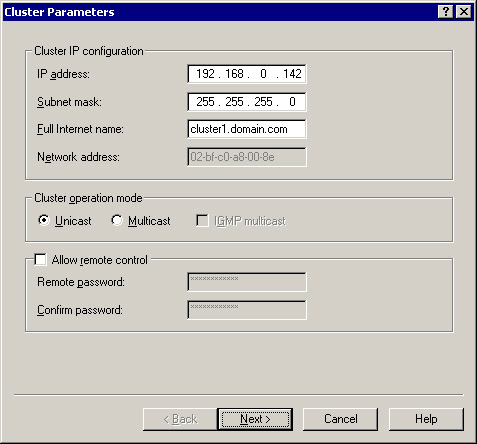
Figure 14-15-23: The Cluster Parameters ScreenYou can also select the mode of cluster operation as Unicast or Multicast. You can select Multicast option if you want to send a message simultaneously to more than one destination on a network.
-
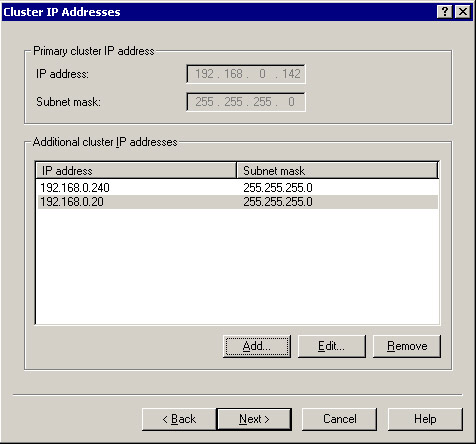
Click Next to open the Cluster IP Address screen, as shown in Figure 14-15-24:
-
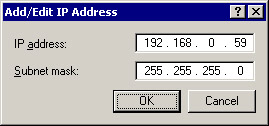
Click the Add button to open the Add/Edit IP Address dialog box as shown in Figure 14-15-25:
-
Click OK to add the IP address and return back to Cluster IP Address screen.
-
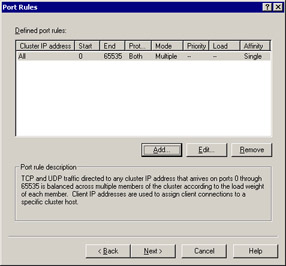
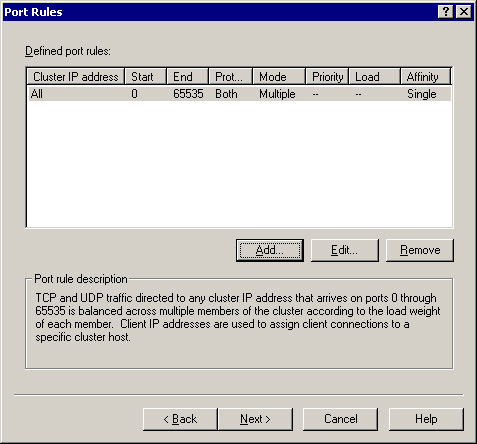
Click Next to open the Port Rules screen as shown in Figure 14-15-26:
-
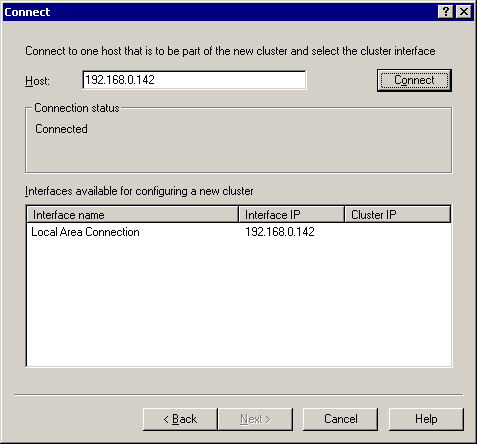
Click Next to open the Connect Screen.
-
Enter the host name or IP address in the Host field of the screen.
-
Click the Connect button to connect to the host.
Figure 14-15-27 shows the Connect screen:
-
Select the interface from the Interface available for configuring a new cluster.
-
Click Next to open the Host Parameters screen.
-
Click Finish and wait as NLB is configured.
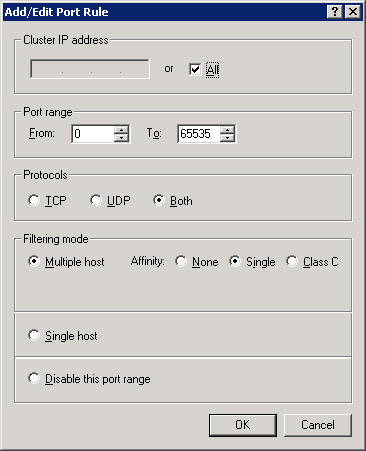
You can configure the NLB port rules to decide which TCP and UDP ports can be used in NLB to respond. Configuring NLB port rules enable cluster members to run a clustered and a non-clustered application. You can edit port settings to configure the port rules. To edit the port settings:
-
Select Start ->Programs -> Administrative Tools -> Network Load Balancing Manager to open the Network Load Balancing Manager console window.
-
Right-click the Cluster 1 icon in the Network Load Balancing Manager console window, to open a shortcut menu.
-
Select Properties option from the shortcut menu to open the Properties dialog box.
-
Select the Port Rules tab.
-
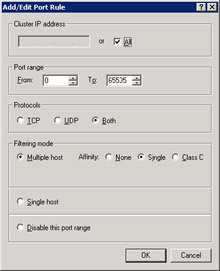
Click the Add or Edit button to open the Add/Edit Port Rule dialog box as shown in Figure 14-15-28:
-
Select the port range property and click OK to change the settings.
The properties of port range are:
-
Affinity Settings: Controls the NLB load balancing of the incoming request to a port range. The options of this setting are:
-
None: All incoming requests are load balanced on the cluster.
-
Single: Requests from new IP address is load balanced on the cluster.
-
Class C: Each IP address in Class C range is load balanced by a single cluster member.
-
-
Port Range: Specifies the starting and the ending port numbers.
-
Protocols: Specifies the IP protocol to which the port range applies. The IP protocol can be TCP, UDP, or both.
When you have created NLB cluster, you need to maintain and control the NLB clusters. NLB Manager enables you to configure and control the NLB clusters. You can make a member of cluster offline for the maintenance of the cluster member using NLB Manager. The NLB cluster provides a single point of configuration and management of NLB clusters. The NLB Manager helps in:
-
Removing or adding hosts from or to NLB clusters.
-
Loading the information of cluster host from a file and then saving this information to a file.
-
Configuring NLB to load balance multiple applications on the same NLB cluster.
-
Creating a new NLB cluster and propagating the cluster parameters and port rules to all the hosts in the cluster.
-
Diagnosing clusters, which are not configured.

