Overview
This chapter introduces the Cisco AnyConnect WebVPN Client. The AnyConnect client is the Cisco WebVPN tunnel mode client, which provides network layer protection of traffic between users and the ASAs using a tunnel mode (network layer) connection. This connection is protected using SSL. The topics covered in this chapter include
-
Overview of the AnyConnect client
-
Preparing the ASA for AnyConnect client connections and installing the client
-
Managing and troubleshooting AnyConnect client sessions
| Note | Cisco Secure Desktop (CSD), a feature that complements WebVPN sessions, will be covered in Chapter 27. |
AnyConnect Client Overview
![]() The Cisco AnyConnect client is an SSL client that protects traffic at the network layer and above. In this sense, it can protect the same kind of traffic that the Cisco Easy VPN IPSec remote software client can protect. Unlike the Easy VPN client, the AnyConnect client uses SSL for protection of traffic. It can use both TCP and UDP as a transport for protecting user traffic. Most people assume that SSL is TCP-based; however, a new RFC now allows UDP as a transport. (This topic is further discussed in the “DTLS as a Transport” section later in the chapter.) DTLS is commonly used to protect delay-sensitive traffic like voice and video.
The Cisco AnyConnect client is an SSL client that protects traffic at the network layer and above. In this sense, it can protect the same kind of traffic that the Cisco Easy VPN IPSec remote software client can protect. Unlike the Easy VPN client, the AnyConnect client uses SSL for protection of traffic. It can use both TCP and UDP as a transport for protecting user traffic. Most people assume that SSL is TCP-based; however, a new RFC now allows UDP as a transport. (This topic is further discussed in the “DTLS as a Transport” section later in the chapter.) DTLS is commonly used to protect delay-sensitive traffic like voice and video.
 WebVPN Network Clients
![]() WebVPN has two network software clients, which are shown in Table 20-1. Cisco commonly refers to network layer protection as tunnel mode protection when referring to these two clients; this is similar to the tunnel mode process used by IPSec remote access clients. The SVC client was the Cisco original network-layer WebVPN client; it has been supplanted by the AnyConnect client. This book focuses only on the use of the AnyConnect client; however, the preparation performed on the ASA for either client is basically the same. The AnyConnect client requires that Java or ActiveX be preinstalled on the user’s desktop.
WebVPN has two network software clients, which are shown in Table 20-1. Cisco commonly refers to network layer protection as tunnel mode protection when referring to these two clients; this is similar to the tunnel mode process used by IPSec remote access clients. The SVC client was the Cisco original network-layer WebVPN client; it has been supplanted by the AnyConnect client. This book focuses only on the use of the AnyConnect client; however, the preparation performed on the ASA for either client is basically the same. The AnyConnect client requires that Java or ActiveX be preinstalled on the user’s desktop.
|
|
|
|
|---|---|---|
|
|
|
|
|
|
|
|
| Note |
|
 AnyConnect Client Implementation
![]() The two operating modes for the AnyConnect client are
The two operating modes for the AnyConnect client are
-
 Web launch mode
 -
 Stand-alone mode
In web launch mode, the user employs a web browser and logs into the WebVPN server via clientless mode. Currently the two WebVPN server products that support the AnyConnect client are the ASAs and certain IOS-based routers. The group policy for the user must allow the use of the AnyConnect client. Assuming the correct policy has been defined, the user would click the AnyConnect tab on the left side of the screen and then click the Start AnyConnect button. The AnyConnect client is then downloaded and installed on the user’s desktop. Once installed, the client automatically opens a tunnel to the WebVPN server, and an icon appears in the taskbar indicating that the tunnel is up. At the end of the session, the user has the option of keeping the client installed or having it uninstalled. Optionally instead of the users manually starting the tunnel from the WebVPN clientless session, you can automate the download for the users once they log in via clientless mode.
In stand-alone mode, the user doesn’t have to log in via clientless mode to initiate the SSL tunnel; instead users start up the client manually from their desktop and provide their authentication credentials. In this mode, you can either send the users the AnyConnect software to manually install, or they can log in via clientless mode to perform the initial installation.
| Tip | One handy feature of the AnyConnect client is that each time it connects, if there is a newer version of the client, the user is notified and has the option of downloading and installing the update from the WebVPN server. |
AnyConnect Client Connections
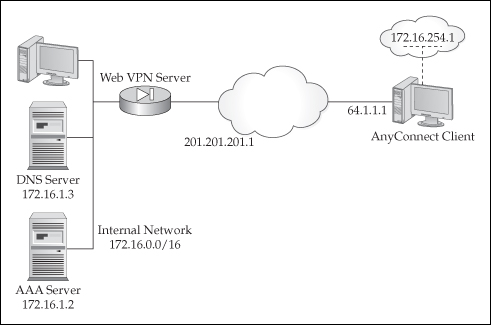
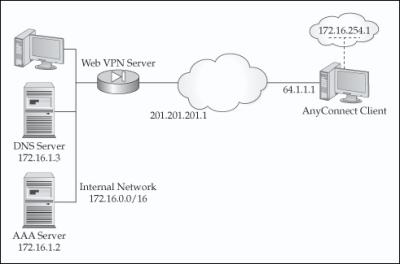
Once connected, the AnyConnect client uses a transport process similar to what Easy VPN uses with IPSec. If you recall from Chapter 17, Easy VPN uses ESP in tunnel mode, encapsulating an IP packet in the ESP payload—basically tunneling IP within IP. The AnyConnect client uses a similar process, as shown in Figure 20-1. The WebVPN server must assign an internal address to the AnyConnect client. The server can obtain this address from a local pool of addresses, from a DHCP server, or from an AAA server; DHCP is the most common implementation. Whenever the AnyConnect client needs to send traffic to the corporate office, an IP packet is created with the internal address as the source and a destination address of the resource at the corporate office. This packet is then protected and either encapsulated in TCP (SSL) or UDP (DTLS). An outer IP header is then added, with a source IP address of what is assigned to the user’s NIC and a destination IP address of the WebVPN server.
| Note |
|
AnyConnect Client Preparation and Installation
![]() The AnyConnect client is supported on the following user desktops: Microsoft Vista, XP, and 2000; Mac for Intel and PowerPC; and Linux. There are two client installation options: manual, where users must manually install the client on their desktop, and automatic, where the client is automatically downloaded and installed when users connect using clientless mode. With either method, users require administrative privileges to install the client.
The AnyConnect client is supported on the following user desktops: Microsoft Vista, XP, and 2000; Mac for Intel and PowerPC; and Linux. There are two client installation options: manual, where users must manually install the client on their desktop, and automatic, where the client is automatically downloaded and installed when users connect using clientless mode. With either method, users require administrative privileges to install the client.
| Note |
|
![]() With the manual mode, you’ll need to download the AnyConnect installation package from the Cisco site by using an authorized CCO (Cisco Connection Online) account. The software can be found under the same section as the ASA operating system files. The Windows downloaded package uses the Microsoft MSI package installer (.msi extension). Just have the user install it from an administrator account. Unlike with the Easy VPN Remote software, users don’t have to reboot their PC once the installation is complete.
With the manual mode, you’ll need to download the AnyConnect installation package from the Cisco site by using an authorized CCO (Cisco Connection Online) account. The software can be found under the same section as the ASA operating system files. The Windows downloaded package uses the Microsoft MSI package installer (.msi extension). Just have the user install it from an administrator account. Unlike with the Easy VPN Remote software, users don’t have to reboot their PC once the installation is complete.
![]() If you want the user to log into the ASA and download the software via clientless mode, you’ll need to download from the Cisco site a different software package, which ends in a .pkg extension. This software will need to be placed in flash on the ASA, and you’ll need to tell the ASA which PKG files can be used by your users. The users will then connect to the ASA via clientless mode, and the software will be downloaded and installed (which again requires administrative privileges on the user desktop).
If you want the user to log into the ASA and download the software via clientless mode, you’ll need to download from the Cisco site a different software package, which ends in a .pkg extension. This software will need to be placed in flash on the ASA, and you’ll need to tell the ASA which PKG files can be used by your users. The users will then connect to the ASA via clientless mode, and the software will be downloaded and installed (which again requires administrative privileges on the user desktop).
| Tip |
|
 ASA Preparation for the AnyConnect Client
![]() To prepare for the use of the AnyConnect client, you must initially perform the following three steps on the ASA:
To prepare for the use of the AnyConnect client, you must initially perform the following three steps on the ASA:
-
 Copy the PKG file or files to flash on the ASA.
 -
 Specify which AnyConnect client(s) can be used on the ASA.
 -
 Enable the use of the AnyConnect client(s).
![]() Once you have completed these steps, you can then define AnyConnect policies for your users. The following sections will cover these three steps.
Once you have completed these steps, you can then define AnyConnect policies for your users. The following sections will cover these three steps.
Copying the PKG File to Flash
![]() If you’ll be using the automatic approach to install the AnyConnect client on the user’s desktop, you’ll first need to copy the PKG file you downloaded from Cisco to flash on the ASA. Here’s the syntax you’ll use to copy the file to flash:
If you’ll be using the automatic approach to install the AnyConnect client on the user’s desktop, you’ll first need to copy the PKG file you downloaded from Cisco to flash on the ASA. Here’s the syntax you’ll use to copy the file to flash:
ciscoasa# copy {tftp | ftp | scp}://IP_address/client_image.pkg
             {disk0: | disk1:}
![]() Please note that there are different installation packages for the different operating systems. Windows has two versions: one, referred to as “gina,” allows the AnyConnect client to start before the Windows Login process starts; the other, referred to as “win,” is used for users that will log into Windows first and then bring up the AnyConnect client. Cisco does have a ZIP file that contains all the AnyConnect clients in one file. Here’s an example of a Windows PKG filename: “anyconnect-win-2.2.0140-k9.pkg.”
Please note that there are different installation packages for the different operating systems. Windows has two versions: one, referred to as “gina,” allows the AnyConnect client to start before the Windows Login process starts; the other, referred to as “win,” is used for users that will log into Windows first and then bring up the AnyConnect client. Cisco does have a ZIP file that contains all the AnyConnect clients in one file. Here’s an example of a Windows PKG filename: “anyconnect-win-2.2.0140-k9.pkg.”
![]() Here is an example of copying an AnyConnect client image to flash on the ASA:
Here is an example of copying an AnyConnect client image to flash on the ASA:
ciscoasa# copy ftp://192.168.1.66/anyconnect-win-2.2.0128-k9.pkg disk0:
Address or name of remote host [192.168.1.66]?
Source filename [anyconnect-win-2.2.0128-k9.pkg]?
Destination filename [anyconnect-win-2.2.0128-k9.pkg]?
Accessing ftp://192.168.1.66/anyconnect-win-2.2.0128-k9.pkg...!!!!!!
<--output omitted-->
Writing file disk0:/anyconnect-win-2.2.0128-k9.pkg...
!!!!!!!!!!!!!!!!!!!!!!!!!!!!!!!
<--output omitted-->
2150443 bytes copied in 2.270 secs (1075221 bytes/sec)
Specifying the Use of AnyConnect Clients
![]() Once you have copied the PKG files to flash, they are not used by default. Instead, they must be “installed,” or unpackaged, in flash of the ASA by using the svc image command in WebVPN subcommand mode:
Once you have copied the PKG files to flash, they are not used by default. Instead, they must be “installed,” or unpackaged, in flash of the ASA by using the svc image command in WebVPN subcommand mode:
ciscoasa(config)# webvpn
ciscoasa(config-webvpn)# svc image disk0:image_name [order]
![]() The image_name parameter is the name of the PKG file you downloaded from an external server. You can specify more than one image name, since you might have to support multiple operating systems or multiple AnyConnect client versions. If you don’t specify the order parameter, they are added sequentially.
The image_name parameter is the name of the PKG file you downloaded from an external server. You can specify more than one image name, since you might have to support multiple operating systems or multiple AnyConnect client versions. If you don’t specify the order parameter, they are added sequentially.
| Tip |
|
![]() Here’s an example of specifying a PKG file to use:
Here’s an example of specifying a PKG file to use:
ciscoasa(config)# webvpn
ciscoasa(config-webvpn)# svc image disk0:anyconnect-win-2.2.0128-k9.pkg
![]() This command is also used to install updated images on users’ PCs—just make sure the newer client image has a lower order number than the original image.
This command is also used to install updated images on users’ PCs—just make sure the newer client image has a lower order number than the original image.
![]() When you install an image, the contents can be viewed with the dir cache:stc command; for each order number you create, you’ll see a subdirectory under the main cache directory. Here’s an example of entry number 1:
When you install an image, the contents can be viewed with the dir cache:stc command; for each order number you create, you’ll see a subdirectory under the main cache directory. Here’s an example of entry number 1:
ciscoasa(config-webvpn)# dir cache:stc/1/
Directory of cache:stc/1/
0     ----   0               07:34:01 May 19 2008  Windows
0     ----   408             07:34:01 May 19 2008  VPNManifest.xml
0     ----   8419     07:34:01 May 19 2008  tips.htm
0     ----   3784     07:34:01 May 19 2008  strings.js
<--output omitted-->
2181120 bytes total (2144993280 bytes free)
Enabling AnyConnect
Once you have installed the appropriate AnyConnect images in flash, they aren’t used unless you globally enable WebVPN tunnel mode in the WebVPN subcommand mode with the svc enable command:
ciscoasa(config)# webvpn
ciscoasa(config-webvpn)# svc enable
Use the show webvpn svc command to verify your configuration:
ciscoasa# show webvpn svc
1. disk0:/anyconnect-win-2.2.0128-k9.pkg 1 dyn-regex=/Windows NT/
 CISCO STC win2k+
 2,2,0128
 Fri 03/28/2008 15:48:45.81
1 SSL VPN Client(s) installed
In this example, a Windows PKG file has been installed as entry 1.
AnyConnect Policies
Many of the group policy configurations of Easy VPN discussed in Chapter 17 apply here, like assigning an internal address, split tunneling and split DNS, DNS server names, and other group policies. This chapter will only focus on the AnyConnect-specific group policy attributes defined on the ASA itself (not on an AAA server); for information on the other group policies, like split tunneling and split DNS, refer back to Chapter 17.
AnyConnect Client Usage
First, you must also allow the usage of the SVC or AnyConnect client in the group policy with the vpn-tunnel-protocol command:
ciscoasa(config)# group-policy group_policy_name internal
ciscoasa(config)# group-policy group_policy_name attributes
ciscoasa(config-group-webvpn)# vpn-tunnel-protocol {[svc] [webvpn]
                                 [ipsec] [l2tp-ipsec]}
The first command specifies that the group policy is defined on the ASA itself. The vpn-tunnel-protocol command is configured as an attribute of the group policy; use the svc parameter to allow users associated with the policy to use either of the two tunnel-mode clients.
Client Installation Policies
The svc ask command, if enabled, prompts users to download the AnyConnect client when they log into the ASA using clientless mode:
ciscoasa(config)# group-policy group_policy_name attributes
ciscoasa(config-group-policy)# webvpn
ciscoasa(config-group-webvpn)# svc ask {none | enable
                                 [default {webvpn | svc}
                                 timeout seconds]}
The default for this command is svc ask none default webvpn, where the ASA immediately displays the home/portal page for WebVPN clientless connections. The default keyword specifies what should happen if the user doesn’t choose within the specified period—download the AnyConnect or SVC client (svc), or display the home/portal page (webvpn). The timeout parameter specifies the number of seconds the user has to accept the download; if not accepted, the user is taken to the home/portal page.
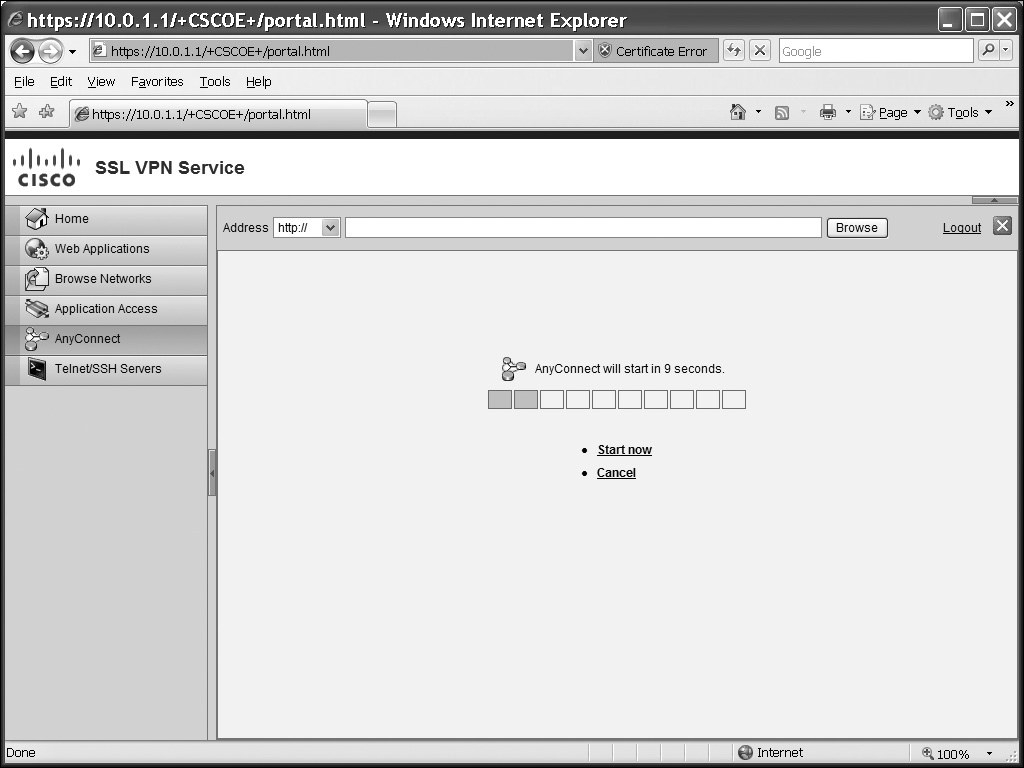
Figure 20-2 shows an example where the following configuration was used for the group policy:
ciscoasa(config)# group-policy anyconnect_policy
                       attributes
ciscoasa(config-group-policy)# webvpn
ciscoasa(config-group-webvpn)# svc ask enable default svc timeout 10
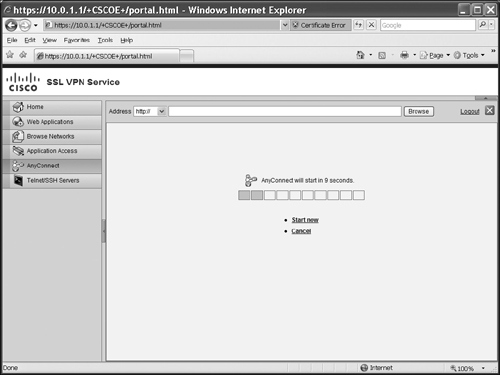
![]() In this example, the default is the AnyConnect client (svc), where you can see the user has 9 more seconds (see Figure 20-2) to choose before the AnyConnect client is automatically downloaded.
In this example, the default is the AnyConnect client (svc), where you can see the user has 9 more seconds (see Figure 20-2) to choose before the AnyConnect client is automatically downloaded.
Temporary or Permanent Client Installation
![]() By default when the user logs in and downloads the AnyConnect client, the client is not permanently installed on the user’s PC—once the user terminates the session, the client is automatically uninstalled. If you want to permanently install the client, use the svc keep-installer installed group policy command:
By default when the user logs in and downloads the AnyConnect client, the client is not permanently installed on the user’s PC—once the user terminates the session, the client is automatically uninstalled. If you want to permanently install the client, use the svc keep-installer installed group policy command:
ciscoasa(config)# group-policy group_policy_name attributes
ciscoasa(config-group-policy)# webvpn
ciscoasa(config-group-webvpn)# svc keep-installer {installed | none}
AnyConnect Modules
![]() AnyConnect modules are add-on features that add functionality to the AnyConnect client. Valid module names can be found from the AnyConnect release notes. For example, vpngina is a module name that enables the “start before login” feature—the AnyConnect starts up first; then the Windows logon screen is displayed. To use this module, the user must enable this feature in the local profile (profiles are discussed later in the “Client Profiles” section) as well as the module being downloaded from the ASA. Here is the group policy command to specify the module names that are allowed to be used:
AnyConnect modules are add-on features that add functionality to the AnyConnect client. Valid module names can be found from the AnyConnect release notes. For example, vpngina is a module name that enables the “start before login” feature—the AnyConnect starts up first; then the Windows logon screen is displayed. To use this module, the user must enable this feature in the local profile (profiles are discussed later in the “Client Profiles” section) as well as the module being downloaded from the ASA. Here is the group policy command to specify the module names that are allowed to be used:
ciscoasa(config)# group-policy group_policy_name attributes
ciscoasa(config-group-policy)# webvpn
ciscoasa(config-group-webvpn)# svc modules value list_of_module_names
MTU Size Adjustment
![]() The AnyConnect client (not the older SVC client) has the ability to adjust the MTU (Maximum Transmission Unit) size for the overhead of the tunneling process. This is done within the group policy configuration:
The AnyConnect client (not the older SVC client) has the ability to adjust the MTU (Maximum Transmission Unit) size for the overhead of the tunneling process. This is done within the group policy configuration:
ciscoasa(config)# group-policy group_policy_name attributes
ciscoasa(config-group-policy)# webvpn
ciscoasa(config-group-webvpn)# svc mtu #_of_bytes
![]() The default group policy configuration is no svc mtu, where the MTU size is adjusted automatically, based on the MTU of the interface that the connection uses, minus the IP, TCP, or UDP/DTLS overhead. The preceding configuration allows you to hard-code the MTU size to use no matter what tunneling method is used.
The default group policy configuration is no svc mtu, where the MTU size is adjusted automatically, based on the MTU of the interface that the connection uses, minus the IP, TCP, or UDP/DTLS overhead. The preceding configuration allows you to hard-code the MTU size to use no matter what tunneling method is used.
Rekeying Tunnel Sessions
![]() To allow a remote client to perform a rekeying upon the expiration (timeout) of the tunnel-mode SSL VPN connection, use the svc rekey command:
To allow a remote client to perform a rekeying upon the expiration (timeout) of the tunnel-mode SSL VPN connection, use the svc rekey command:
ciscoasa(config)# group-policy group_policy_name attributes
ciscoasa(config-group-policy)# webvpn
ciscoasa(config-group-webvpn)# svc rekey method {ssl |
                                 new-tunnel | none}
ciscoasa(config-group-webvpn)# svc rekey time minutes
![]() The method parameter specifies when rekeying of encryption/HMAC keys is done. The none parameter disables rekeying; the ssl parameter specifies that SSL renegotiation takes place during the rekeying; and the new-tunnel parameter specifies that the client must establish a new tunnel when rekeying is needed. The svc rekey time command specifies the number of minutes from the start of the session until when rekeying is needed (4 to 10,080 minutes).
The method parameter specifies when rekeying of encryption/HMAC keys is done. The none parameter disables rekeying; the ssl parameter specifies that SSL renegotiation takes place during the rekeying; and the new-tunnel parameter specifies that the client must establish a new tunnel when rekeying is needed. The svc rekey time command specifies the number of minutes from the start of the session until when rekeying is needed (4 to 10,080 minutes).
DTLS as a Transport
![]() DTLS was developed to deal with the latency involved in running real-time, voice, and multimedia applications across SSL VPN tunnels. Using TCP creates performance problems with these kinds of applications: voice, video, and multimedia. DTLS uses UDP instead. This process is defined in RFC 4347. When DTLS is enabled, two tunnels are used between the client and the server: one uses SSL with TCP port 443, and the other uses DTLS with UDP with port 443.
DTLS was developed to deal with the latency involved in running real-time, voice, and multimedia applications across SSL VPN tunnels. Using TCP creates performance problems with these kinds of applications: voice, video, and multimedia. DTLS uses UDP instead. This process is defined in RFC 4347. When DTLS is enabled, two tunnels are used between the client and the server: one uses SSL with TCP port 443, and the other uses DTLS with UDP with port 443.
DTLS Configuration
![]() When WebVPN is enabled, DTLS is automatically enabled; however, DTLS can be disabled globally or on a per-group policy basis using the following two configurations:
When WebVPN is enabled, DTLS is automatically enabled; however, DTLS can be disabled globally or on a per-group policy basis using the following two configurations:
ciscoasa(config)# webvpn
ciscoasa(config-webvpn)# enable logical_if_name tls-only
ciscoasa(config)# group-policy group_policy_name attributes
ciscoasa(config-group-policy)# webvpn
ciscoasa(config-group-webvpn)# svc dtls {none | enable}
![]() When DTLS is being used, it uses UDP with a destination port of 443. To change the port number for DTLS, use this command in the WebVPN subcommand mode:
When DTLS is being used, it uses UDP with a destination port of 443. To change the port number for DTLS, use this command in the WebVPN subcommand mode:
ciscoasa(config)# webvpn
ciscoasa(config-webvpn)# dtls port port_#
Dead Peer Detection
![]() Because DTLS uses UDP, intermediate firewalls or address translation devices can create problems by timing out idle DTLS connections before they are done. Dead Peer Detection (DPD) can be used to send keepalives across the DTLS connection to ensure this doesn’t happen. The DPD interval should be set two times higher than the firewall’s idle threshold. The keepalive interval should be set to something less than the firewall’s idle timer. For example, if the firewall has an idle timer of 30 seconds, the DPD interval should be set to 60 seconds, and the keepalive interval to 20 or 25 seconds.
Because DTLS uses UDP, intermediate firewalls or address translation devices can create problems by timing out idle DTLS connections before they are done. Dead Peer Detection (DPD) can be used to send keepalives across the DTLS connection to ensure this doesn’t happen. The DPD interval should be set two times higher than the firewall’s idle threshold. The keepalive interval should be set to something less than the firewall’s idle timer. For example, if the firewall has an idle timer of 30 seconds, the DPD interval should be set to 60 seconds, and the keepalive interval to 20 or 25 seconds.
![]() This configuration is performed within the group policy:
This configuration is performed within the group policy:
ciscoasa(config)# group-policy group_policy_name attributes
ciscoasa(config-group-policy)# webvpn
ciscoasa(config-group-webvpn)# svc dpd-interval client seconds
ciscoasa(config-group-webvpn)# svc keepalive seconds
 WebVPN Tunnel Groups
![]() You must create a WebVPN tunnel group for the tunnel or clientless mode connections. The function of the tunnel group is to associate the group policy and other parameters that will be applied to a particular group of remote access people. The general attributes of the tunnel group are the same as those discussed in Chapters 17 and 19. WebVPN attributes were introduced in Chapter 19. In this chapter, I’ll only focus on the tunnel group properties specific to AnyConnect client users.
You must create a WebVPN tunnel group for the tunnel or clientless mode connections. The function of the tunnel group is to associate the group policy and other parameters that will be applied to a particular group of remote access people. The general attributes of the tunnel group are the same as those discussed in Chapters 17 and 19. WebVPN attributes were introduced in Chapter 19. In this chapter, I’ll only focus on the tunnel group properties specific to AnyConnect client users.
Tunnel Group Properties
![]() To create your tunnel group for WebVPN users (clientless, thin client, and tunnel mode client) use the following command:
To create your tunnel group for WebVPN users (clientless, thin client, and tunnel mode client) use the following command:
ciscoasa(config)# tunnel-group tunnel_group_name type remote-access
![]() Give the tunnel group a descriptive name.
Give the tunnel group a descriptive name.
![]() Once you’ve created the tunnel group, you can then associate attributes or properties to it. General properties for remote access were discussed in Chapter 17:
Once you’ve created the tunnel group, you can then associate attributes or properties to it. General properties for remote access were discussed in Chapter 17:
ciscoasa(config)# tunnel-group tunnel_group_name general-attributes
ciscoasa(config-tunnel-general)# authentication-server-group
                                 [(logical_if_name)] server_tag
                                 [LOCAL]
ciscoasa(config-tunnel-general)# authorization-server-group
                                 [(logical_if_name)] server_tag
ciscoasa(config-tunnel-general)# default-group-policy policy_name
ciscoasa(config-tunnel-general)# accounting-server-group server_tag
![]() The authentication-server-group command specifies where to find the user credentials to authenticate the AnyConnect users: these can be on an AAA server or defined locally. The authorization-server-group command specifies the AAA server the group policies are located on; if the policies are defined on the ASA itself, then specify the name of the policy with the default-group-policy command. And if you’re using AAA and want a record of who connects and how long they’re connected, you can specify an AAA server to send accounting records with the accounting-server-group command.
The authentication-server-group command specifies where to find the user credentials to authenticate the AnyConnect users: these can be on an AAA server or defined locally. The authorization-server-group command specifies the AAA server the group policies are located on; if the policies are defined on the ASA itself, then specify the name of the policy with the default-group-policy command. And if you’re using AAA and want a record of who connects and how long they’re connected, you can specify an AAA server to send accounting records with the accounting-server-group command.
![]() Instead of authenticating users based on user accounts, you could authenticate them by using digital certificates obtained from an SSL certificate authority (CA) by configuring the following WebVPN tunnel group attribute:
Instead of authenticating users based on user accounts, you could authenticate them by using digital certificates obtained from an SSL certificate authority (CA) by configuring the following WebVPN tunnel group attribute:
ciscoasa(config)# tunnel-group tunnel_group_name webvpn-attributes
ciscoasa(config-tunnel-webvpn)# authentication {[aaa] [certificate]}
![]() If you want to authenticate users based only on certificates, then only specify the certificate parameter; if you want to authenticate users based only on usernames and passwords, then specify the aaa parameter; and if you want to use both, specify both parameters (the order of the parameters doesn’t matter).
If you want to authenticate users based only on certificates, then only specify the certificate parameter; if you want to authenticate users based only on usernames and passwords, then specify the aaa parameter; and if you want to use both, specify both parameters (the order of the parameters doesn’t matter).
| Note |
|
Internal Address Assignment
![]() When using the AnyConnect client, the ASA must assign an internal address to the user. Assigning addresses was discussed in Chapter 17 (what applies there also applies here). Internal addresses can be obtained from the following sources:
When using the AnyConnect client, the ASA must assign an internal address to the user. Assigning addresses was discussed in Chapter 17 (what applies there also applies here). Internal addresses can be obtained from the following sources:
-
 From an AAA server (per-user)
 -
 From a DHCP server
 -
 From a local address pool defined on the ASA
 -
 From attributes of a local user account defined on the ASA
![]() If you’ll be using a local pool of addresses, use the following configuration:
If you’ll be using a local pool of addresses, use the following configuration:
ciscoasa(config)# ip local pool pool_name
                       beginning_IP_addr-ending_IP_addr
                       [mask subnet_mask]
ciscoasa(config)# tunnel-group tunnel_group_name general-attributes
ciscoasa(config-tunnel-general)# address-pool addr_pool_name
![]() If you’ll be acquiring the internal address from a DHCP server, you’ll need to define the network number to send to the DHCP server in a group policy, and then define the DHCP server(s) in the general attributes of the tunnel group:
If you’ll be acquiring the internal address from a DHCP server, you’ll need to define the network number to send to the DHCP server in a group policy, and then define the DHCP server(s) in the general attributes of the tunnel group:
ciscoasa(config)# group-policy policy_name attributes
ciscoasa(config-group-policy)# dhcp-network-scope subnet_number
ciscoasa(config-group-policy)# exit
ciscoasa(config)# tunnel-group tunnel_group_name general-attributes
ciscoasa(config-tunnel-general)# dhcp-server IP_addr1 [...IP_addr10]
Tunnel Groups and User Association
![]() Authentication of users was discussed in the last chapter. If you will be supporting more than one group and are not using certificates to match the user to the name of the group, then you will need to create an alias for the tunnel group name and enable the listing function for WebVPN:
Authentication of users was discussed in the last chapter. If you will be supporting more than one group and are not using certificates to match the user to the name of the group, then you will need to create an alias for the tunnel group name and enable the listing function for WebVPN:
ciscoasa(config)# webvpn
ciscoasa(config-webvpn)# tunnel-group-list enable
ciscoasa(config-webvpn)# exit
ciscoasa(config)# tunnel-group tunnel_group_name webvpn-attributes
ciscoasa(config-tunnel-webvpn)# group-alias group_name_alias enable
![]() These commands were discussed in the last chapter.
These commands were discussed in the last chapter.
![]() Here’s an example:
Here’s an example:
ciscoasa(config)# webvpn
ciscoasa(config-webvpn)# tunnel-group-list enable
ciscoasa(config-webvpn)# exit
ciscoasa(config)# tunnel-group salesgroup webvpn-attributes
ciscoasa(config-tunnel-webvpn)# group-alias sales enable
| Tip |
|
 Client Profiles
![]() Client profiles are XML files that control the interface and configuration of the AnyConnect client on the user’s desktop, including items like who the WebVPN server is (its IP address), the start before login feature, and others. The profile is stored in a file on the user’s hard drive. The client type will determine where you’ll find the profile:
Client profiles are XML files that control the interface and configuration of the AnyConnect client on the user’s desktop, including items like who the WebVPN server is (its IP address), the start before login feature, and others. The profile is stored in a file on the user’s hard drive. The client type will determine where you’ll find the profile:
-
 Windows 2000 and XP C:\Documents and Settings\your_username\ Application Data\Cisco\Cisco AnyConnect VPN Client\Profile
 -
 Windows Vista C:\ProgramData\Cisco\Cisco AnyConnect VPN Client\Profile
 -
 Linux and Mac /opt/cisco/vpn/profile
![]() By default when the AnyConnect installation occurs on the user’s desktop, the profile is copied from flash on the ASA to one of the preceding directories. A default template XML file can be found in the preceding directories and it is called “AnyConnectProfile. tmpl.” You can use an XML editor to edit the file and then give it a descriptive name, like the name of the group that will use the configuration profile. This can then be used by users of a particular group. Place this file on an FTP, TFTP, or SCP server.
By default when the AnyConnect installation occurs on the user’s desktop, the profile is copied from flash on the ASA to one of the preceding directories. A default template XML file can be found in the preceding directories and it is called “AnyConnectProfile. tmpl.” You can use an XML editor to edit the file and then give it a descriptive name, like the name of the group that will use the configuration profile. This can then be used by users of a particular group. Place this file on an FTP, TFTP, or SCP server.
Installing the Profile on the ASA
![]() For a user to use the profile, you’ll need to first copy it to the ASA flash drive:
For a user to use the profile, you’ll need to first copy it to the ASA flash drive:
ciscoasa# copy URL_of_profile disk0:
![]() After you’ve copied the client profile to the ASA flash, you’ll need to load it into the ASA WebVPN cache with the svc profiles WebVPN subcommand mode:
After you’ve copied the client profile to the ASA flash, you’ll need to load it into the ASA WebVPN cache with the svc profiles WebVPN subcommand mode:
ciscoasa(config)# webvpn
ciscoasa(config-webvpn)# svc profiles profile_name
                            disk0:/profile_file_name.xml
![]() You can have different profiles for different groups of users, where each profile will need to be given a descriptive profile_name, like salesprofile or engineeringprofile. You can view the installed profiles with the dir cache:/stc/profiles command:
You can have different profiles for different groups of users, where each profile will need to be given a descriptive profile_name, like salesprofile or engineeringprofile. You can view the installed profiles with the dir cache:/stc/profiles command:
ciscoasa# dir cache:/stc/profiles
Directory of cache:/stc/profiles/
0      ----  6424        15:37:15 May 19 2008 profile_name.xml
2189312 bytes total (2144993280 bytes free)
Associating the Profile to a Group Policy
![]() Once you’ve loaded a profile into the ASA WebVPN cache, you need to associate it to a group policy in order to use it:
Once you’ve loaded a profile into the ASA WebVPN cache, you need to associate it to a group policy in order to use it:
ciscoasa(config)# group-policy group_policy_name attributes
ciscoasa(config-group-policy)# webvpn
ciscoasa(config-group-webvpn)# svc profiles value profile_name
After you have done this, the next time a user connects who is associated with this group policy, the client profile will automatically be downloaded to the user’s desktop and installed in the Profile subdirectory...the next time the user connects, she’ll use the newly installed profile.
| Tip | A quick way of testing this is to start up an AnyConnect client connection, log in, and then disconnect. Then bring up the AnyConnect client interface on the user’s desktop, and verify the profile settings in the AnyConnect client GUI. |
Managing and Troubleshooting AnyConnect Sessions
![]() Now that you understand how to configure the ASA to accept AnyConnect client connections, this last section in the chapter will cover how to download the client from the ASA to a user’s desktop, use the client on the user’s desktop, and how to manage client sessions from the ASA.
Now that you understand how to configure the ASA to accept AnyConnect client connections, this last section in the chapter will cover how to download the client from the ASA to a user’s desktop, use the client on the user’s desktop, and how to manage client sessions from the ASA.
 Connecting to a WebVPN Server
![]() The next two sections discuss how to install the AnyConnect client on a user’s desktop and how to use it once it is installed.
The next two sections discuss how to install the AnyConnect client on a user’s desktop and how to use it once it is installed.
Installing the AnyConnect Client
![]() The easiest way of installing the client is to have your users connect via WebVPN clientless mode and either have the user manually start the AnyConnect download from the home page or have this automatically done (if you’ve configured the svc ask command discussed previously in the “Client Installation Policies” section).
The easiest way of installing the client is to have your users connect via WebVPN clientless mode and either have the user manually start the AnyConnect download from the home page or have this automatically done (if you’ve configured the svc ask command discussed previously in the “Client Installation Policies” section).
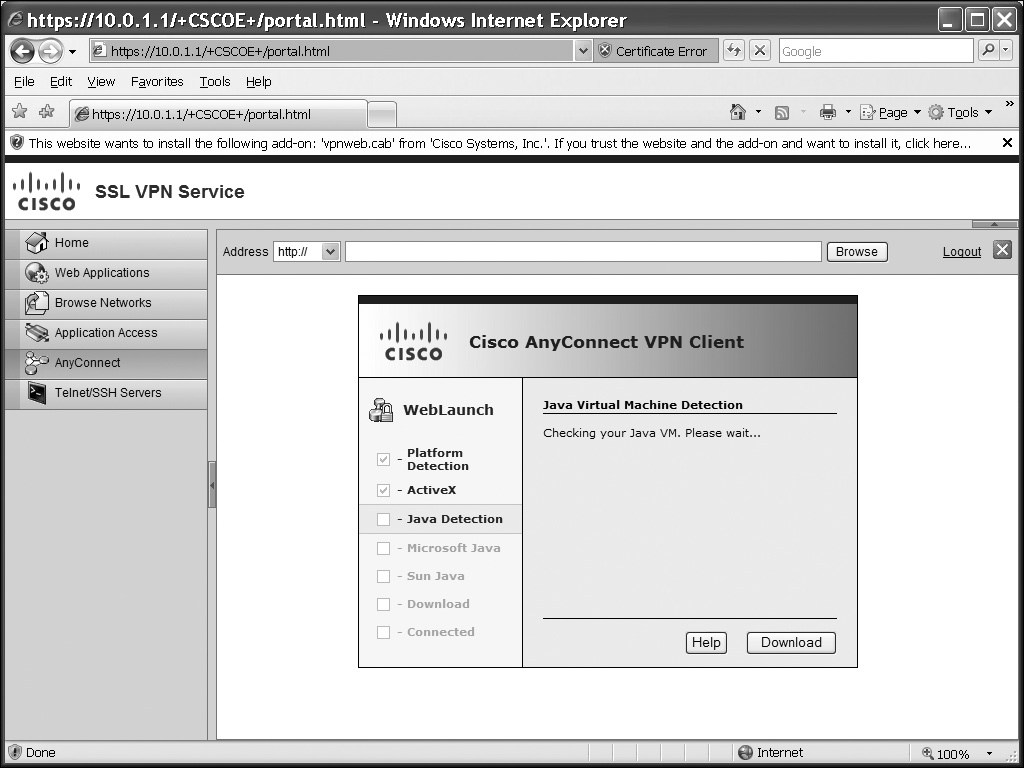
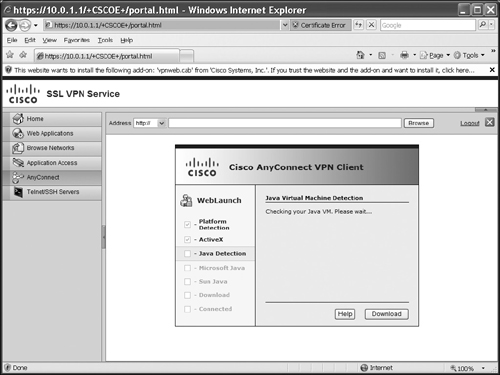
![]() If you’ll be using this method, first connect to the ASA using a web browser (HTTPS), enter your username and password, and select a group you belong to. Then click the Login button. In the following figures, I’ll be performing the install from a Windows XP desktop. The software first performs some validation steps, shown in Figure 20-3. The install can use either ActiveX or Java: if you’ll be using Java, you’ll need to accept the self-signed Java code. Once the software is installed, the AnyConnect client automatically connects to your ASA. If the connection is successful, in Windows you can look at your taskbar: you should see an icon with two globes and a closed yellow lock, indicating that the tunnel is up. At this point you can close the web browser clientless mode connection.
If you’ll be using this method, first connect to the ASA using a web browser (HTTPS), enter your username and password, and select a group you belong to. Then click the Login button. In the following figures, I’ll be performing the install from a Windows XP desktop. The software first performs some validation steps, shown in Figure 20-3. The install can use either ActiveX or Java: if you’ll be using Java, you’ll need to accept the self-signed Java code. Once the software is installed, the AnyConnect client automatically connects to your ASA. If the connection is successful, in Windows you can look at your taskbar: you should see an icon with two globes and a closed yellow lock, indicating that the tunnel is up. At this point you can close the web browser clientless mode connection.
| Tip |
|
Using the AnyConnect Client
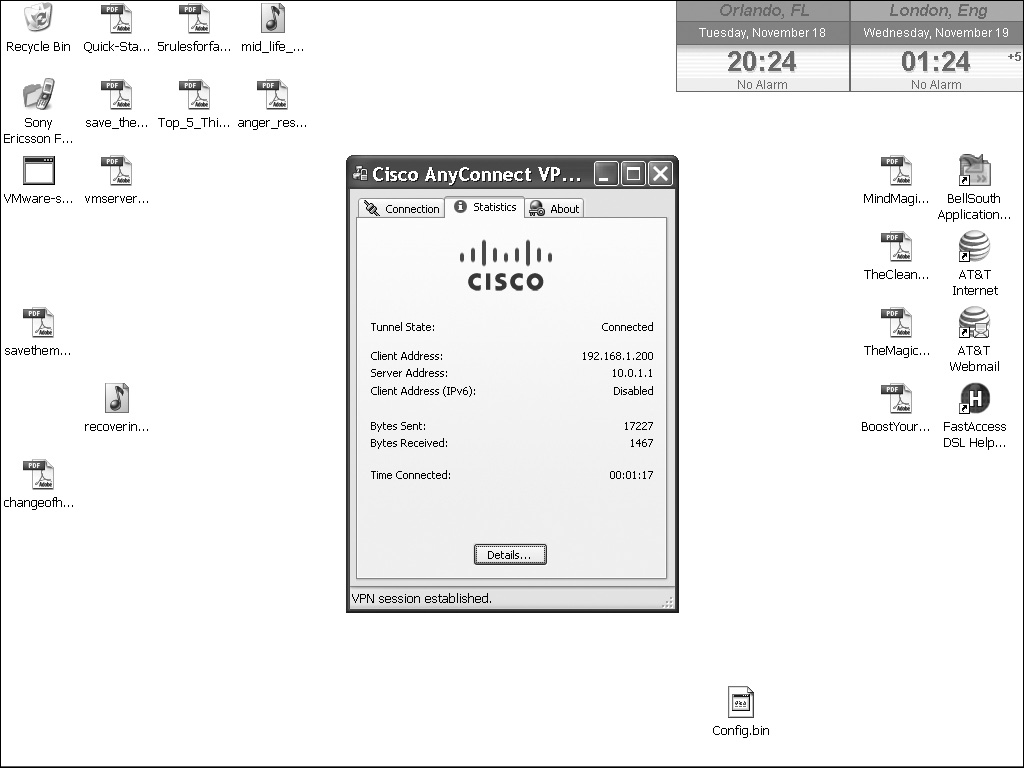
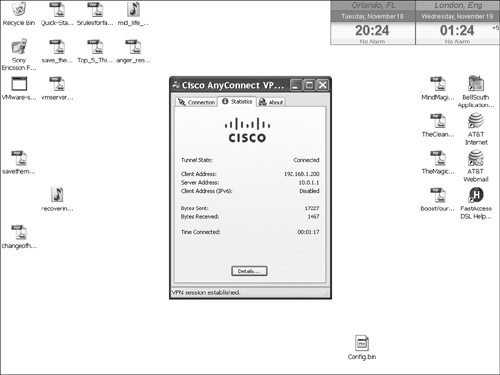
When a session has been established, you can pull up the connection statistics or disconnect the client by right-clicking the icon in the taskbar and choosing Open or Disconnect, respectively. The statistics window is shown in Figure 20-4. In this example, the internal address assigned to the client is 192.168.1.200, and the IP address assigned to the user’s NIC is 10.0.1.11. The number of bytes sent and received will increment as traffic is sent across or received from the tunnel.
![]() To disconnect an AnyConnect client session, perform either of the following:
To disconnect an AnyConnect client session, perform either of the following:
-
 Right-click on the AnyConnect icon in the taskbar and choose Disconnect.
 -
 In the Connection tab of the AnyConnect client GUI, click the Disconnect button.
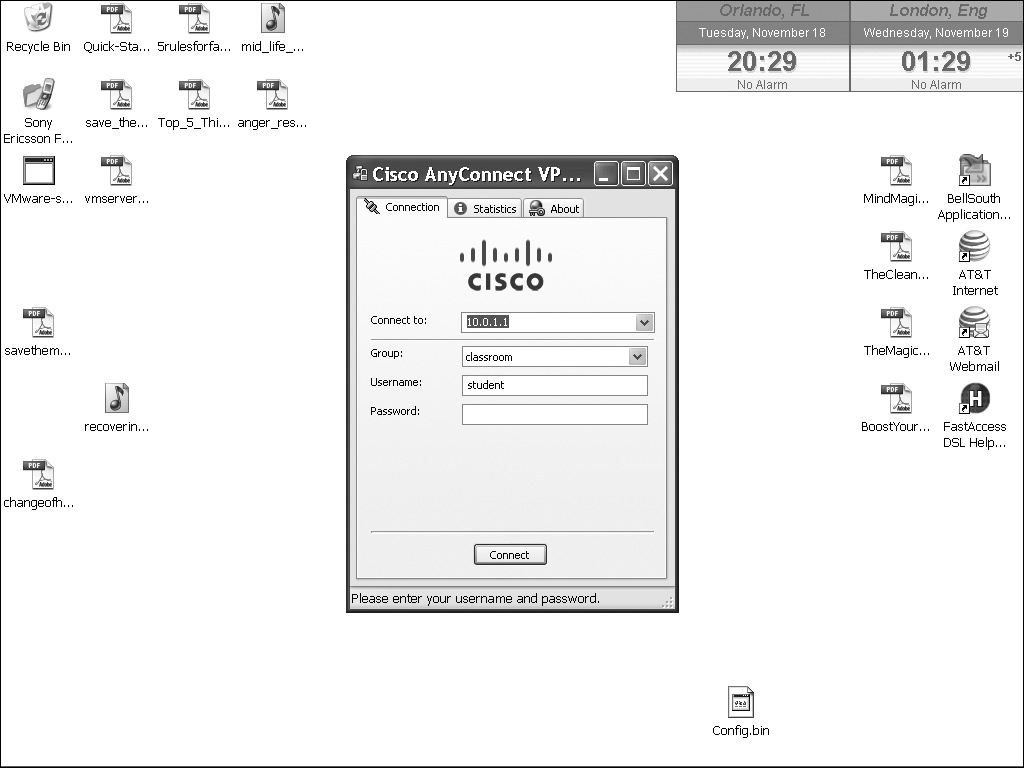
![]() If the client is installed on your computer, you can manually start it up, displaying the window shown in Figure 20-5. If more than one profile has been installed, you can select the profile in the drop-down Connect To selector—this allows the user to choose which ASA to connect to. Unlike in clientless mode where you have to access the Logon page to see the groups and enter your username and password, as soon as you choose a profile, this is done for you automatically. Select the Group name, enter your Username and Password, and click the Connect button. When done, you should see the AnyConnect icon in the taskbar with a closed yellow lock, indicating that you have successfully established a tunnel mode connection to the ASA.
If the client is installed on your computer, you can manually start it up, displaying the window shown in Figure 20-5. If more than one profile has been installed, you can select the profile in the drop-down Connect To selector—this allows the user to choose which ASA to connect to. Unlike in clientless mode where you have to access the Logon page to see the groups and enter your username and password, as soon as you choose a profile, this is done for you automatically. Select the Group name, enter your Username and Password, and click the Connect button. When done, you should see the AnyConnect icon in the taskbar with a closed yellow lock, indicating that you have successfully established a tunnel mode connection to the ASA.
| Tip |
|
Viewing and Managing Connected Users
On the ASA, you can use the show vpn-sessiondb svc command to view any connected AnyConnect client users using tunnel mode:
ciscoasa# show vpn-sessiondb svc
Session Type: SVC
Username     : student                Index        : 10
Assigned IP  : 192.168.1.200          Public IP    : 10.0.1.11
Protocol     : Clientless SSL-Tunnel DTLS-Tunnel
License      : SSL VPN
Encryption   : RC4 AES128             Hashing      : SHA1
Bytes Tx     : 1015195                Bytes Rx     : 189358
Group Policy : webvpn_group_policy    Tunnel Group : classroom
Login Time   : 00:51:04 UTC Tue Jul 1 2008
Duration     : 0h:07m:11s
NAC Result   : Unknown
VLAN Mapping : N/A                     VLAN        : none
In the preceding example, you can see the username that was authenticated (“student”), the assigned IP address (“192.168.1.200”), and the group policy and tunnel group associated with the user.
To disconnect all SVC users, use the vpn-sessiondb logoff svc command:
ciscoasa# vpn-sessiondb logoff svc
Optionally you can disconnect particular users by their username or index number (see the output from the show vpn-sessiondb svc command):
ciscoasa# vpn-sessiondb logoff name username
ciscoasa# vpn-sessiondb logoff index index_#
![]() For detailed troubleshooting of AnyConnect client sessions, use the following debug command:
For detailed troubleshooting of AnyConnect client sessions, use the following debug command:
 ciscoasa# debug webvpn svc [1-255]
![]() This command displays debug messages about connections to SSL VPN clients over WebVPN. Optionally you can qualify the level of debugging (the default is 1, which means the output is sparse).
This command displays debug messages about connections to SSL VPN clients over WebVPN. Optionally you can qualify the level of debugging (the default is 1, which means the output is sparse).

