WebVPN Clientless Home Portal
The next few sections will provide a brief overview of using the WebVPN clientless interface: what the users see when they log in, how to navigate the home portal, and the floating toolbar.
Login Screen
To access the WebVPN interface, the user must connect to the address of the interface on the ASA that WebVPN is enabled on, using HTTPS. By default the port number is 443, unless you’ve changed this in the global WebVPN configuration, discussed previously in the “Enabling WebVPN” section. Here’s the syntax the users need to use in their web browser address text box:
https://ASA_IP_address[:port_number] For example, if the ASA IP address for WebVPN is 192.1.1.1, then the user would enter https://192.1.1.1 in her web browser address text box.
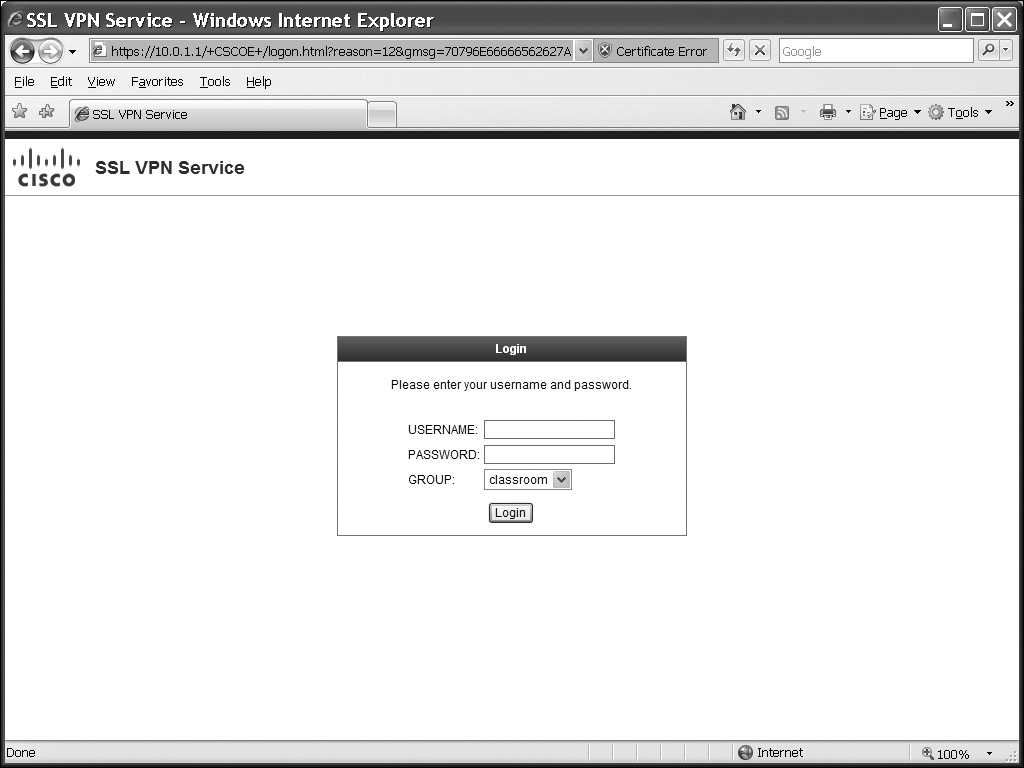
When you connect, you are taken to the login screen, shown in Figure 19-1. You won’t see the group drop-down selector unless you set up an alias for at least one tunnel group and enabled the drop-down selector in the global WebVPN configuration; this was discussed previously in the “Tunnel Group Lists” section.
Home Portal Overview
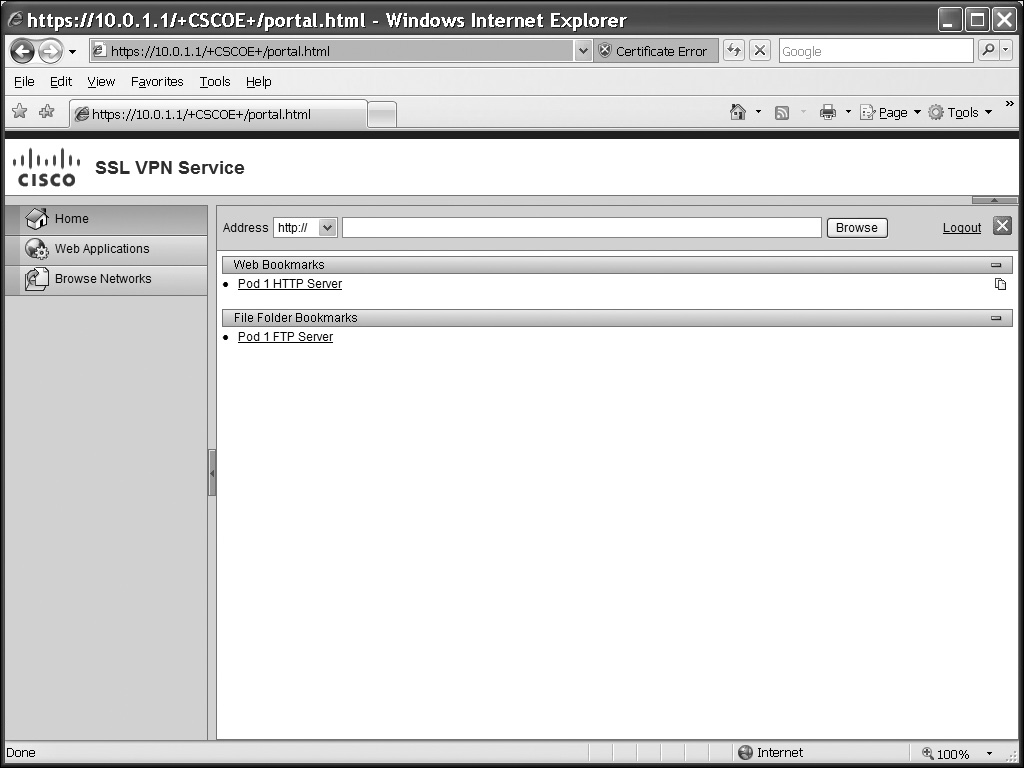
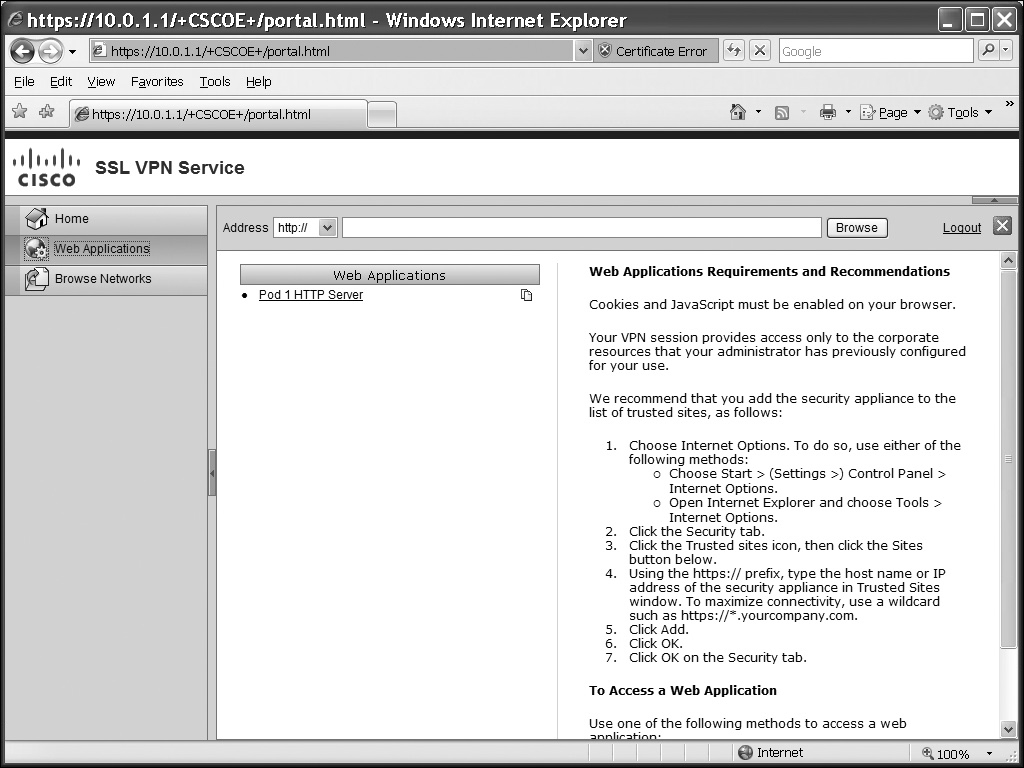
Once you log in, you are taken to the home portal page, commonly called the WebVPN home page. This can be seen in Figure 19-2. In the top left corner, you can see the Cisco logo and the name of the page, which is “SSL VPN Service” by default (you can replace these two items with your own choices). At the top-right corner of the screen, click the Logout hyperlink or the red Xicon to gracefully log out.
![]() To the left is the Address bar. You won’t see this if you didn’t configure the url-entry enable command I discussed previously in the “Predefined URLs and URL Policies” section. The Address bar is broken into two components: a drop-down selector to choose the type of access (HTTP, HTTPS, FTP, and CIFS) and a text box where the users can complete the rest of the URL that they want proxied.
To the left is the Address bar. You won’t see this if you didn’t configure the url-entry enable command I discussed previously in the “Predefined URLs and URL Policies” section. The Address bar is broken into two components: a drop-down selector to choose the type of access (HTTP, HTTPS, FTP, and CIFS) and a text box where the users can complete the rest of the URL that they want proxied.
![]() In the left column are icons/tabs you can click. Clicking the Home tab will take you to the screen shown in Figure 19-2. The elements you’ve defined for your home portal will affect what tabs you see in the left column. In Figure 19-2, I’ve predefined web URLs, FTP URLs, and allowed Windows file share (CIFS) access, so you see the Web Applications (web) and Browse Networks (FTP and CIFS) tabs. These items are controlled in the group policy associated with the user’s tunnel group. All the URLs that are defined for this user’s policy are displayed within the home page, broken into two sections: web URLs and file URLs. If you click a web hyperlink, you are proxied directly to the destination, where the contents of the remote web server page are displayed in the same window as your WebVPN access. If you examine to the right of the web URL on the home page (“Pod 1 HTTP Server”), you’ll notice an icon of two pieces of paper—clicking this icon will open a proxied connection in a separate web browser window.
In the left column are icons/tabs you can click. Clicking the Home tab will take you to the screen shown in Figure 19-2. The elements you’ve defined for your home portal will affect what tabs you see in the left column. In Figure 19-2, I’ve predefined web URLs, FTP URLs, and allowed Windows file share (CIFS) access, so you see the Web Applications (web) and Browse Networks (FTP and CIFS) tabs. These items are controlled in the group policy associated with the user’s tunnel group. All the URLs that are defined for this user’s policy are displayed within the home page, broken into two sections: web URLs and file URLs. If you click a web hyperlink, you are proxied directly to the destination, where the contents of the remote web server page are displayed in the same window as your WebVPN access. If you examine to the right of the web URL on the home page (“Pod 1 HTTP Server”), you’ll notice an icon of two pieces of paper—clicking this icon will open a proxied connection in a separate web browser window.
 Home Portal Tabs
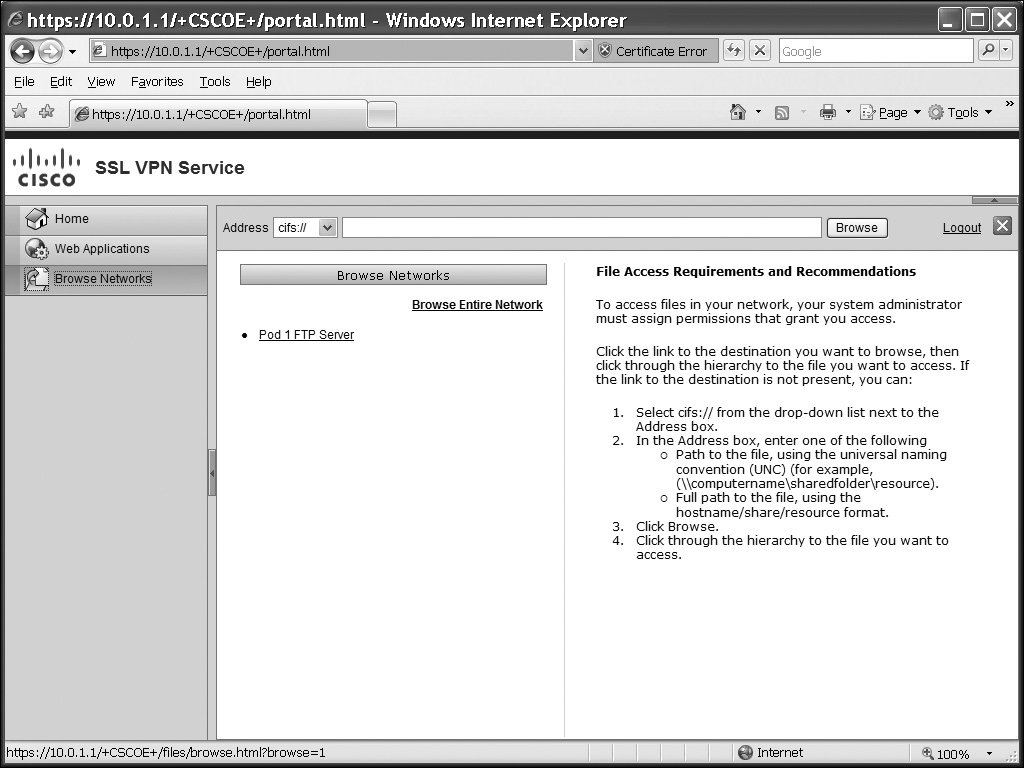
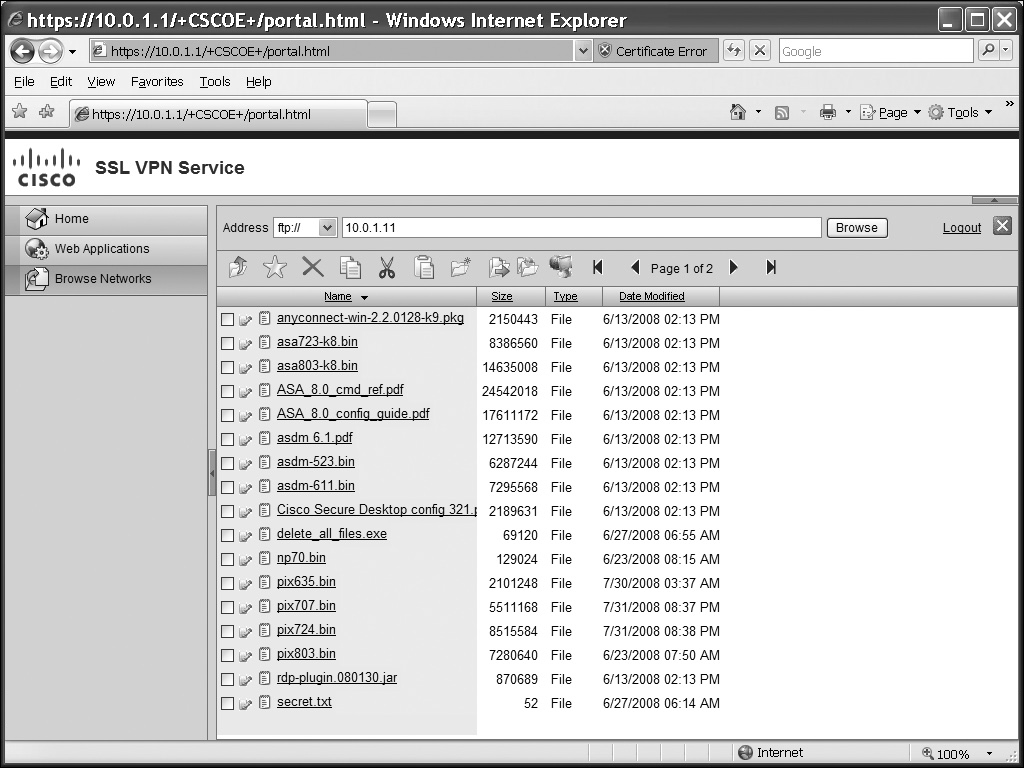
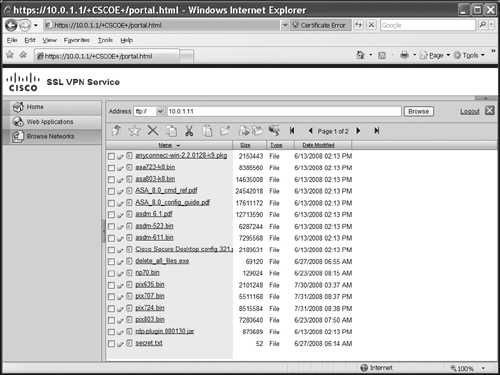
![]() Clicking the Web Applications tab will list only the web-based URLs that you’ve predefined (HTTP and HTTPS). This tab can be seen in Figure 19-3. Clicking the Browse Networks tab, shown in Figure 19-4, will list only the file share URLs (CIFS and FTP). You’ll see the “Browse Entire Network” hyperlink if you’ve configured the file-browsing enable command for the user’s group policy. When accessing a file share (CIFS or FTP), you’ll see something similar to that shown in Figure 19-5. In this example, I’m interfacing with an FTP server. Notice the icons below the Address bar and the list of files below them. You can use this screen to upload, download, copy, delete, and rename files, as well as to create, delete, and rename directories (assuming you have the appropriate permissions on the file/FTP server). The GUI interface for manipulating files and directories is not the same as using Windows Explorer, but the process is somewhat similar.
Clicking the Web Applications tab will list only the web-based URLs that you’ve predefined (HTTP and HTTPS). This tab can be seen in Figure 19-3. Clicking the Browse Networks tab, shown in Figure 19-4, will list only the file share URLs (CIFS and FTP). You’ll see the “Browse Entire Network” hyperlink if you’ve configured the file-browsing enable command for the user’s group policy. When accessing a file share (CIFS or FTP), you’ll see something similar to that shown in Figure 19-5. In this example, I’m interfacing with an FTP server. Notice the icons below the Address bar and the list of files below them. You can use this screen to upload, download, copy, delete, and rename files, as well as to create, delete, and rename directories (assuming you have the appropriate permissions on the file/FTP server). The GUI interface for manipulating files and directories is not the same as using Windows Explorer, but the process is somewhat similar.
| Note | Other icons or window panes you may see within the WebVPN clientless web browser will depend upon what you’ve enabled for the group policy the user is associated with. |
Non-Web Traffic
![]() For applications that don’t use FTP, HTTP, or HTTPS (commonly referred to as non-web applications), you can still give the user access to these applications. You have two basic options: if the user is using only a web browser for WebVPN, then you can use the thin client feature for accessing non-web applications; otherwise the user must use the network client (AnyConnect), discussed in Chapter 20. This chapter will focus on the former option. The thin client feature supports three solutions for non-web applications: port forwarding, plug-ins, and/or smart tunnels. As you will see in the following sections, each has advantages and disadvantages, and you can pick and choose which ones you want to use based on your particular situation and needs.
For applications that don’t use FTP, HTTP, or HTTPS (commonly referred to as non-web applications), you can still give the user access to these applications. You have two basic options: if the user is using only a web browser for WebVPN, then you can use the thin client feature for accessing non-web applications; otherwise the user must use the network client (AnyConnect), discussed in Chapter 20. This chapter will focus on the former option. The thin client feature supports three solutions for non-web applications: port forwarding, plug-ins, and/or smart tunnels. As you will see in the following sections, each has advantages and disadvantages, and you can pick and choose which ones you want to use based on your particular situation and needs.
 Port Forwarding
![]() Port forwarding was the original Cisco thin client solution to allow non-web-based applications to work across a web-browser SSL session. Port forwarding rules are created on the ASA and pushed down, along with JavaScript code, to the user. The JavaScript code then listens for local port connections based on the port forwarding rules and redirects these connections across the SSL tunnel, where the ASA will proxy them. The following sections will discuss the applications that port forwarding works with, along with how to set it up and troubleshoot it.
Port forwarding was the original Cisco thin client solution to allow non-web-based applications to work across a web-browser SSL session. Port forwarding rules are created on the ASA and pushed down, along with JavaScript code, to the user. The JavaScript code then listens for local port connections based on the port forwarding rules and redirects these connections across the SSL tunnel, where the ASA will proxy them. The following sections will discuss the applications that port forwarding works with, along with how to set it up and troubleshoot it.
Port Forwarding Supported Applications, Requirements, and Restrictions
![]() Cisco only supports a small number of TCP-based applications for port forwarding. These applications include Lotus Notes, Microsoft Outlook and Outlook Express, Perforce, Sametime, Secure FTP (FTP over SSH), SSH, Telnet, and Windows Terminal Services. Other applications may work, but haven’t been officially tested by Cisco.
Cisco only supports a small number of TCP-based applications for port forwarding. These applications include Lotus Notes, Microsoft Outlook and Outlook Express, Perforce, Sametime, Secure FTP (FTP over SSH), SSH, Telnet, and Windows Terminal Services. Other applications may work, but haven’t been officially tested by Cisco.
![]() Port forwarding actually has many restrictions, which is why it was not commonly used by many companies when it was originally introduced by Cisco:
Port forwarding actually has many restrictions, which is why it was not commonly used by many companies when it was originally introduced by Cisco:
-
 Port forwarding requires the use of Sun Java 1.5 or later—JavaScript code must be installed on the user’s desktop, which requires administrative privileges. The code can either be preinstalled or installed when the user connects using clientless mode. Because it requires administrative privileges, it cannot typically be used on public or noncompany computers, like airport kiosks.
 -
 Port forwarding only works with connections that use static port numbers—applications that use dynamic port numbers, like FTP, won’t work.
 -
 The Microsoft MAPI protocol for exchange is not supported for port forwarding, along with smart tunnels: instead, a network layer client like AnyConnect or Easy VPN must be used.
 -
 Port forwarding sessions are not replicated when stateful failover is implemented: users will lose their connections and have to reconnect.
Port Forwarding Configuration
![]() Implementing port forwarding is a two-step process:
Implementing port forwarding is a two-step process:
-
 You must create the port forwarding rules in the WebVPN configuration mode.
 -
 You must associate the rules to a group policy.
Port Forwarding Lists
![]() A port forwarding list is basically a grouping of port forwarding rules that specify the TCP connections that will be proxied by the ASA. These are configured using the port-forward command in the WebVPN subcommand mode:
A port forwarding list is basically a grouping of port forwarding rules that specify the TCP connections that will be proxied by the ASA. These are configured using the port-forward command in the WebVPN subcommand mode:
ciscoasa(config)# webvpn
ciscoasa(config-webvpn)# port-forward {port_list_name local_port_#
                      remote_server remote_port_# [description]}
![]() The port list name for the port forwarding rules groups the rules together in a set. You must specify a local port number that is unlikely to be used on the local PC. This is the port number the local application must use and that the JavaScript code is listening on. An application connecting to this port will have its traffic redirected by the JavaScript code across the SSL tunnel to the ASA, and then proxied to the actual destination. Cisco recommends using local port numbers greater than 65000, since these are not commonly used by local applications. The remote server can be the server IP address or hostname. If it is the latter, the JavaScript code will edit the “winnt/system32/drivers/etc/hosts” file and put an entry in it for local resolution, like this:
The port list name for the port forwarding rules groups the rules together in a set. You must specify a local port number that is unlikely to be used on the local PC. This is the port number the local application must use and that the JavaScript code is listening on. An application connecting to this port will have its traffic redirected by the JavaScript code across the SSL tunnel to the ASA, and then proxied to the actual destination. Cisco recommends using local port numbers greater than 65000, since these are not commonly used by local applications. The remote server can be the server IP address or hostname. If it is the latter, the JavaScript code will edit the “winnt/system32/drivers/etc/hosts” file and put an entry in it for local resolution, like this:
 127.0.0.2 myremotehost.com # added by WebVpnPortForward
![]() Notice that the remote server name is resolved to a loopback address. It is important that your users gracefully close down port forwarding in order for the extra added entries from the hosts file to be correctly cleaned up. I discuss this later in the “Port Forwarding and the Windows’ Local Hosts File” section. The remote port number in the port-forward command is the actual port number the application is listening on at the remote server end. Basically the port forwarding rules tell the JavaScript code and the ASA how to perform the proxy for TCP applications.
Notice that the remote server name is resolved to a loopback address. It is important that your users gracefully close down port forwarding in order for the extra added entries from the hosts file to be correctly cleaned up. I discuss this later in the “Port Forwarding and the Windows’ Local Hosts File” section. The remote port number in the port-forward command is the actual port number the application is listening on at the remote server end. Basically the port forwarding rules tell the JavaScript code and the ASA how to perform the proxy for TCP applications.
![]() Here’s a simple example of two port forwarding rules in the same rule set:
Here’s a simple example of two port forwarding rules in the same rule set:
ciscoasa(config)# webvpn
ciscoasa(config-webvpn)# port-forward STPorts 65025 SMTPserver 25
ciscoasa(config-webvpn)# port-forward STPorts 65023 10.0.1.100 23
![]() The first rule specifies that when an e-mail connection is opened to SMTPserver on port 65025, JavaScript code will redirect it across the SSL tunnel. Remember that SMTPserver is resolved to a local loopback address based on the modification to the host file by the JavaScript code. The second command specifies that a telnet connection to port 65023 will be redirected across the tunnel; the one catch with the second method is that the user cannot telnet to the actual destination IP address of 10.0.1.100. Instead, for the JavaScript code to intercept the connection, the user must connect to port 65023 on the PC itself. In this situation, the telnet command would look something like this:
The first rule specifies that when an e-mail connection is opened to SMTPserver on port 65025, JavaScript code will redirect it across the SSL tunnel. Remember that SMTPserver is resolved to a local loopback address based on the modification to the host file by the JavaScript code. The second command specifies that a telnet connection to port 65023 will be redirected across the tunnel; the one catch with the second method is that the user cannot telnet to the actual destination IP address of 10.0.1.100. Instead, for the JavaScript code to intercept the connection, the user must connect to port 65023 on the PC itself. In this situation, the telnet command would look something like this:
C:\> telnet 127.0.0.1 65023
| Note |
|
Enabling Port Forwarding
![]() Once you have created your port forwarding rules, you need to associate them with a group policy in the WebVPN subcommand mode:
Once you have created your port forwarding rules, you need to associate them with a group policy in the WebVPN subcommand mode:
ciscoasa(config)# group-policy group_policy_name attributes
ciscoasa(config-group-policy)# webvpn
ciscoasa(config-group-webvpn)# port-forward {auto-start | enable }
                           port_list_name
![]() The auto-start parameter will automatically download the JavaScript code and port forwarding rules when the user logs in using clientless mode; the enable parameter requires users to manually start port forwarding from the home portal once they log in.
The auto-start parameter will automatically download the JavaScript code and port forwarding rules when the user logs in using clientless mode; the enable parameter requires users to manually start port forwarding from the home portal once they log in.
![]() Here’s an example that associates the port forwarding rules in the example from the last section to a group policy:
Here’s an example that associates the port forwarding rules in the example from the last section to a group policy:
ciscoasa(config)# group-policy ST_group_policy attributes
ciscoasa(config-group-policy)# webvpn
ciscoasa(config-group-webvpn)# port-forward auto-start STports
Using the Port Forwarding Feature
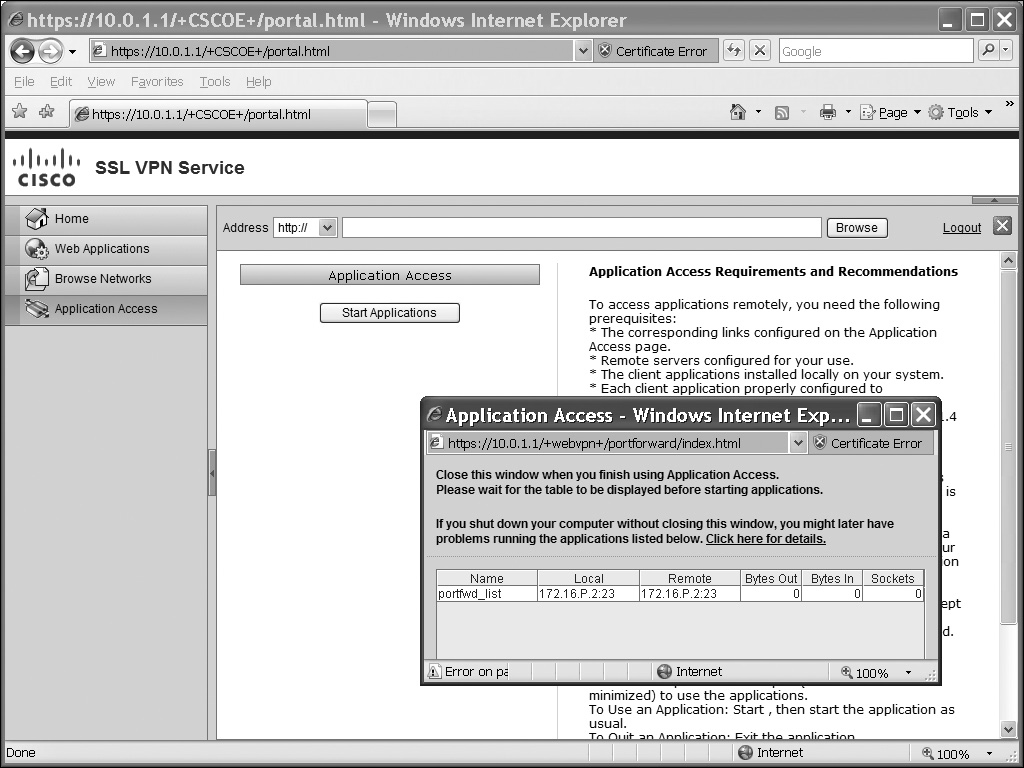
![]() If port forwarding must be started manually by the user, the user first logs in and then clicks the Application Access tab, shown in Figure 19-6. The user then clicks the Start Applications button. A window will pop up where JavaScript will download, and the port forwarding rules will be displayed (the bottom right of Figure 19-6). The local column indicates what the user needs to use for the connection parameters to have the TCP application proxied by the ASA. This window must remain open until the user is done with the port forwarding process.
If port forwarding must be started manually by the user, the user first logs in and then clicks the Application Access tab, shown in Figure 19-6. The user then clicks the Start Applications button. A window will pop up where JavaScript will download, and the port forwarding rules will be displayed (the bottom right of Figure 19-6). The local column indicates what the user needs to use for the connection parameters to have the TCP application proxied by the ASA. This window must remain open until the user is done with the port forwarding process.
| Note |
|
Port Forwarding and the Windows’ Local Hosts File
![]() When a user starts the port forwarding process, the Windows local host file is copied to “hosts.webvpn” in the same directory. To ensure that the Windows local host file is returned to its original state after a user is done using port-forwarded applications, the user should close the pop-up window with the port forwarding rules. This will restore the original file and delete the file called “hosts.webvpn.” If users don’t follow this procedure, or they ungracefully close down the WebVPN clientless session or lose power to their PC, the next time they try to start up port forwarding, they’ll receive this error message: Backup HOSTS file.
When a user starts the port forwarding process, the Windows local host file is copied to “hosts.webvpn” in the same directory. To ensure that the Windows local host file is returned to its original state after a user is done using port-forwarded applications, the user should close the pop-up window with the port forwarding rules. This will restore the original file and delete the file called “hosts.webvpn.” If users don’t follow this procedure, or they ungracefully close down the WebVPN clientless session or lose power to their PC, the next time they try to start up port forwarding, they’ll receive this error message: Backup HOSTS file.
![]() To recover from this problem, the user has three options to choose from to fix the problem:
To recover from this problem, the user has three options to choose from to fix the problem:
-
 Restore from backup The “hosts.webvpn” file is copied to the “hosts” file, and the “hosts.webvpn” file is deleted; at this point, the user can start port forwarding.
 -
 Do nothing Choosing this option takes the users to the home page; port forwarding won’t start until the problem is fixed.
 -
 Delete backup The “hosts.webvpn” file is deleted, where the “hosts” file has the port forwarding entries in it; port forwarding then uses the existing “hosts” file.
 Web Browser Plug-Ins
![]() Port forwarding is a legacy solution for proxying a limited number of TCP applications. Plug-ins, new in version 8.0, are an alternative to using port forwarding rules. A plug-in is basically Java code, located in flash on the appliance, that is downloaded and included as part of the web browser and contains the actual application: the user therefore doesn’t need this application on their desktop! Plug-ins try to minimize the impact on the user by hiding the thin client process—port forwarding rules don’t have to be created and downloaded. Plug-ins also perform much better than port forwarding and don’t require anything to be installed on the user’s PC, as is the case with port forwarding.
Port forwarding is a legacy solution for proxying a limited number of TCP applications. Plug-ins, new in version 8.0, are an alternative to using port forwarding rules. A plug-in is basically Java code, located in flash on the appliance, that is downloaded and included as part of the web browser and contains the actual application: the user therefore doesn’t need this application on their desktop! Plug-ins try to minimize the impact on the user by hiding the thin client process—port forwarding rules don’t have to be created and downloaded. Plug-ins also perform much better than port forwarding and don’t require anything to be installed on the user’s PC, as is the case with port forwarding.
![]() Cisco-supported plug-ins can be downloaded with a CCO account on the Cisco site under the ASA software section. Cisco supports plug-ins for the following applications: VNC, Citrix, SSH, telnet, Windows Terminal Services, as well as non-Cisco ones.
Cisco-supported plug-ins can be downloaded with a CCO account on the Cisco site under the ASA software section. Cisco supports plug-ins for the following applications: VNC, Citrix, SSH, telnet, Windows Terminal Services, as well as non-Cisco ones.
| Note |
|
Importing Plug-Ins
![]() To use a plug-in, you must load it into flash of the ASA with the import webvpn plug-in command:
To use a plug-in, you must load it into flash of the ASA with the import webvpn plug-in command:
ciscoasa# import webvpn plug-in protocol protocol URL
![]() The protocol is the name of the application the plug-in will handle: the URL is the remote server the plug-in is located on. When importing the “ssh-plugin.jar” file, if you want both telnet and SSH to appear as connection options in the address bar of the home page, list both protocols in the import command separated by a comma and no spaces, like this:
The protocol is the name of the application the plug-in will handle: the URL is the remote server the plug-in is located on. When importing the “ssh-plugin.jar” file, if you want both telnet and SSH to appear as connection options in the address bar of the home page, list both protocols in the import command separated by a comma and no spaces, like this:
ciscoasa# import webvpn plug-in protocol ssh,telnet
            ftp://192.168.1.66/ssh-plugin.jar
!!!!!!!!!!!!!!!!!!!!!!!!!!!!!!!!!!!!!!!!!!!!!!!!!!!!!!!!!!!!!!!!!!
!!!!!!!!!!!!!!!!!!!!!!!!!!!!!!
<--output omitted-->
![]() Plug-ins are loaded to flash on the ASA and stored in the “csco-config/97/plugin” directory, which is a hidden directory.
Plug-ins are loaded to flash on the ASA and stored in the “csco-config/97/plugin” directory, which is a hidden directory.
Using Plug-Ins
![]() Plug-ins allow the user to use the address bar on the home portal page. Once you have imported plug-ins, when you log into the ASA using the clientless approach and use the drop-down selector for the address bar, you should see the plug-ins listed. These include the following in the drop-down selector of the address bar:
Plug-ins allow the user to use the address bar on the home portal page. Once you have imported plug-ins, when you log into the ASA using the clientless approach and use the drop-down selector for the address bar, you should see the plug-ins listed. These include the following in the drop-down selector of the address bar:
-
 rdp:// Terminal services plug-in
 -
 ssh:// SSH plug-in
 -
 telnet:// SSH plug-in
 -
 vnc:// VNC client plug-in
 -
 ica:// Citrix client plug-in
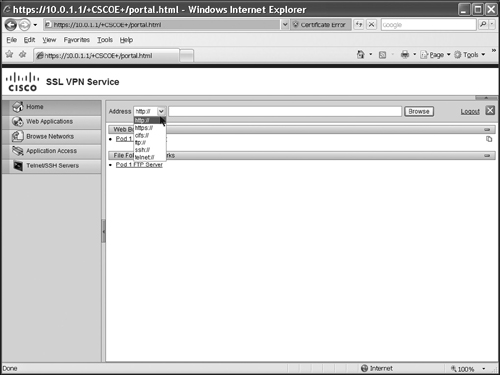
![]() Figure 19-7 displays an example of plug-ins appearing in the Address bar. You can also define these in URL lists that appear as hyperlinks on the home page.
Figure 19-7 displays an example of plug-ins appearing in the Address bar. You can also define these in URL lists that appear as hyperlinks on the home page.
 Smart Tunneling
![]() Smart tunnels are new in version 8.0. A smart tunnel is a secure connection using an SSL VPN session via clientless mode between a Winsock 2 TCP-based application and a server behind the ASA. In that sense, it’s something like port forwarding or plug-ins. With port forwarding, you must define port forwarding rules that are downloaded to the user’s web browser, and Java listens on a local port number and redirects the traffic across the SSL tunnel where the ASA proxies the connection.
Smart tunnels are new in version 8.0. A smart tunnel is a secure connection using an SSL VPN session via clientless mode between a Winsock 2 TCP-based application and a server behind the ASA. In that sense, it’s something like port forwarding or plug-ins. With port forwarding, you must define port forwarding rules that are downloaded to the user’s web browser, and Java listens on a local port number and redirects the traffic across the SSL tunnel where the ASA proxies the connection.
![]() Plug-ins, like telnet or SSH, basically have the actual application reside on the ASA itself, so users don’t need the actual application installed. Their main disadvantage, though, is that Cisco only supports a handful of them.
Plug-ins, like telnet or SSH, basically have the actual application reside on the ASA itself, so users don’t need the actual application installed. Their main disadvantage, though, is that Cisco only supports a handful of them.
![]() Smart tunnels bridge the gap between plug-ins and port forwarding. Unlike plug-ins, the application must be installed on the user’s desktop. However, unlike with port forwarding, you don’t have to change the user’s application in order for the traffic to be tunneled. Some common applications that you can use for smart tunnels include MS Outlook and Outlook Express, Lotus Notes, and many, many others.
Smart tunnels bridge the gap between plug-ins and port forwarding. Unlike plug-ins, the application must be installed on the user’s desktop. However, unlike with port forwarding, you don’t have to change the user’s application in order for the traffic to be tunneled. Some common applications that you can use for smart tunnels include MS Outlook and Outlook Express, Lotus Notes, and many, many others.
Smart Tunnel Requirements and Restrictions
![]() To use smart tunnels, you must be running a 32-bit version of Microsoft Windows 2000 or XP, and your web browser must support and have enabled either Java, ActiveX, or both. (I have successfully used them on Windows 2003; however, Cisco doesn’t officially support this OS.) As with plug-ins and port forwarding, stateful failover doesn’t replicate these sessions between the active and standby units. As with port forwarding, Microsoft Outlook Exchange proxy (MAPI) is not supported—the AnyConnect or Easy VPN client must be used instead.
To use smart tunnels, you must be running a 32-bit version of Microsoft Windows 2000 or XP, and your web browser must support and have enabled either Java, ActiveX, or both. (I have successfully used them on Windows 2003; however, Cisco doesn’t officially support this OS.) As with plug-ins and port forwarding, stateful failover doesn’t replicate these sessions between the active and standby units. As with port forwarding, Microsoft Outlook Exchange proxy (MAPI) is not supported—the AnyConnect or Easy VPN client must be used instead.
| Tip |
|
Smart Tunnel Configuration
![]() Implementing smart tunnels is similar to port forwarding, involving the same two-step process:
Implementing smart tunnels is similar to port forwarding, involving the same two-step process:
-
 You must create smart tunnel lists in the WebVPN configuration mode.
 -
 You must associate a list to a group policy.
Smart Tunnel Lists
![]() A smart tunnel application list is a list of applications that can use the smart tunnel function. The list is created in the WebVPN subcommand mode with the smart-tunnel list command:
A smart tunnel application list is a list of applications that can use the smart tunnel function. The list is created in the WebVPN subcommand mode with the smart-tunnel list command:
ciscoasa(config)# webvpn
ciscoasa(config-webvpn)# smart-tunnel list st_list_name app_name
                      app_path/file_name [hash_value]
![]() The list is given a name (st_list_name) that groups the applications. Each application that will be smart-tunneled must have a display name (app_name). Normally this is the name of the application itself, but you can call it whatever you want—this might be necessary if two different versions of the application with different names exist. Next you follow it with the application path and/or filename. If you don’t specify the application path, but just “program.exe,” that would include any file called “program.exe” on the user’s drive space. You can be more specific and list a directory path. If there is the possibility of having more than one directory path for the application, list the application multiple times, giving it differentapp_names, and the different directory path and filename.
The list is given a name (st_list_name) that groups the applications. Each application that will be smart-tunneled must have a display name (app_name). Normally this is the name of the application itself, but you can call it whatever you want—this might be necessary if two different versions of the application with different names exist. Next you follow it with the application path and/or filename. If you don’t specify the application path, but just “program.exe,” that would include any file called “program.exe” on the user’s drive space. You can be more specific and list a directory path. If there is the possibility of having more than one directory path for the application, list the application multiple times, giving it differentapp_names, and the different directory path and filename.
![]() Optionally you can include a hash value of the application—this reduces the likelihood of another program “masquerading” as a valid program. To find out the hash value of an application, use the Microsoft File Checksum Integrity Verifier (FCIV) program, which is available at http://support.microsoft.com/kb/841290/. Once you’ve installed FCIV, place a temporary copy of the application to be hashed on a directory path that contains no spaces (for example, c:\temp\fciv.exe); then enter the following at a command-line prompt (cmd.exe):
Optionally you can include a hash value of the application—this reduces the likelihood of another program “masquerading” as a valid program. To find out the hash value of an application, use the Microsoft File Checksum Integrity Verifier (FCIV) program, which is available at http://support.microsoft.com/kb/841290/. Once you’ve installed FCIV, place a temporary copy of the application to be hashed on a directory path that contains no spaces (for example, c:\temp\fciv.exe); then enter the following at a command-line prompt (cmd.exe):
fciv.exe -sha1 application
![]() For example, fciv.exe -sha1 c:\msimn.exe will display a SHA-1 hash value for “msimn.exe.” The SHA-1 hash is always 40 hexadecimal characters.
For example, fciv.exe -sha1 c:\msimn.exe will display a SHA-1 hash value for “msimn.exe.” The SHA-1 hash is always 40 hexadecimal characters.
| Tip |
|
![]() Here’s a simple example of a smart tunnel list of various applications:
Here’s a simple example of a smart tunnel list of various applications:
ciscoasa(config)# webvpn
ciscoasa(config-webvpn)# smart-tunnel list myapps CmdPrompt "cmd.exe"
ciscoasa(config-webvpn)# smart-tunnel list myapps telnet "telnet.exe"
ciscoasa(config-webvpn)# smart-tunnel list myapps putty "putty.exe"
ciscoasa(config-webvpn)# smart-tunnel list myapps OutlookExp "msimn.exe"
Enabling Smart Tunnels
![]() Once you have created your smart tunneling list, you need to associate it with a group policy in the WebVPN subcommand mode:
Once you have created your smart tunneling list, you need to associate it with a group policy in the WebVPN subcommand mode:
ciscoasa(config)# group-policy group_policy_name attributes
ciscoasa(config-group-policy)# webvpn
ciscoasa(config-group-webvpn)# smart-tunnel {auto-start | enable}
                           st_list_name
![]() Notice that this is similar to associating a set of port forwarding rules to a group policy. The auto-start parameter will automatically start up the smart tunneling process when the user logs into clientless mode on the ASA; using the enable parameter requires users to manually start the smart tunneling process from the home portal once they log into the ASA.
Notice that this is similar to associating a set of port forwarding rules to a group policy. The auto-start parameter will automatically start up the smart tunneling process when the user logs into clientless mode on the ASA; using the enable parameter requires users to manually start the smart tunneling process from the home portal once they log into the ASA.
![]() Here’s an example that associates the smart tunnel list from the example in the last section to a group policy:
Here’s an example that associates the smart tunnel list from the example in the last section to a group policy:
ciscoasa(config)# group-policy my_group_policy attributes
ciscoasa(config-group-policy)# webvpn
ciscoasa(config-group-webvpn)# smart-tunnel auto-start myapps
| Note |
|
Using Smart Tunnels
![]() If smart tunneling must be started manually, the user logs in and clicks the Application Access tab. Below the Start Applications button, you can see the list of app_names that can be tunneled using smart tunneling—it’s best to give these descriptive names to help out the users (see Figure 19-8). Click the Start Smart Tunnel button. A window will pop up asking you to accept the self-signed applet, and another window will pop up asking you if you want to tunnel traffic (data to pass through) to the ASA: click the Yes button. If the autostart feature was enabled for the group policy, then the pop-up window would appear immediately when the user logs in.
If smart tunneling must be started manually, the user logs in and clicks the Application Access tab. Below the Start Applications button, you can see the list of app_names that can be tunneled using smart tunneling—it’s best to give these descriptive names to help out the users (see Figure 19-8). Click the Start Smart Tunnel button. A window will pop up asking you to accept the self-signed applet, and another window will pop up asking you if you want to tunnel traffic (data to pass through) to the ASA: click the Yes button. If the autostart feature was enabled for the group policy, then the pop-up window would appear immediately when the user logs in.

WebVPN Verification and Troubleshooting
![]() Once you have set up clientless and/or thin client functionality and users are connecting to the ASA using WebVPN, you can use show and debug commands to verify and troubleshoot connectivity. The following two sections briefly cover these commands.
Once you have set up clientless and/or thin client functionality and users are connecting to the ASA using WebVPN, you can use show and debug commands to verify and troubleshoot connectivity. The following two sections briefly cover these commands.
 show Commands
![]() To see a summary of the VPN sessions established on the appliances or the actual sessions themselves, respectively, use the following two commands:
To see a summary of the VPN sessions established on the appliances or the actual sessions themselves, respectively, use the following two commands:
ciscoasa# show vpn-sessiondb summary
ciscoasa# show vpn-sessiondb [detail] {webvpn | svc}
![]() Here’s an example using the summary parameter:
Here’s an example using the summary parameter:
ciscoasa# show vpn-sessiondb summary
Active Sessions:                Session Information:
IPSec LAN-to-LAN : 0            Peak Concurrent : 0
IPSec Remote Access : 0         IPSec Limit : 750
WebVPN : 8                      WebVPN Limit : 500
SSL VPN Client (SVC) : 0        Cumulative Sessions : 0
Email Proxy : 0
Total Active Sessions : 0       Percent Session Load : 0%
                               VPN LB Mgmt Sessions : 0
<--output omitted-->
![]() Notice that eight clientless/thin-client connections are established on the ASA.
Notice that eight clientless/thin-client connections are established on the ASA.
![]() You can log off a WebVPN user by using the following command:
You can log off a WebVPN user by using the following command:
ciscoasa# vpn-sessiondb logoff {remote | l2l | webvpn |
             email-proxy | protocol protocol_name |
             name username | ipaddress IP_address |
             tunnel-group group_name | index index_number | all}
 debug Commands
![]() You can use the debug command to troubleshoot WebVPN connectivity issues:
You can use the debug command to troubleshoot WebVPN connectivity issues:
ciscoasa# debug webvpn [chunk | cifs | citrix | failover | html |
             javascript | request | response | svc |
             transformation | url | util | xml] [level]
![]() Table 19-1 explains the parameters for the debug webvpn command.
Table 19-1 explains the parameters for the debug webvpn command.
|
|
|
|---|---|
|
|
|
|
|
|
|
|
|
|
|
|
|
|
|
|
|
|
|
|
|
|
|
|
|
|
|
|
|
|
|
|
|
|
|
|
|
|
|
|
|
|

