![]() This ReferencePoint provides an overview of NAS and explains the installation, configuration, analysis, and tuning of filers. In addition, it shows how to manage the backup and recovery of NAS.
This ReferencePoint provides an overview of NAS and explains the installation, configuration, analysis, and tuning of filers. In addition, it shows how to manage the backup and recovery of NAS.
 Introducing NAS
![]() NAS devices are storage devices that are connected to a network directly and shared by multiple end users. The features and benefits of NAS devices are:
NAS devices are storage devices that are connected to a network directly and shared by multiple end users. The features and benefits of NAS devices are:
-
 Platform Independence: NAS devices can be deployed on client-server networks running on multiple operating systems. This is possible because NAS devices have different communication channels for different operating systems. For example, these devices communicate with UNIX environments using Network File System (NFS) and with Microsoft Windows environments using Common Internet File System (CIFS).
 -
 Plug-and-Play Support: NAS devices can be disconnected from or connected to a network at any time without disrupting network performance.
 -
 Task Specificity: NAS devices perform specific tasks, such as Web caching, audio-video streaming, tape backup, and data storage.
 Platform Independence with NFS and CIFS
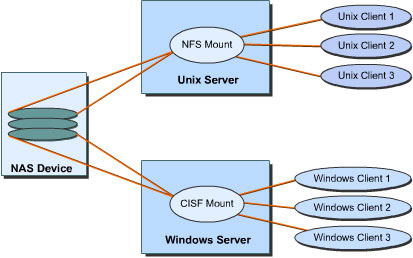
![]() Platform independence in NAS is implemented with NFS and CIFS. For example, in the network shown in Figure 7-1-1, NFS and CIFS shares have been created on UNIX and Windows NT server. UNIX clients access the NAS device volume using the NFS mount on the UNIX server and Windows NT clients access the NAS device volume using the CIFS mount on the Windows NT server.
Platform independence in NAS is implemented with NFS and CIFS. For example, in the network shown in Figure 7-1-1, NFS and CIFS shares have been created on UNIX and Windows NT server. UNIX clients access the NAS device volume using the NFS mount on the UNIX server and Windows NT clients access the NAS device volume using the CIFS mount on the Windows NT server.
 Comparison of SAN and NAS
![]() Table 7-1-1 lists the differences between NAS and Storage Area Network (SAN) technologies:
Table 7-1-1 lists the differences between NAS and Storage Area Network (SAN) technologies:
| | | |
|---|---|---|
| | | |
| | | |
| | | |
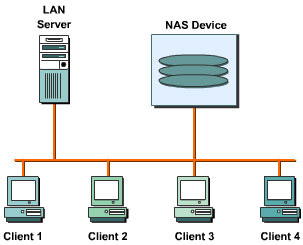
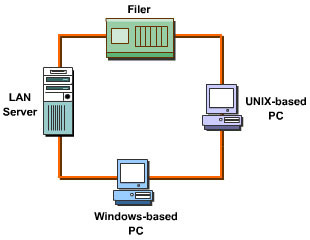
![]() NAS is a network-centric technology that speeds up data access in a network. Due to the availability of a dedicated NAS device for file I/O in a LAN, clients can access data directly without using a LAN server. Figure 7-1-2 shows a LAN to which a NAS device is connected:
NAS is a network-centric technology that speeds up data access in a network. Due to the availability of a dedicated NAS device for file I/O in a LAN, clients can access data directly without using a LAN server. Figure 7-1-2 shows a LAN to which a NAS device is connected:
![]() NAS devices use gigabit Ethernet cables to connect to the network. Gigabit Ethernet cables and support a large number of clients over a single Network Interface Card (NIC). Some NAS devices also support multiple NICs, which enables multiple networks to use a single NAS device.
NAS devices use gigabit Ethernet cables to connect to the network. Gigabit Ethernet cables and support a large number of clients over a single Network Interface Card (NIC). Some NAS devices also support multiple NICs, which enables multiple networks to use a single NAS device.
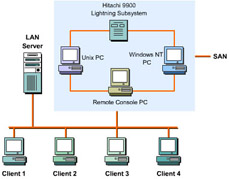
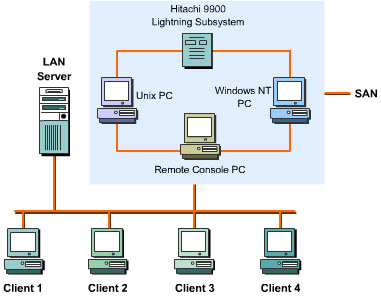
![]() SAN is a data-centric technology that consists of multiple storage devices and includes components to manage storage devices. SAN devices can be connected by high-speed fiber channel cables for faster performance. Figure 7-1-3 shows how a SAN can be connected to a LAN:
SAN is a data-centric technology that consists of multiple storage devices and includes components to manage storage devices. SAN devices can be connected by high-speed fiber channel cables for faster performance. Figure 7-1-3 shows how a SAN can be connected to a LAN:
Introduction to Filers
Filers are NAS devices that work as dedicated file servers. The advantages of using filers are:
-
Reduced Network Load: Most LANs consist of a general-purpose server that provides file, print, database, and login services to clients. These servers often slow down when CPU-intensive data processing operations are done. By using a filer as a file storage service, you can reduce the load on general-purpose servers.
-
Platform-independence: Filers support NFS to store data from UNIX environments and CIFS to store data from Microsoft Windows environments. As a result, it is possible to share data on filers across different operating system platforms.
-
Easy Administration: Filers consist of embedded software tools to perform data management, data protection, client access support, and administrative tasks. These tools provide simple and easy-to-use Graphical User Interfaces (GUIs) for administrative tasks.
Figure 7-1-4 shows a filer network:
Functions of Filer Software
Filers use a built-in operating system to coordinate data storage and manage the filer hardware. For example, the NetApp filer consists of the Data ONTAP operating system. The filer operating system provides utilities and tools to administer a filer, and replicate and secure data on a filer.
Administering a Filer
The filer operating system includes a remote administration tool that provides an easy-to-use GUI to administer the filer. The administration tool eliminates the need to learn programming languages or command-line interfaces to configure and maintain filers. You can access the Web-based GUI and navigate the screens to perform tasks that would have otherwise required the use of a programming language.
The administration tool helps install the filer software easily. After assigning an IP address to the filer from a console or a Dynamic Host Configuration Protocol (DHCP) server, you can use the setup wizard to configure the filer quickly.
Replicating Filer Data
The filer operating system includes replication software to mirror data on multiple network filers. The replication software continually updates the mirrored data to keep it current and available for recovery. Replication software performs three types of mirroring:
-
Incremental Mirroring: Replicates a subset of the entire filer data and reduces network bandwidth requirements. First time replication transfers the entire data on the source filer volume to the destination filer. Subsequent replications perform incremental updates only with new and changed data blocks replicated on the destination filer.
-
Checkpoint Mirroring: Creates checkpoints during data transfers using replication software. If the target or source filer is unavailable, transfer restarts from the most recent checkpoint.
-
Cascade Mirroring: Replicates data over distant geographical locations. A target mirror filer is a source for other filers, with each mirror pair running on its own schedule to meet site-specific requirements. A high-cost link replicates data across distant locations and lower-cost links replicate across close locations.
Securing Data on Filers
The security features supported by the filer operating system are:
-
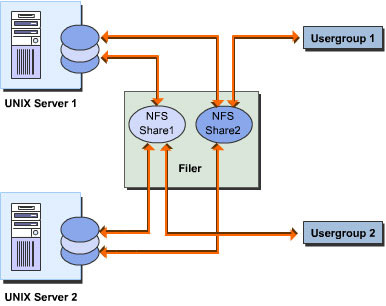
Managing Data on Multiple Servers: The filer data security software can manage data stored on the UNIX and Windows platforms. Take an example of a network consisting of ten UNIX and five Windows servers. In this type of network, each server has to manage data stored locally on the server storage. These servers require additional hardware investment and administrative costs. It is possible to plug a single filer into these networks, and create logical NFS and CIFS storage partitions, which map to physical partitions on multiple computers, on the filer.
-
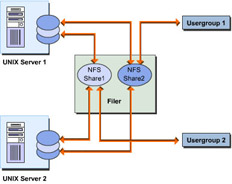
Support for Resource Partitioning: Creates separate logical storage partitions on a filer for different end users on a network. As shown in Figure 7-1-5, a logical storage partition can use partitions created across different computers. Logical storage partitions created on a filer also support authentication services.
Installing Filers
You need to configure filer hardware and software to enable them to communicate with the network. This is done using an installation mechanism that connects to the filer from a remote administration console, invokes the filer configuration wizard, and specifies the filer hardware and software settings.
This section describes the installation and configuration of the Sun StorEdge 8600 Filer. Before you install the filer, ensure that it is connected to the administration console. The administration console can be on any Unix- or Windows-based computer.
To connect to a filer from a UNIX-based console, log on to the console as root and type tip –9600 /dev/ttya at the UNIX prompt.
To connect to a filer from a Windows-based console:
-
Select Start->Run. The Run dialog box appears.
-
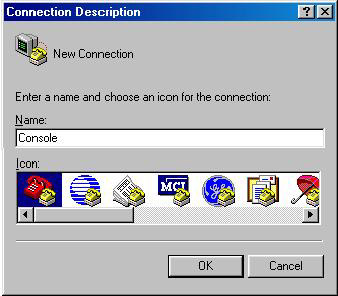
Type hypertrm and click OK. The Connection Description dialog box appears, as shown in Figure 7-1-6:
-
In the Connection Description dialog box, specify an arbitrary name for the connection between the console and the filer and select a connection icon.
-
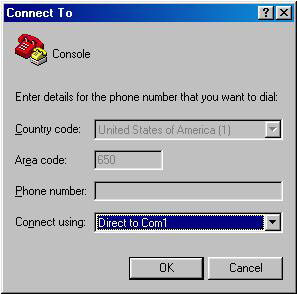
Click OK. The Connect To dialog box appears, as shown in Figure 7-1-7:
-
In the Connect To dialog box, select the COM port to connect to the filer from the Connect using list.
-
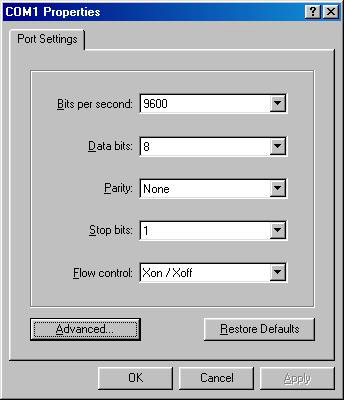
Click OK. The COM1 Properties dialog box appears.
-
Specify values for the different options in the COM1 dialog box, as shown in Figure 7-1-8, and click OK.
After establishing a connection with the administration console, the filer displays the Command window. In the Command window, press ENTER. At the OK prompt, type boot to start the 8600 Filer Configuration wizard.
In the Filer Configuration wizard, specify the values for all options as listed in Table 7-1-2:
| Option | Value |
|---|---|
| Choose a language | 0 |
| Choose a locale | 0 |
| Choose a terminal type | 3 or 12 |
| Do you have network connectivity? | Yes |
| Is DHCP used? | No |
| Select the primary network interface | Hme0 |
| Type the host name | Specify the name of the filer |
| Type the IP address | Specify the IP address assigned for the filer |
| Is IPv6 used? | No |
| Confirm the above information | Yes |
| Is Kerberos security used? | No |
| Confirm the above information | Yes |
| Name the service | Specify the service to authenticate the filer connection |
| The domain name | Specify the domain name assigned for the filer |
| The domain server IP address | Specify the domain IP address assigned for the filer |
| Confirm the name service information | Yes |
| Is the system part of a subnet? | Yes |
| Type the netmask | Specify the subnet mask to connect to the 8600 filer |
| Confirm the time | Specify the region, time zone, date, and time to set the time of the filer; this time schedules backup and restore operations |
| Type and verify the root password | Specify the root password to connect to the filer |
After you specify values in the Filer Configuration wizard, the 8600 filer system reboots and configures the filer.
Administering and Configuring Filers
![]() Filers provide a Web-based administration tool to administer and configure filers. The tool can be invoked from any computer on the filer network by using a Web browser. The Web-based administration tool is used to:
Filers provide a Web-based administration tool to administer and configure filers. The tool can be invoked from any computer on the filer network by using a Web browser. The Web-based administration tool is used to:
-
 Configure the permissions of end users and groups who access data stored on a filer.
 -
 Specify a list of network host computers that can access data stored on a filer.
 -
 Create network shares for filer directories.
 -
 Configure the NIC of a filer.
 -
 Configure the services, such as e-mail notification and domain naming service (DNS), provided by a filer.
![]() Sun StorEdge 8600 filers provide the Sun StorEdge N8000 administration tool. To start the N8000 Filer administration tool:
Sun StorEdge 8600 filers provide the Sun StorEdge N8000 administration tool. To start the N8000 Filer administration tool:
-
 Start Internet Explorer and type http://hostname:8080 in the URL field, where hostname refers to the name of the filer.
 -
 Press ENTER. The Password dialog box appears.
 -
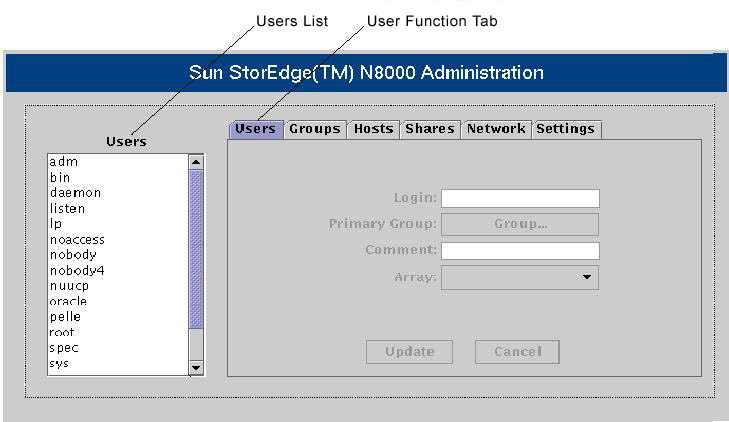
 Type the password specified during filer installation and click OK. The N8000 Filer administration tool is invoked, shown in Figure 7-1-9:
![]() The N8000 Filer administration tool consists of six panes: Users, Groups, Hosts, Shares, Network, and Settings.
The N8000 Filer administration tool consists of six panes: Users, Groups, Hosts, Shares, Network, and Settings.
 Users Pane
![]() The Users pane provides the Login, Primary Group, and Array fields to configure permissions for user accounts for the administration tool. The Users pane is used to specify the login name for an end user. The Primary Group field specifies the name of the group to which the end user belongs and the Array name allocates a particular disk array to an end user in multi-array filer environments.
The Users pane provides the Login, Primary Group, and Array fields to configure permissions for user accounts for the administration tool. The Users pane is used to specify the login name for an end user. The Primary Group field specifies the name of the group to which the end user belongs and the Array name allocates a particular disk array to an end user in multi-array filer environments.
![]() The Users list to the left of the Users pane in the Filer administration tool interface displays a list of all end users who can access the data on the filer. When you right-click a user name, a shortcut menu appears. Table 7-1-3 lists the options of the shortcut menu:
The Users list to the left of the Users pane in the Filer administration tool interface displays a list of all end users who can access the data on the filer. When you right-click a user name, a shortcut menu appears. Table 7-1-3 lists the options of the shortcut menu:
| | |
|---|---|
| | |
| | |
| | |
| | |
| Note | |
 Groups Pane
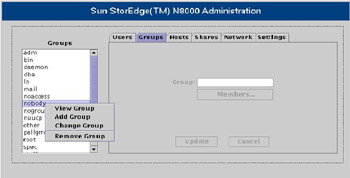
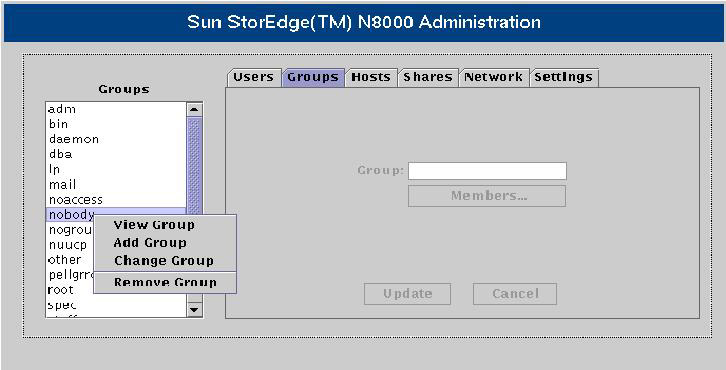
![]() When you select the Groups tab, the Groups list replaces the Users list. When you right-click a group name, a shortcut menu appears, as shown in Figure 7-1-10:
When you select the Groups tab, the Groups list replaces the Users list. When you right-click a group name, a shortcut menu appears, as shown in Figure 7-1-10:
![]() Table 7-1-4 lists the functions of each option in the shortcut menu:
Table 7-1-4 lists the functions of each option in the shortcut menu:
| | |
|---|---|
| | |
| | |
| | |
| | |
 Hosts Pane
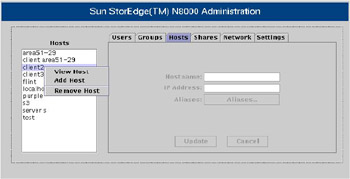
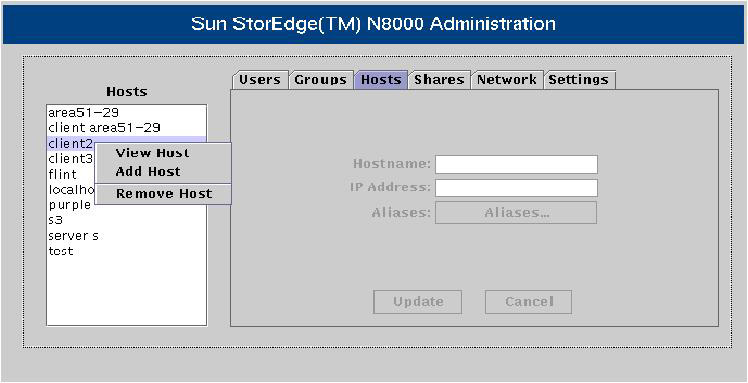
![]() A host is a computer on the network to which the filer is connected. Each host has a unique IP address, a computer name, and a number of alias names. Figure 7-1-11 shows the N8000 Filer Administration tool with the Hosts pane active:
A host is a computer on the network to which the filer is connected. Each host has a unique IP address, a computer name, and a number of alias names. Figure 7-1-11 shows the N8000 Filer Administration tool with the Hosts pane active:
![]() Table 7-1-5 lists the options in the shortcut menu displayed in Figure 7-1-11:
Table 7-1-5 lists the options in the shortcut menu displayed in Figure 7-1-11:
| | |
|---|---|
| | |
| | |
| | |
 Shares Pane
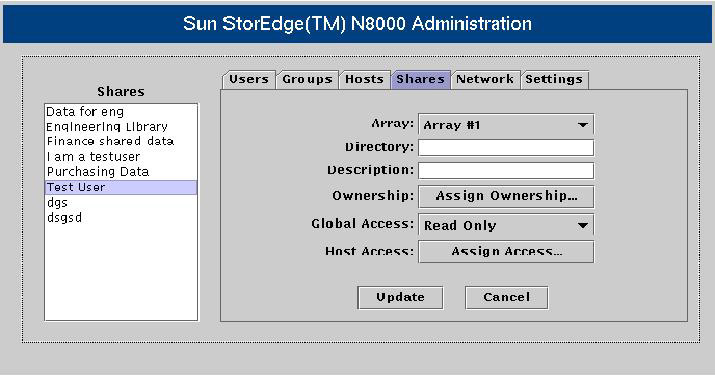
![]() Shares are specific directories on a filer accessible to other network hosts and their end users. Each shared directory has a unique name. The Shares list displays a list of share names present on a filer. To configure shares on a filer, you need to use the Shares pane. Figure 7-1-12 shows the N8000 Filer Administration tool with the Shares pane active:
Shares are specific directories on a filer accessible to other network hosts and their end users. Each shared directory has a unique name. The Shares list displays a list of share names present on a filer. To configure shares on a filer, you need to use the Shares pane. Figure 7-1-12 shows the N8000 Filer Administration tool with the Shares pane active:
![]() When you right-click a share name, a shortcut menu appears, which has the following options:
When you right-click a share name, a shortcut menu appears, which has the following options:
-
 Add Share: Creates a share on a particular directory
 -
 Change Share: Changes the permissions assigned to an existing share
 -
 Remove Share: Deletes the selected share from the filer
Note  Deleting a share does not delete the directory related to that share.
![]() Table 7-1-6 lists the fields in the Shares pane of the Filer Administration tool:
Table 7-1-6 lists the fields in the Shares pane of the Filer Administration tool:
| | |
|---|---|
| | |
| | |
| | |
| | |
| | |
| | |
 Network Pane
![]() The Network pane configures the NICs installed on the filer. When you install the filer, you specify the interface name, IP address, and subnet mask of the primary network interface. Use the Network pane to set up additional network interfaces for a filer.
The Network pane configures the NICs installed on the filer. When you install the filer, you specify the interface name, IP address, and subnet mask of the primary network interface. Use the Network pane to set up additional network interfaces for a filer.
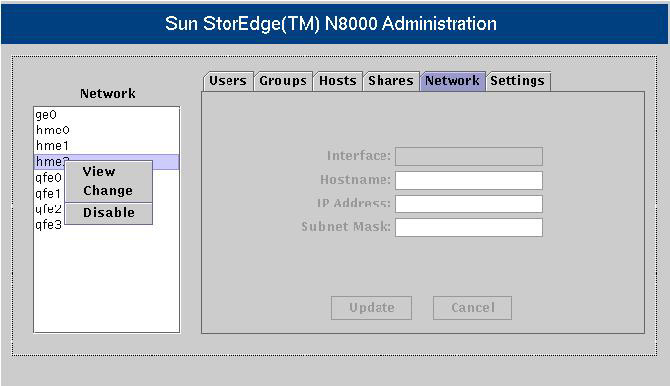
![]() The Network list, which appears to the left of the Network pane, displays the names of all network interfaces installed on a filer. Figure 7-1-13 illustrates the Network pane:
The Network list, which appears to the left of the Network pane, displays the names of all network interfaces installed on a filer. Figure 7-1-13 illustrates the Network pane:
![]() When you right-click any of the interface names, a shortcut menu appears. Table 7-1-7 lists the options in the shortcut menu:
When you right-click any of the interface names, a shortcut menu appears. Table 7-1-7 lists the options in the shortcut menu:
| | |
|---|---|
| | |
| | |
| | |
| Note | |
 Settings Pane
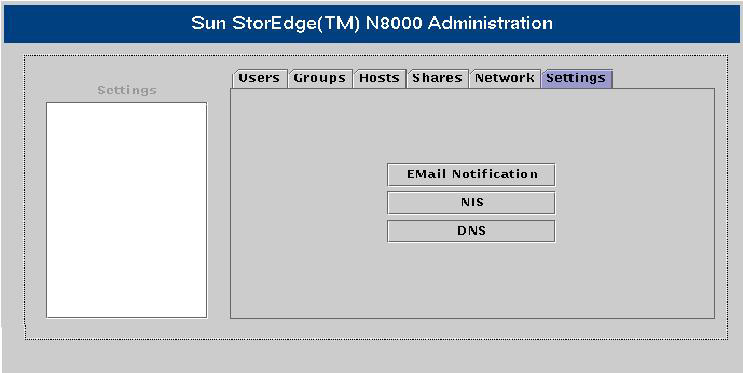
![]() The Settings pane has three options:
The Settings pane has three options:
-
 Email Notification: Specifies a list of all e-mail addresses to which an e-mail message has to be sent when hardware fails in any of the filer disk arrays. To enable the EMail Notification option, use the Hosts pane of the Filer Administration tool to create a host related to the network mail server.
 -
 NIS: Changes the Network Information Service domain to which the filer belongs. The Network Information Service domain distributes data files across multiple hosts.
 -
 DNS: Changes the Domain Name Service settings stored on a filer. The filer uses the DNS settings to identify the IP address of a host based on the host name.
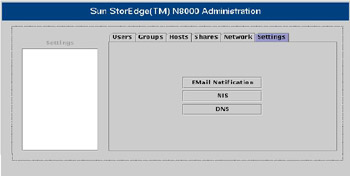
![]() Figure 7-1-14 shows the Sun StorEdge N8000 Filer Administration tool with the Settings pane active:
Figure 7-1-14 shows the Sun StorEdge N8000 Filer Administration tool with the Settings pane active:
Analyzing and Tuning Filer Performance
![]() Analyzing the performance of a filer helps detect problems associated with the filer hardware and software. Monitor the performance of filer disk arrays using one of three tools: SNMP notification, syslog error reporting, and array command line interface (CLI).
Analyzing the performance of a filer helps detect problems associated with the filer hardware and software. Monitor the performance of filer disk arrays using one of three tools: SNMP notification, syslog error reporting, and array command line interface (CLI).
 SNMP Notification
![]() When an event, such as a disk failure that requires attention, occurs in the filer disk array, the filer operating system sends an SNMP Trap to the SNMP Manager. The SNMP Manager receives the SNMP trap and notifies the administrator about the event.
When an event, such as a disk failure that requires attention, occurs in the filer disk array, the filer operating system sends an SNMP Trap to the SNMP Manager. The SNMP Manager receives the SNMP trap and notifies the administrator about the event.
| Tip | |
![]() An SNMP trap is a User Datagram Protocol (UDP) packet, which consists of an event description, a header that identifies the type of the event, and the IP address of the host computer. UDP converts data messages generated by computer hardware into data packets.
An SNMP trap is a User Datagram Protocol (UDP) packet, which consists of an event description, a header that identifies the type of the event, and the IP address of the host computer. UDP converts data messages generated by computer hardware into data packets.
 Syslog Error Reporting
![]() The disk array controller of the filer has a syslog utility. The utility is activated automatically when you switch the filer on. The syslog utility executes as a daemon thread in the background. The utility reports four types of messages:
The disk array controller of the filer has a syslog utility. The utility is activated automatically when you switch the filer on. The syslog utility executes as a daemon thread in the background. The utility reports four types of messages:
-
 Error: Indicates a critical system event, such as an over-temperature condition, which requires immediate attention.
 -
 Warning: Indicates a system event that is important but not urgent, such as a disabled disk array on which a recovery procedure is being executed.
 -
 Notice: Indicates a system event, such as a power switch in the off position, which can be a result of other events or a normal condition.
 -
 Information: Indicates a system event that has no effect on the health of the system. An example of this message is a report on the healthy state of a disk array.
![]() The syslog utility sends these messages to an administrator host that records the messages in a syslog database.
The syslog utility sends these messages to an administrator host that records the messages in a syslog database.
 Array Command Line Interface
![]() The performance of disk arrays can also be monitored by using commands such as vol, sys, and fru. To run these commands, connect to the filer using a telnet session from the administration console and log on as root. A telnet session between the filer disk array and the administration console is an array CLI.
The performance of disk arrays can also be monitored by using commands such as vol, sys, and fru. To run these commands, connect to the filer using a telnet session from the administration console and log on as root. A telnet session between the filer disk array and the administration console is an array CLI.
 Tuning the Performance of a Filer
![]() Performance tuning is the combined task of measuring performance, identifying bottlenecks, and altering configuration settings to fine-tune a NAS device. Perform the activities listed in Table 7-1-8 to enhance the performance of a filer. Different filers provide different management tools to perform each of these activities:
Performance tuning is the combined task of measuring performance, identifying bottlenecks, and altering configuration settings to fine-tune a NAS device. Perform the activities listed in Table 7-1-8 to enhance the performance of a filer. Different filers provide different management tools to perform each of these activities:
NAS Backup and Recovery
Backing up and restoring business data is crucial for round-the-clock data availability. Some technologies to backup and restore data are snapshots, server-to-server mirroring, NFS/CIFS, and NDMP.
Snapshots
Snapshots are similar to shortcuts of files in the Windows environment and give a static view of the filesystem as it existed at the time of backup.
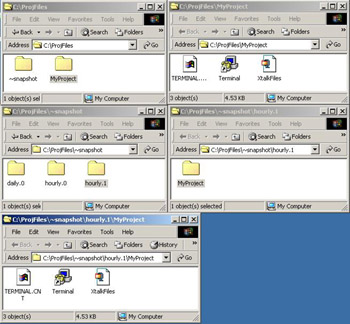
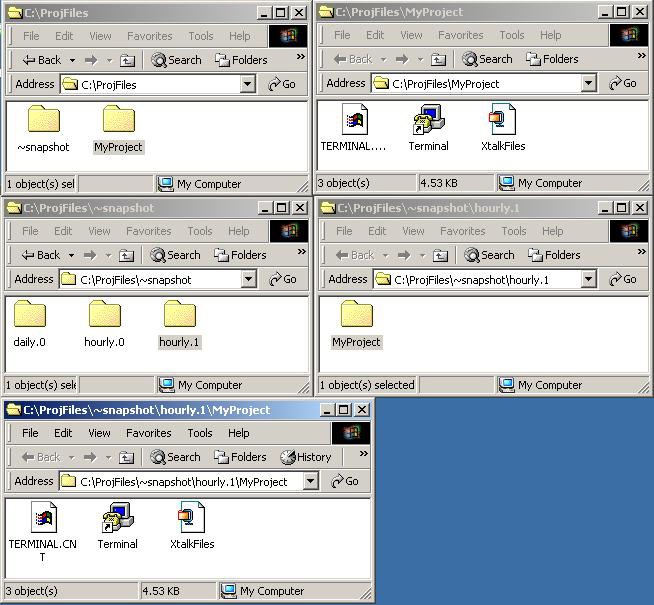
You can schedule snapshot backup operations for a folder stored on a NAS device by accessing the folder from a Windows or UNIX host and using the host-based volume manager utility. Figure 7-1-15 shows the snapshots taken for a folder, MyProject, on an hourly and daily basis:
As shown in Figure 7-1-15, the MyProject folder consists of three files. The daily.0, hourly.0, and hourly.1 folders contain a copy of the MyProject folder taken at different times.
Server-to-Server Mirroring
In snapshots, backup copies of data are stored on the same NAS device as the source data. Server-to-Server mirroring creates a replica of the data stored on one NAS device on another NAS device.
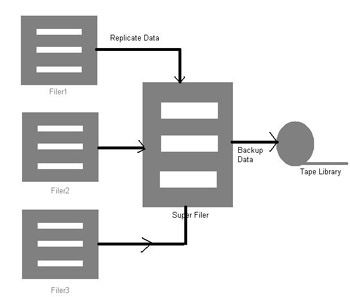
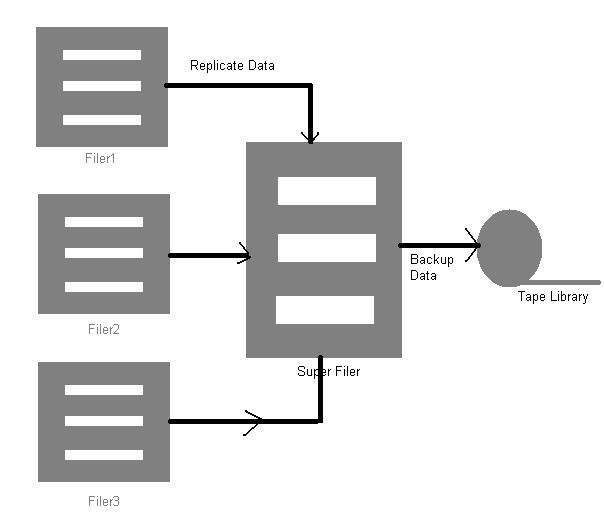
As shown in Figure 7-1-16, the server-to-server mirroring technique, replicates data stored on multiple small filers to a super filer across a LAN or Wide Area Network (WAN) connection:
The disadvantage of the snapshot technique is that the backup copies are lost when the source data is lost. Server-to-Server mirroring overcomes this disadvantage by storing the source and backup data at different locations. In addition, if the super backup filer is located in a different location, instantaneous recovery can be done in case of disasters at the source location.
NFS/CIFS
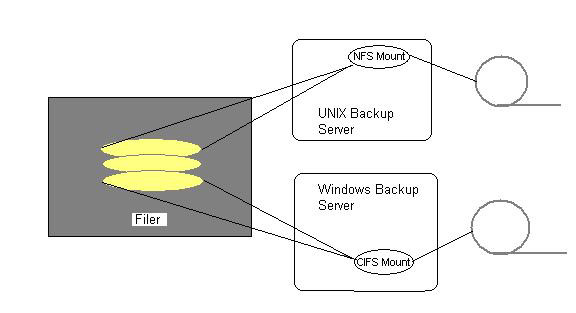
Server-to-Server mirroring maintains two copies of data, one on the super filer and another on the tape library. This technique consumes a lot of storage space. The NFS/CIFS backup technique involves mounting volumes on the NAS device as NFS/CIFS shares and using these shares to back up the data. The NFS/CIFS mounts point to the source data and do not contain a separate copy of the data.
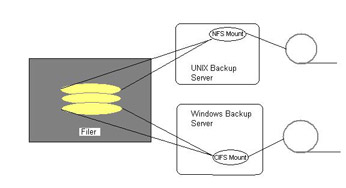
As shown in Figure 7-1-17, you can mount a volume on the NAS device as an NFS volume on to a UNIX machine or a CIFS volume on to a Windows machine. You can use a UNIX or Windows backup utility, such as dump and NTBACKUP, to back up the volume on the NAS device using the NFS/CIFS share.
Some of the disadvantages of the NFS/CIFS backup technique are:
-
Impact on Performance: NAS devices give lower priority to backup processes, such as NDMP backups and the dump and NetBackup commands issued directly to a NAS device volume. If the NFS/CIFS mount technique is used, the NAS device cannot distinguish between file requests for the backup process and file requests for other end user processes. As a result, backup processes are given the same priority as other end user processes. Backup processes consume a lot of cache memory and normal file requests are devoid of cache memory services.
-
Loss of CIFS ACL: If an NFS mount backs up a NAS device volume, the Windows-based Access Control List (ACL) information of the volume is lost.
-
Loss of Unicode File Names: NFS does not support Unicode file-naming conventions. For example, a volume on a NAS device contains files created using Windows NT and named in Unicode format. When this volume is backed up using an NFS mount, the original file name is replaced with a NFS-friendly name in the backup copy. NFS-friendly names are different from the original file names.
-
Loss of New Technology File System (NTFS) Alternate Data Streams: In NTFS volumes, a file consists of multiple streams of data that store the ACL information, file data, and format settings. When NTFS volumes are backed up using NFS mount, the data streams do not translate to the actual data, resulting in data loss.
NDMP
NDMP defines standards to control the backup and recovery of data stored on a NAS device. To back up and recover data on a NAS device using NDMP, the operating system of the NAS device needs to include support for NDMP. The third-party utility used to perform the backup operation needs to include support for NDMP.
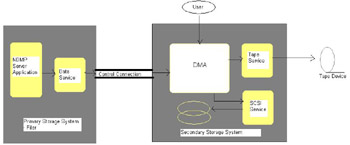
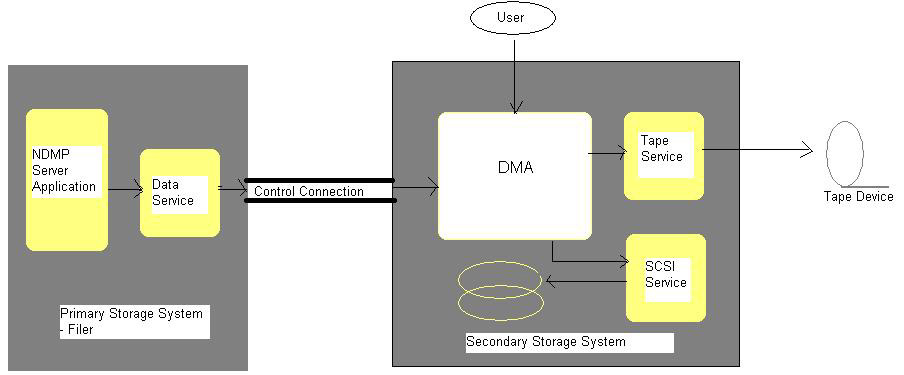
Figure 7-1-18 shows the components performing backup operations using NDMP:
Table 7-1-9 lists the components performing backup and restore operations using NDMP:
| Component | Description |
|---|---|
| NDMP Server Application | A daemon application included within the operating system of a NAS device. Switch the NAS device on to invoke the application. |
| DMA | A Data Management Application that provides the end user interface to perform the NDMP backup operation. |
| Primary Storage System | The system that contains the source data to be backed up. |
| Secondary Storage System | The system that contains the backup device to which the data has to be backed up. |
| Control Connection | A TCP/IP data connection between the primary storage system and the secondary storage system. |
| Data Service | An NDMP service that transfers data from the primary storage to the data connection. |
| Tape Service | An NDMP service that transfers data from a data connection to a tape library. |
| SCSI Service | An NDMP service that transfers data from a data connection to a Small Computer System Interface (SCSI) device. |
Depending on the secondary storage system, NDMP backup operations are classified as filer-to-filer if the secondary storage system is a filer and filer-to-server if the secondary storage system is a UNIX or Windows-based server.
One of the disadvantages of the NDMP backup technique is that NDMP backups are not portable. Different vendors of NAS devices implement the NDMP server application differently. As a result, the format in which the NDMP server application sends backup data to the DMA differs.
During restoration, the DMA needs to send data to the NDMP application in the same format as during the backup. As a result, the data backed up from a NetApp filer cannot be restored on to a Sun StorEdge 8600 filer because the NDMP server application of NetApp and Sun StorEdge filers use different data formats.
Backing Up and Restoring Filer Data
Backup and restore software included with the filer operating system can be used to make a back up or recover data quickly and efficiently. Filer backup and restore software use the snapshot technology to perform backup and restore operations. This enables efficient use of storage by storing block-level changes between each successive snapshot. The snapshot process is automatic and instantaneous, resulting in significantly faster backups.
Managing NAS
A network administrator needs to be familiar with the daily management activities performed on NAS devices. When managing NAS devices, you need to monitor the performance of these devices, troubleshoot hardware and software problems, and migrate data from distributed local storage to a NAS device.
Monitoring the Performance of NAS Devices
NAS devices provide counters to monitor the performance of the CPU, memory, network, and file system of NAS devices. Table 7-1-10 lists some of the frequently used counters:
| Counter | Description |
|---|---|
| CPU Utilization | The time for which the CPU is busy with handling file I/O, incoming client requests, outgoing replies, and Redundant Array of Inexpensive Drives (RAID) management. |
| Network Interface Statistics | The set of counters that specify the amount of data received and transmitted over a network by the NAS device, the information about NIC buffer overflow, and the number of Ethernet collisions. |
| Disk Utilization | The time for which the disk head has been busy performing read/write operations. This data helps to identify the over utilized disks. |
Some of the applications built into NAS devices to monitor system performance are Network Appliance DataFabric Manager, EMC Control Center Symmetrix Manager, and Multi Router Traffic Grapher (MRTG).
Network Appliance DataFabric Manager
Network Appliance DataFabric Manager is a remote management utility built into NetApp cache appliances and filers. This software is used to:
-
Monitor the usage and availability of disks and hot drives.
-
Monitor system settings, such as temperature, power supplies, and fan performance.
-
Monitor the utilization of protocols, such as HTTP, FTP, NNTP, NFS, and CIFS.
-
Measure the number of bytes and packets read or written over the network, and the errors associated with each network interface.
-
Send an e-mail or pager notification to an administrator on detecting hardware or software problems.
-
Provide graphs and reports to help analyze system performance based on past and current data.
EMC Control Center Symmetrix Manager
EMC Control Center Symmetrix Manager is a management utility built into EMC Symmetrix storage systems. This software monitors the performance of channel and disk directors and generates physical and logical views of NAS device hardware configurations.
Multi Router Traffic Grapher
Multi Router Traffic Grapher (MRTG) is a general-purpose network traffic management utility used with NAS devices from any vendor. This utility reads the traffic counters of a NAS device network connection from a router and creates detailed graphs showing the status of the monitored network connection. The graphs are created as HTML pages and can be viewed using a Web browser.
Troubleshooting Hardware and Software Problems
NAS device vendors provide Field Replaceable Units (FRUs) for hardware liable to pose problems. For example, most NAS vendors provide one or two hot disk drives. When one of the disks in the NAS disk drive array fails, the data on the damaged disk is copied to the spare disk and all read/write operations are performed from the spare disk. In addition, most vendors provide multiple Ethernet channels to a single NIC. When one channel links fails, alternate links automatically perform data transfer.
| Tip | The NAS device management software sends a notification to the administrator about the link and disk failures. In case of failures in other hardware components, such as the CPU, the motherboard, and the power supply, it is best to let an experienced technician fix the error. |
Software errors that occur on a NAS device can be classified into three categories: system bugs, system panics, and system hangs.
System Bugs
System bugs are errors that are part of the NAS operating system software and cannot be fixed by an end user. The bugs in the NAS operating system can be fixed by purchasing upgrade software or patches from the NAS device vendor.
System Panics
System panics are errors that can occur when the NAS operating system code performs an illegal operation, such as a function trying to read disk blocks with illegal block numbers. System panics cause the NAS device to shut down, reboot, and dump memory contents to a file, core file. You need to send the core file to the NAS device vendor and get the error fixed.
System Hangs
System hangs are errors that occur in a NAS device due to the watchdog mechanism. The watchdog mechanism performs a coordinated check between the hardware and software of the NAS device. After a predefined time, the operating system of the device increments a counter in the memory.
The Read Only Memory Basic Input/Output System (ROM BIOS) firmware periodically checks to see if the counter has been incremented. If the counter has not been incremented, the BIOS firmware assumes that the NAS device operating system is not functioning and reboots the system.
Migrating Data from a Local Storage to a NAS Device
Copying data across platforms involves the migration of data across different filesystems, such as UNIX File Systems (UFS) and NTFS. Commonly available softwares built into NAS devices to perform data migration are:
-
NDMPcopy: Transfers data between two NAS devices across a dedicated network connection using the NDMP protocol. The NDMPcopy software supports full and incremental copies of data to be transferred and supports volume- or directory-level copy operations.
-
Network Appliance SnapMirror: Mirrors data across two or more filers. This software is built into NetApp filers and supports incremental, checkpoint, and cascade mirroring. It does not need additional resources to manage the replication process.
-
EMC Celerra TimeFinder/FS: Migrates complete volumes from one Symmetrix NAS device to another. This software enables volumes to be mirrored across remote sites and supports splitting of mirror volumes.
-
cp, xcopy, and tar Commands: Copy data from UNIX- and Windows-based computers to NAS devices. The UNIX cp and Windows xcopy commands copy UFS and NTFS volumes on to a NAS device volume.
-
Remote Tape Utility: Copies data from a remote tape to a NAS device. This utility is provided by UNIX-based NAS device vendors.
Note The NDMPcopy, SnapMirror, and TimeFinder software can migrate UFS and NTFS volumes across NAS devices.
When migrating data across NAS devices, ensure that the software you use to perform the migration provides support for migration of metadata and access control lists (ACL). For example, the xcopy command copies ACLs along with data when migrating NTFS volumes to a NAS device. In addition, ensure that soft links, which are symbolic links to directories on other volumes, are also migrated. The cp command follows symbolic links and copies the target of the links to the destination location.

