Disk partitioning is the process of logically dividing the hard disk of a computer into different sections called disk partitions. Each disk partition of a hard disk acts as a separate disk drive. Linux allows you to create different types of disk partitions, such as primary, logical, swap, and Redundant Array of Independent Disks (RAID). You can create and manage the disk partitions either by using Disk Druid or the parted utility. Disk Druid is a partitioning tool that helps create, delete, and resize the disk partitions when installing Linux. The parted utility helps to create new disk partitions and modify the existing disk partitions using the shell prompt. The parted utility helps perform various tasks, such as changing the size of the disk partitions, removing the disk partitions, and adding the disk partitions.
This ReferencePoint introduces disk partitions and describes how to create, resize, and delete the disk partitions using Disk Druid and the parted utility.
Introducing Disk Partitions in Linux
A hard disk can support disk partitions of varied sizes. Information about different disk partitions is stored in a partition table. A partition table stores the following information:
-
Size and location of the disk partition on the hard disk.
-
Status of the disk partition that indicates whether the disk partition is active or not. The active status of a disk partition signals the boot loader to load the operating system from that disk partition.
-
Type of the disk partition, such as primary or extended.
The partition table is stored in the first sector of a hard disk called Master Boot Record (MBR). MBR also contains the boot loader, which reads the content of the partition table to determine the active disk partition.
Types of Disk Partitions
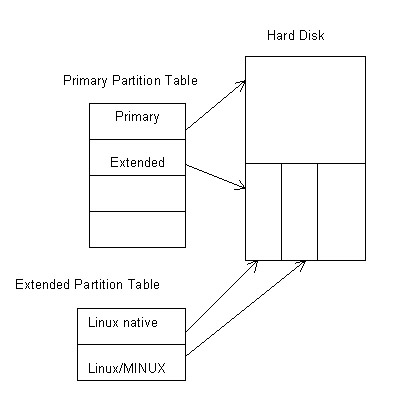
Disk partitions are of various types, such as primary and extended. Primary disk partitions divide the hard disk into different sections. A hard disk can contain a maximum of four primary disk partitions.
An extended disk partition contains several sub partitions, which are called logical partitions. Logical partitions allow you to divide the disk space of an extended disk partition into different sections. Each section acts as a separate disk drive. An extended disk partition also contains a partition table that stores information about different logical partitions.
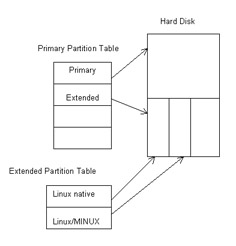
Figure 4-20-1 shows a hard disk with a primary and an extended disk partition:
Linux also supports other disk partitions, such as swap and RAID. Swap partitions are used as virtual memory to store data when Random Access Memory (RAM) of the computer is full. Swap partitions allocate a specific amount of memory space to be used as swap space. The size of swap space should be double the size of RAM. The disadvantage of swap space in comparison to RAM is that the access time of the swap space is greater than that of RAM.
RAID partitions are used for creating a RAID drive, which is a combination of different disk drives that act as a single logical disk drive to the computer. RAID drives provide redundancy of data by storing same data at different locations. You can create a RAID partition by using Disk Druid.
In addition to RAID partitions, Disk Druid also allows you to create Logical Volume Manager (LVM) groups. LVM is the method of dividing the hard disk space into logical volumes that can be resized easily. You can create LVM groups by using two or more disk partitions having file system type, physical volume.
Partition Naming Scheme
You can identify the disk partitions in Linux by using the partition naming scheme. The format of the partition naming scheme is:
/dev/xxyN
In this naming scheme:
-
/dev: Specifies the name of the directory that stores the device files.
-
xx: Specifies the type of the hard disk containing the disk partitions. For example, hd specifies the Integrated Drive Electronics (IDE) disks and sd specifies the Small Computer System Interface (SCSI) disks.
-
y: Specifies the hard disk containing the disk partition. For example, /dev/hda specifies the first IDE disk and /dev/hdb specifies the second IDE disk.
-
N: Specifies the type of a disk partition with the help of an integer value. The numbers from one to four specify primary or extended partitions. The numbers starting from five specify the logical partitions. For example, /dev/hdb6 specifies the second logical partition of the second IDE disk.
Repartitioning a Disk
Repartitioning a hard disk means creating disk partitions on a hard disk that already contains disk partitions. You can repartition a hard disk when:
-
You want to use unpartitioned disk space.
-
You want to use an existing unused disk partition.
-
You want to use the free space of an existing disk partition that is currently being used.
Unpartitioned disk space is created when no partition is assigned to a specific area of a hard disk. You can use the unpartitioned disk space to create different number and type of disk partitions.
You can also use an existing disk partition for repartitioning. You need to first delete the existing disk partition from the hard disk and then use a partitioning utility, such as parted and fdisk to create new disk partitions.
You can also use the free space of an existing disk partition, currently storing data, to create new disk partitions. Two ways of repartitioning an existing disk partition are:
-
Destructive repartitioning: Is a repartitioning process in which the entire data of an existing disk partition is deleted before creating new disk partitions.
-
Non-destructive repartitioning: Is a repartitioning process in which the existing disk partition is resized without losing the data present on the existing partition and new disk partitions are created using the free space.
You need to back up data contained in the Alternatively, you do not need to back up data in non-destructive repartitioning process:
-
Compresses the existing data by rearranging it to create free space at contiguous memory locations.
-
Resizes the existing partition to create an unformatted disk partition from the free space of the hard disk by using the resizing software.
-
Creates a new disk partition after deleting the disk partitions created by resizing software.
Using Disk Druid
Disk Druid allows you to create and manage disk partitions either automatically or manually. Automatic disk partitioning helps the end users to install Linux by automatically creating disk partitions. Manual partitioning allows the end users to manually create new disk partitions, and manage the existing disk partitions.
Disk Druid is initiated during the installation of Red Hat Enterprise Linux. To initiate Disk Druid:
-
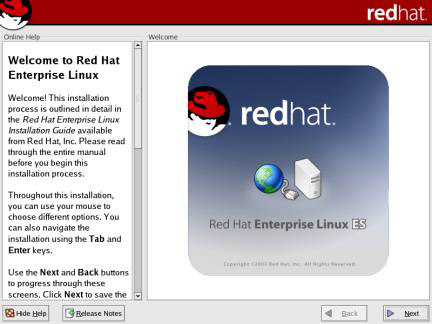
Run the Red Hat Enterprise Linux installation program. The Welcome screen appears, as shown in Figure 4-20-2:
-
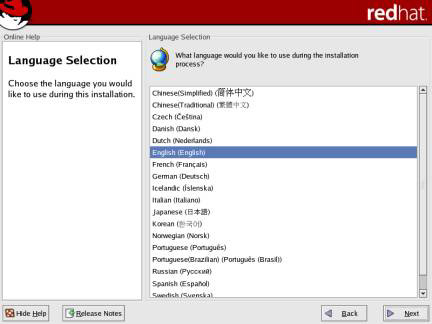
Click Next to open the Language Selection screen, as shown in Figure 4-20-3:
-
Click Next to display the Keyboard screen that helps specify the type of keyboard to be used.
-
Click Next to display the Mouse Configuration screen that helps specify the type of mouse to be used.
-
Select the model of the mouse from the Model list box and the port to which the mouse is connected from the Device list box.
-
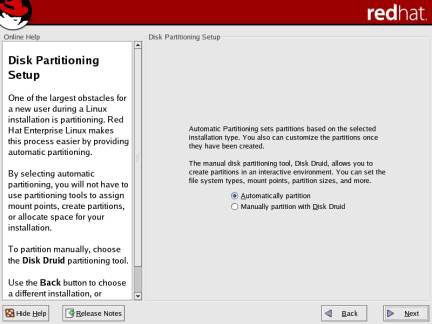
Click Next to display the Disk Partitioning Setup screen, as shown in Figure 4-20-4:
The Automatically partition option partitions the hard disk automatically by creating new disk partitions of default sizes. Alternatively, the Manually partition with Disk Druid option allows you to manually partition the hard disk by explicitly specifying the size of each partition.
Automatic Partitioning
Automatic partitioning creates the required disk partitions of default size from the available free space automatically. You do not need to specify the size of the disk partitions in automatic partitioning.
To initiate automatic partitioning:
-
Select the Automatically partition option from the Disk Partitioning Setup screen of the Red Hat Enterprise Linux installation program.
-
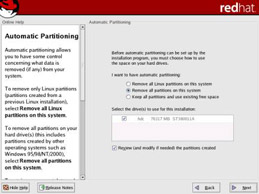
Click Next to display the Automatic Partitioning screen, as shown in Figure 4-20-5:
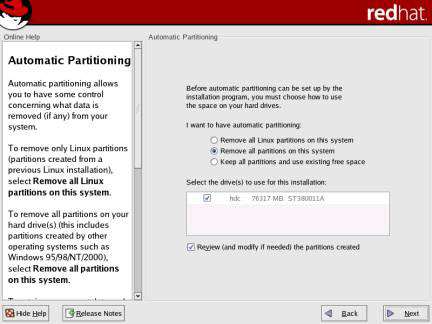
Figure 4-20-5: The Automatic Partitioning ScreenThe various options provided by Disk Druid for automatic partitioning are:
-
Remove all Linux partitions on this system: Removes all the existing Linux disk partitions present on the hard disk.
-
Remove all partitions on this system: Removes all the existing disk partitions present on the hard disk. This includes both Linux and non-Linux partitions.
-
Keep all partitions and use existing free space: Retains all the existing disk partitions and uses the available free space on the hard disk for creating new disk partitions.
-
Select the drive(s) to use for this installation: Helps select the disk drive on which Linux is to be installed and the disk partitions are to be created.
-
Review (and modify if needed) the partitions created: Allows you to review the disk partitions created by automatic partitioning. This option also allows you to modify the created disk partitions.
-
-
Select the Remove all partitions on this system option.
-
Select the disk drive on which you want to create the disk partitions from the Select the drive(s) to use for this installation list.
-
Select the Review (and modify if needed) the partitions created option and click Next. A warning message appears to confirm the deletion of existing partitions on the selected disk drive.
-
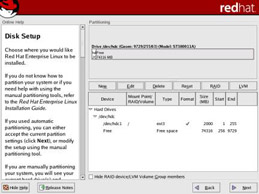
Click Yes to display the Partitioning screen, as shown in Figure 4-20-6:
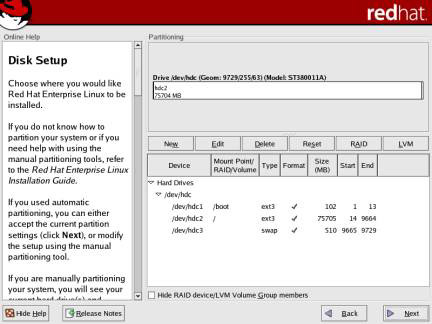
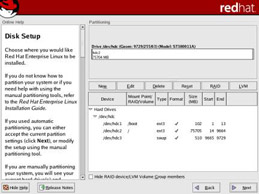
Figure 4-20-6: Disk Partitions in the Partitioning ScreenIn this case, automatic partitioning creates three disk partitions:
-
/dev/hdc1: Specifies the boot partition. This partition stores the operating system kernel and the files that are used during the booting of a computer.
-
/dev/hdc2: Specifies the root partition, which stores the system files and user data.
-
/dev/hdc3: Specifies the swap partition and contains the swap space that is used if RAM of the computer is full.
Note You can modify the disk partitions created during the automatic partitioning process by using the Edit option of the Partitioning screen.
-
-
Click Next to complete the process of creating the disk partitions. The Boot Loader Configuration screen appears, which helps select the boot loader.
Manual Partitioning
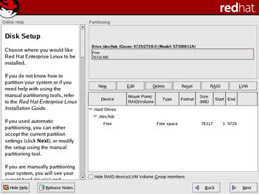
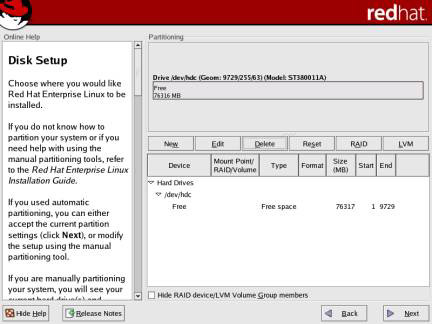
Disk Druid allows you to manage the disk partitions through a Graphical User Interface (GUI). You can perform manual partitioning with Disk Druid by selecting the Manually partition with Disk Druid option on the Disk Partitioning Setup screen and clicking Next. Figure 4-20-7 shows the Partitioning screen of the Red Hat Enterprise Linux installation program, which is a GUI of Disk Druid:
The various options on the Partitioning screen are:
-
Partition List: Represents the various disk partitions in a hierarchical form. Information about the disk partitions represented in Partitions list is illustrated through different labels, such as:
-
Device: Specifies the type of device, such as SCSI or IDE that contains a disk partition.
-
Mount Point/RAID/Volume: Specifies the mount point of a disk partition.
-
Type: Specifies the type of disk partition, such as ext2.
-
Format: Specifies whether or not a disk partition is to be formatted.
-
Size (MB): Specifies the size of a disk partition in Mega Bytes (MB).
-
Start: Specifies the cylinder of the hard disk from where a disk partition starts.
-
End: Specifies the cylinder of the hard disk where a disk partition ends.
-
-
New: Allows you to create new disk partitions.
-
Edit: Allows you to modify the disk partition that is selected on the Partition list.
-
Delete: Allows you to delete the disk partition selected from the Partitions list.
-
Reset: Allows you to reset all the changes made in the GUI of Disk Druid and return the GUI to its original state.
-
RAID: Allows you to create RAID partitions.
-
LVM: Allows you to create LVM groups.
Creating Disk Partitions
You can create a new disk partition by using the Add Partition dialog box.
To create a new disk partition:
-
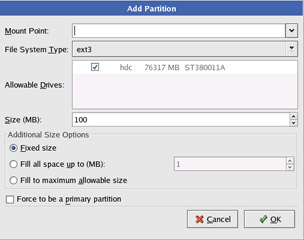
Click the New button on the Partitioning screen of the Red Hat Enterprise Linux installation program to display the Add Partition dialog box, as shown in Figure 4-20-8:
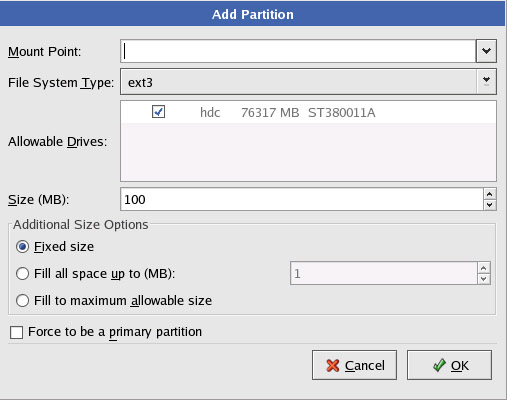
Figure 4-20-8: The Add Partition Dialog BoxThe various options provided by the Add Partition dialog box are:
-
Mount Point: Helps specify the mount point of the new disk partition.
-
File System Type: Helps specify the type of file system, such as ext3 for the new disk partition.
-
Allowable Drives: Lists the various disk drives present on the computer. Disk partitions are created on the selected disk drive.
-
Size (MB): Helps specify the size of the new disk partition. The default size for a new partition is 100 MB.
-
Additional Size Options: Helps specify whether or not the disk partition is of fixed size. This options provides various options:
-
Fixed size: Creates a disk partition of fixed size.
-
Fill all space up to (MB): Creates a disk partition of specific size, specified in the corresponding text box.
-
Fill to maximum allowable size: Creates a disk partition with all the available free disk space.
-
-
Force to be a primary partition: Helps specify whether the new partition is a primary or logical disk partition. The new disk partition becomes a primary partition if you select this option.
-
-
Enter / in the Mount Point text box to create the new disk partition as root partition.
-
Select ext3 from the File System Type list.
-
Specify the size of the disk partition in the Size (MB) field.
-
Click OK to create a new disk partition. The new disk partition appears in the Partitioning screen, as shown in Figure 4-20-9:
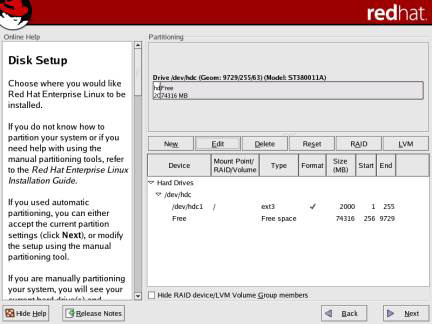
Figure 4-20-9: The Partitioning Screen with the New Disk Partition
Editing Partitions
You can make changes to an existing disk partition, such as changing the mount point of a partition by using the Edit option on the Partitioning screen.
To edit an existing partition:
-
Select an existing disk partition, such as /dev/hdc2 from the Partitioning screen.
-
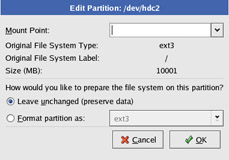
Click the Edit button. The Edit Partition: /dev/hdc2 dialog box containing various options for editing a partition appears, as shown in Figure 4-20-10:
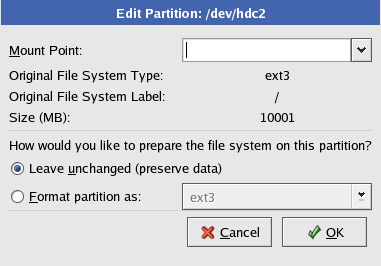
Figure 4-20-10: The Edit Partition: /dev/hdc2 Dialog BoxThe various options that help edit a partition are:
-
Mount Point: Helps change the mount point of the existing disk partition by specifying a new mount point.
-
Leave unchanged (preserve data): Helps modify the disk partition, without formatting, to save the existing data.
-
Format partition as: Helps modify the disk partition by formatting, to delete the existing data from the disk partition. You can also specify the type of file system that you want to create on the formatted disk partition.
Note The name of the Edit Partition dialog box changes, depending on the selected partition.
-
-
Specify a mount point for the disk partition in the Mount Point field.
-
Select the Format partition as option and select the type of file system that you want to create on the disk partition after formatting and click OK. A warning message appears indicating that all data in the disk partition will be deleted.
-
Click Continue. The Partitioning screen appears, which displays the changes made to a disk partition.
-
Click Next to open the Format Warnings dialog box, which lists the existing disk partitions selected for formatting.
-
Click Format to format the disk partition and display the Boot Loader Configuration screen, which helps configure the boot loader.
Deleting Partitions
The Partitioning Screen provides the Delete button that helps you delete an existing disk partition. To delete an existing disk partition:
-
Select the disk partition that you want to delete from the Partitions list of the Partitioning screen.
-
Click Delete. A warning message appears that prompts you to confirm the deletion of the disk partition.
-
Click Continue to delete the disk partition. The name of the deleted disk partition is removed form the Partitions list.
Using the parted Utility
The parted utility allows you to perform various disk partitioning related tasks, such as viewing the partition table and creating, removing, and resizing the disk partitions. You need to unmount a mounted disk partition and disable the swap space before using the parted utility for manipulating a disk partition. The command to unmount a disk partition is umount and to disable the swap space is swapoff.
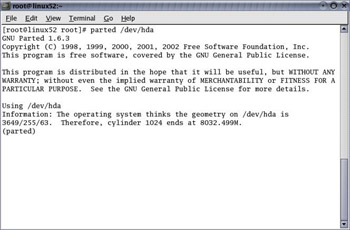
You can install the parted utility by using the parted RAM package. The command for starting the parted utility is:
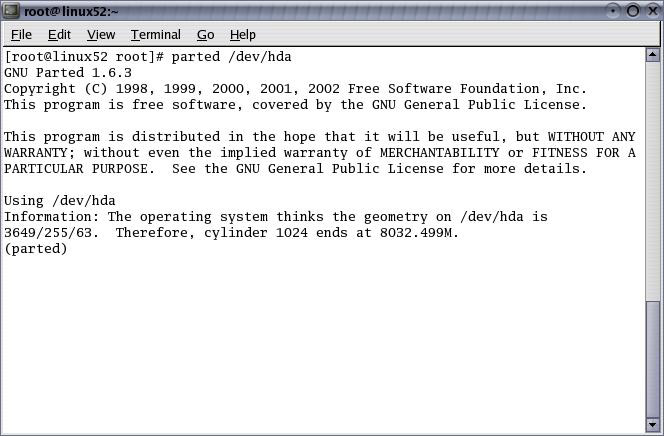
parted /dev/hda
In the above command, /dev/hda specifies the name of the hard disk that you want to configure using the parted utility. Figure 4-20-11 shows the output of the parted command:
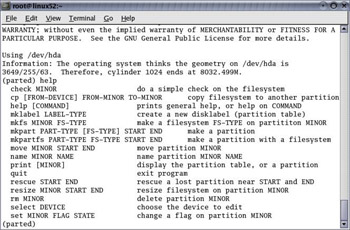
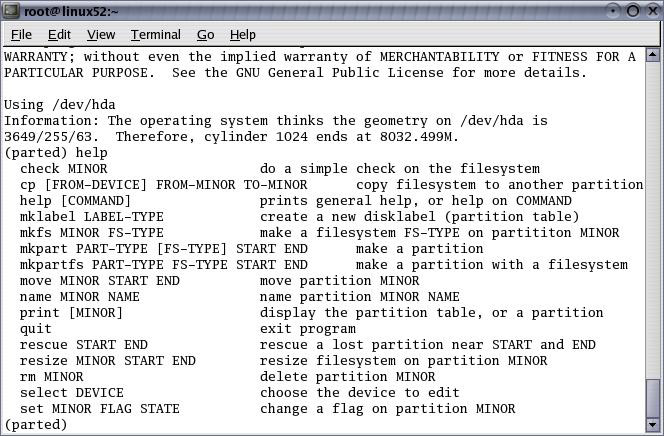
You can view the various commands available with the parted utility by using the help command. Figure 4-20-12 shows the output of the help command:
Viewing the Partition Table
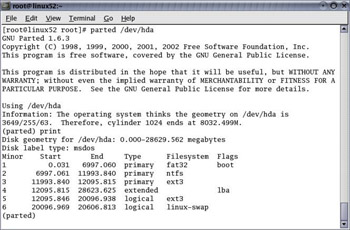
You can use the print command of the parted utility to view a partition table. To view a partition table:
-
Open the command prompt window.
-
Start the parted utility by using the following command at the shell prompt:
parted /dev/had
-
Run the following command at the parted prompt to view the partition table:
print
Figure 4-20-13 shows the output of the print command:
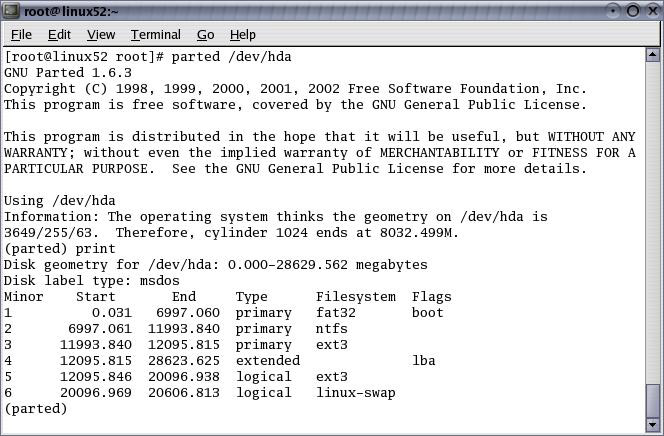
Figure 4-20-13: Output of the print CommandThe partition table lists the following information about the hard disk, /dev/hda:
-
Minor: Specifies the integer value assigned to a disk partition.
-
Start: Specifies the starting cylinder of a disk partition.
-
End: Specifies the ending cylinder of a disk partition.
-
Type: Specifies the type of the disk partition, such as primary, extended, or logical.
-
Filesystem: Specifies the type of file system, such as ext3, used by a disk partition.
-
Flags: Specifies the flag assigned to a disk partition. A flag helps identify the type of a disk partition. The various flag values are boot, swap, raid, and lvm.
-
You can also view the partition table of different hard disks by using the select command. The select command allows you to view the partition table of a different disk partition without restarting the parted utility. The syntax of the select command is:
select /dev/hdb
Creating Disk Partitions
You can create a disk partition by using the mkpart command provided by the parted utility. Creating a disk partition involves different processes, such as labeling, formatting, and creating mount points.
To create a disk partition:
-
Start the parted utility for the hard disk on which you want to create the disk partitions.
-
Determine whether or not free space is available on the hard disk, by viewing its partition table.
-
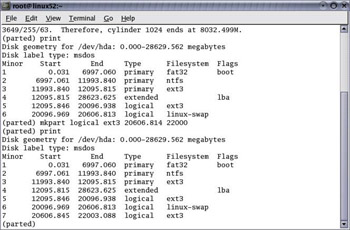
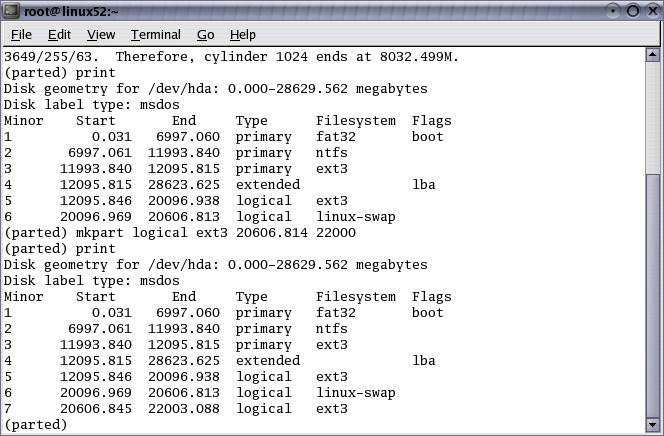
Run the following command at the parted prompt to create the new disk partition:
mkpart logical ext3 20606.814 22000
The above command creates a logical disk partition with ext3 file system type. The starting point of the disk partition is 20606.814 and its end point is 22000.
-
Verify that the new disk partition has been created by using the print command at the parted prompt, as shown in Figure 4-20-14:
-
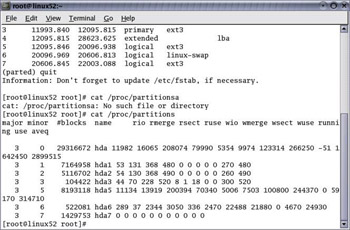
Run the following command at the shell prompt to verify whether or not the kernel can identify the new disk partition:
cat /proc/partitions
Figure 4-20-15 shows the output of the cat command:
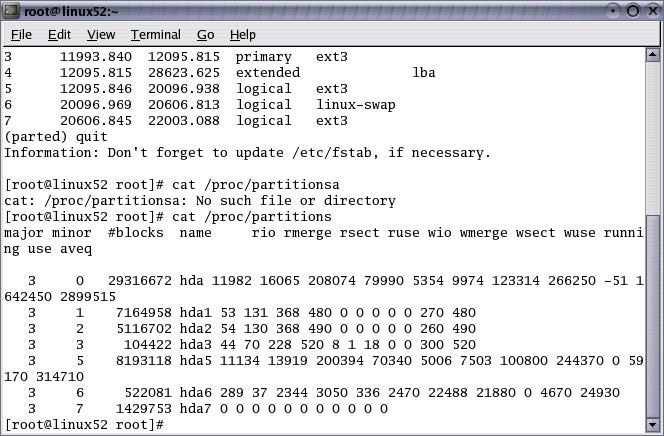
Figure 4-20-15: Output of the cat CommandNote You can exit the parted prompt by using the quit command.
-
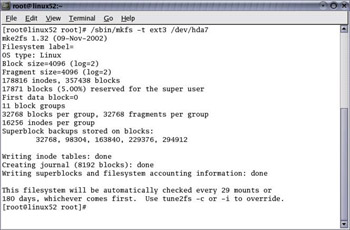
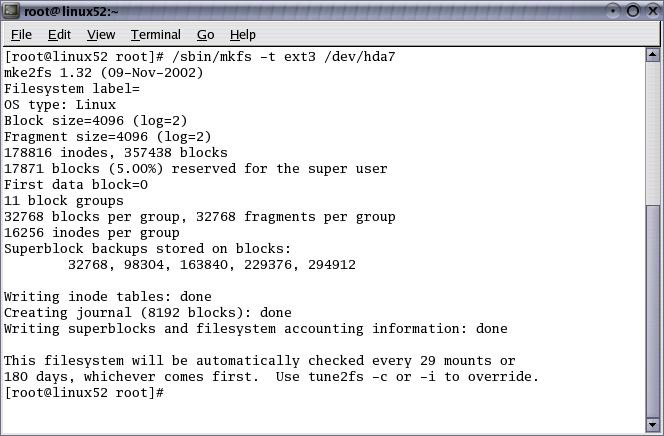
Run the following command at the shell prompt to format the newly created disk partition, /dev/hda7, and create a new file system:
/sbin/mkfs -t ext3 /dev/hda7
Figure 4-20-16 shows the output after formatting the /dev/hda7 disk partition:
-
Run the following command at the shell prompt to assign a label to the newly created disk partition:
e2label /dev/hda7 /new
-
Create a mount point for the newly created disk partition by using the following command at the shell prompt:
mkdir /new
-
Edit the /etc/fstab file and add the following code to mount the disk partitions at boot time:
LABEL=/new/new ext3 defaults 1 2
The above code specifies information about the disk partition, such as label, mount point, and file system. It also specifies that the disk partition is mounted at boot time.
Removing Partitions
You can remove an existing disk partition by using the rm command of the parted utility. To remove an existing partition:
-
Start the parted utility for the hard disk from which you want to delete an existing disk partition.
-
Run the print command at the parted prompt to determine the minor number of the disk partition from the partition table.
-
Run the following command to delete the disk partition with minor number, seven:
rm 7
-
Verify the removal of the disk partition from the partition table by using the print command.
-
Verify that the kernel can identify the removal of the disk partition by using the following command:
cat /proc/partitions
-
Edit the /etc/fstab file to remove the information about the deleted partition.
Managing Swap Partitions
Swap partitions increase the memory capacity of a computer by allowing the memory space of the hard disk to be used as the additional RAM. You can create and manage swap partitions by using the parted utility.
Adding Swap Partitions
You can add a swap partition by using the mkpartfs command of the parted utility. You must unmount all the disk partitions and disable the swap space before adding a swap partition. To add a swap partition:
-
Run the following command at the shell prompt to initiate the parted utility:
parted /dev/had
-
Determine the amount of free space available on hard disk, hda by using the print command.
-
Run the following command at the parted prompt to add the swap partition:
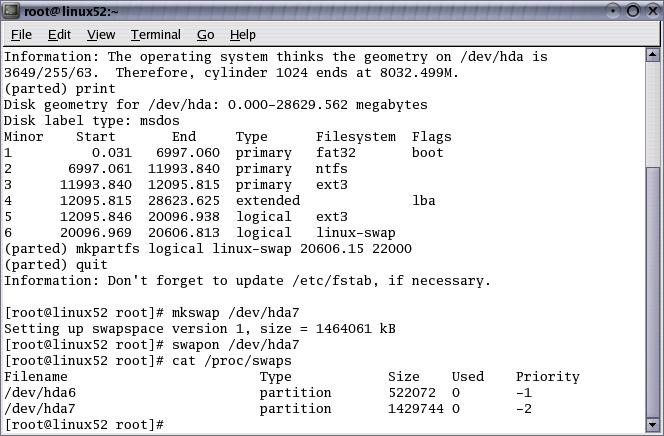
mkpartfs logical linux-swap 20606.15 22000
-
Exit the parted prompt by using the quit command.
-
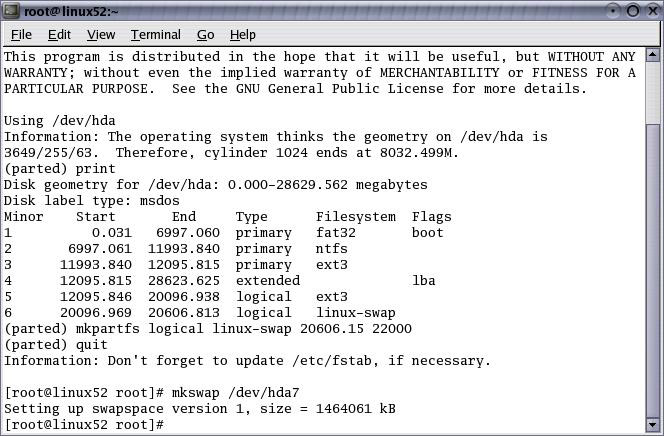
Run the following command at the shell prompt to setup the swap partition:
mkswap /dev/hda7
Figure 4-20-17 shows the output of the mkswap command:
-
Run the following command at the shell prompt to enable the swap partition:
swapon/dev/hda7
-
Edit the /etc/fstab file and add the following code to mount the swap partition at boot time:
/dev/hda7 swap swap defaults 0 0
-
Run the following command to verify whether or not the swap partition is enabled:
cat /proc/swaps
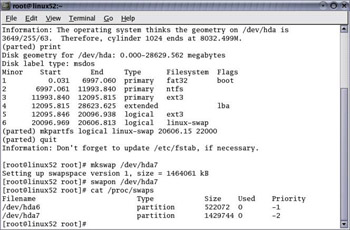
Figure 4-20-18 shows the output of the cat /proc/swaps command:
Removing Swap Partition
You can remove a swap partition by using the rm command of the parted utility. You must unmount all the disk partitions and disable the swap space before removing a swap partition. To remove a swap partition:
-
Run the following command at the shell prompt to disable all the swap partitions:
/swapoff dev/hda7
-
Edit the /etc/fstab file to remove the information about the swap partition.
-
Initiate the parted utility to open the parted prompt.
-
Determine the minor number of the swap partition, which you want to delete, by using the print command.
-
Run the following command to remove the swap partition having minor number seven:
rm 7
-
Exit the parted prompt by using the quit command.
Creating RAID Devices and LVM Groups
A RAID device is a collection of different disk drives arranged in an array, which acts as a single large disk drive. A RAID device reduces the amount of time required to access data because the transfer of data occurs simultaneously from multiple disk drives present in a RAID array. A RAID device also increases the storage capacity, as data is stored in multiple hard disks. In addition, a RAID device also reduces the impact of disk failure. A RAID device is implemented in the following ways:
-
Hardware RAID: Uses RAID controllers to implement RAID device in a computer. RAID controllers are hardware components that interconnect different disk drives of a RAID array and provide a single disk interface to the computer.
-
Software RAID: Uses kernel code to implement a RAID device in a computer and does not require RAID controllers.
The amount of data stored on each disk drive of an array depends on the RAID configuration. The different configurations of RAID, which are also called RAID levels are:
-
Level 0: Divides data into different strips that are stored across different disk drives of a RAID array. This RAID level is also called disk striping. This level does not provide data redundancy.
-
Level 1: Stores same data in all the hard disks present in an array to provide redundancy of data. This RAID level is also called disk mirroring. This level provides high data availability because if one disk drive fails, the same data can be accessed from the other disk drive in the array. The disadvantage of this level is that it requires double amount of disk space to store a specific amount of data.
-
Level 4: Uses one disk drive of the array for error correction and other disk drives for storing data. The disk drive for error correction stores the parity bit used for error correction. This level reduces the impact of disk failure as only partial data loss occurs, if any one disk drive of the array fails.
-
Level 5: Divides and stores data along with their parity bit in all disk drives of the array. Data loss does not occur, if any one of the disk drive fails, but the data failure of more than one disk drive causes the entire data array to fail.
-
Linear RAID: Stores data sequentially across all disk drives of the array. When a hard disk is full, the data is stored on the next hard disk present in the array. This level does not provide data redundancy. The failure of one disk drive of the array causes the complete array to fail.
You can create a RAID device using RAID partitions of fixed size. As a result, you cannot resize a RAID device. LVM groups provide the resizing feature that helps to eliminate this disadvantage. You can resize an LVM group by adding logical volumes to it. You can create RAID devices and LVM groups by using the Partitioning screen.
Creating a RAID Device
You can create a RAID device by using two or more RAID partitions. You can create a RAID device and RAID partitions by using Disk Druid. To create a RAID partition:
-
Click the New button on the Partitioning screen to open the Add Partition dialog box.
-
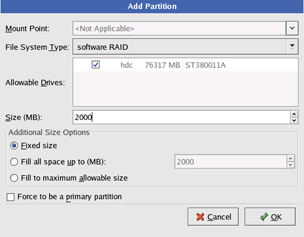
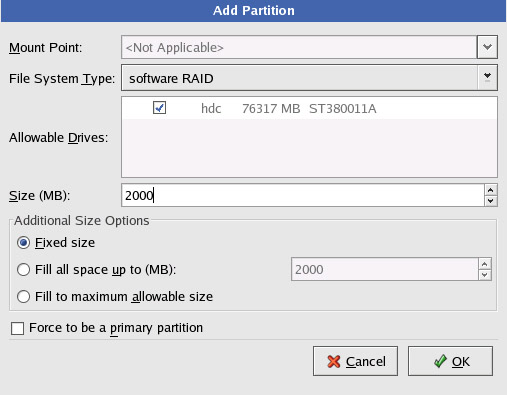
Select software RAID from the File System Type list and enter 2000 in the Size (MB) text box, as shown in Figure 4-20-19:
-
Click OK to create the RAID partition.
-
Create another RAID partition of equal size. The newly created RAID partitions appear in the Partitions list of the Partitioning screen.
You need to use the RAID option of the Partitioning screen to create a RAID device from the newly created RAID partitions. To create a RAID device:
-
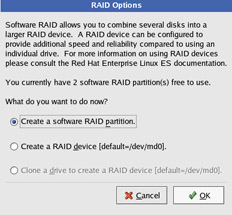
Click RAID in the partitioning screen to display the RAID Options dialog box, as shown in Figure 4-20-20:
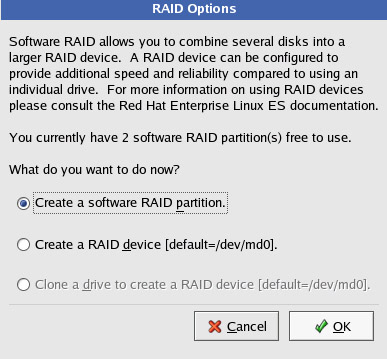
Figure 4-20-20: The RAID Options Dialog BoxThe various options in the RAID Options dialog box are:
-
Create a software RAID partition: Helps create a software RAID partition.
-
Create a RAID device [default=/dev/md0]: Helps create a RAID device using different RAID partitions.
-
Clone a drive to create a RAID device [default=/dev/md0]: Helps create a RAID device similar to another RAID device.
-
-
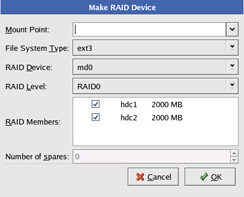
Select the Create a software RAID partition option and click OK to display the Make RAID Device dialog box, as shown in Figure 4-20-21:
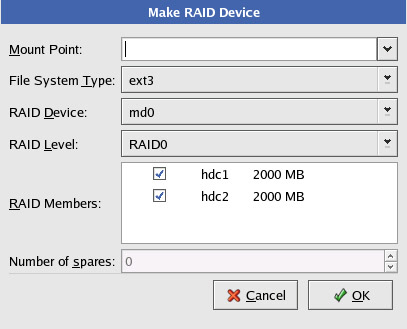
Figure 4-20-21: The Make RAID Device Dialog BoxThe various options provided by the Make RAID Device dialog box are:
-
Mount Point: Helps specify a mount point for the RAID device.
-
File System Type: Helps specify the type of file system to be used by the RAID device.
-
RAID Device: Helps assign a name, such as md0 and md1 to the RAID device.
-
RAID Level: Helps assign a RAID level, such as RAID0 and RAID1 to the RAID device.
-
RAID Members: Lists various available RAID partitions, such as hdc1 and hdc2, in a list box.
-
Number of spares: Specifies the number of remaining RAID partitions.
-
-
Enter /raid in the Mount Point text box, and select ext3 from the File System Type list.
-
Select md0 from the RAID Device list in the Make RAID Device dialog box and RAID0 from the RAID Level list.
-
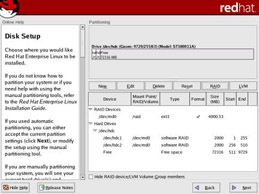
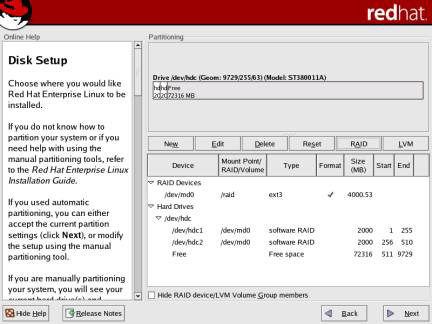
Click OK to create the RAID device for RAID partitions, hdc1 and hdc2. The new RAID device, /dev/md0 appears in the Partitioning screen, as shown in Figure 4-20-22:
You can also edit a RAID device by selecting it from the Partitions list and clicking the Edit button on the Partitioning screen.
Creating LVM Groups
You create LVM groups using different disk partitions with file system type, physical volume. To create an LVM group, you need to first create different physical volume partitions and then use the LVM option on the Partitioning screen, to create an LVM group.
To create physical volume partitions:
-
Click New in the Partitioning screen to display the Add Partition dialog box.
-
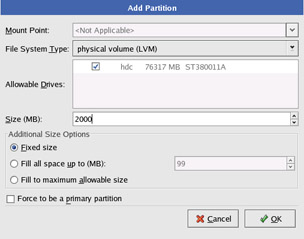
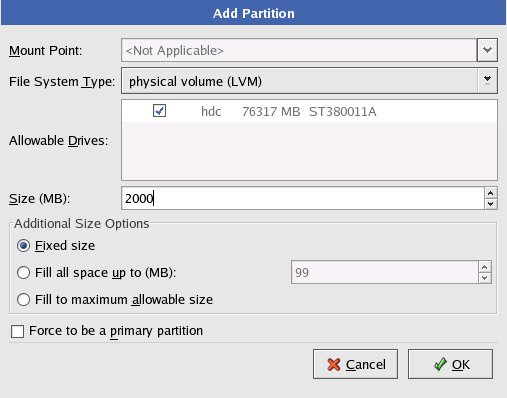
Select physical volume (LVM) from the File System Type list and enter 2000 in the Size (MB) text box, as shown in Figure 4-20-23:
-
Click OK to create the physical volume partition.
-
Create two more physical volume partitions. The newly created physical volume partitions appear in the Partitions list of the Partitioning screen.
Note You can specify different size for these physical volume partitions.
You need to use the LVM option of the Partitioning screen to create an LVM group from the newly created physical volume partitions. To create an LVM group:
-
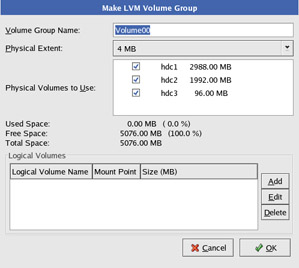
Click the LVM button in the Partitioning screen to display the Make LVM Volume Group dialog box, as shown in Figure 4-20-24:
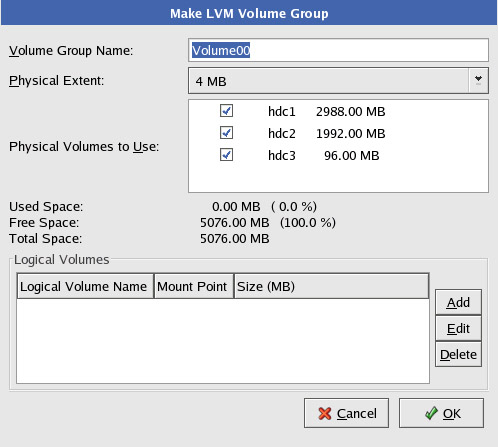
Figure 4-20-24: The Make LVM Volume Group Dialog BoxThe various options provided by the Make LVM Volume Group dialog box are:
-
Volume Group Name: Helps specify a name for the new LVM group. The default name for the LVM group is Volume00.
-
Physical Extent: Helps specify the size of the addressable units for the logical volumes of an LVM group. The default size is 4 MB.
-
Physical Volumes to use: Lists the various available physical volume partitions.
-
Add: Helps add an LVM group by using the selected physical volume partitions.
-
Edit: Helps edit an LVM group.
-
Delete: Helps delete an LVM group.
-
-
Enter the name of the LVM group in the Volume Group Name text box and select a physical extent size from the Physical Extent list.
-
Select the physical volumes that you want to use for creating LVM group from the Physical Volumes to Use list.
-
Click Add in the Make LVM Volume Group dialog box to display the Make Logical Volume dialog box, as shown in Figure 4-20-25:
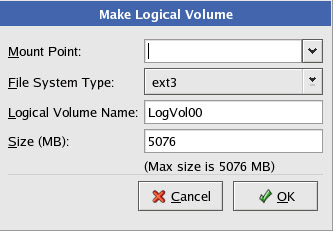
Figure 4-20-25: The Make Logical Volume Dialog BoxThe various options provided by the Make Logical Volume dialog box are:
-
Mount Point: Helps specify the mount point of a logical volume.
-
File System Type: Helps select the type of file system to be used by the logical volume.
-
Logical Volume Name: Helps specify a name for the logical volume.
-
Size (MB): Helps specify the size of the logical volume.
-
-
Enter /pv in the Mount Point text box and select ext3 as the file system type from the File System Type list.
-
Enter the name of the logical volume in the Logical Volume Name text box and the size of the logical volume in the Size (MB) text box.
-
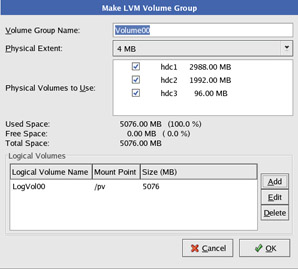
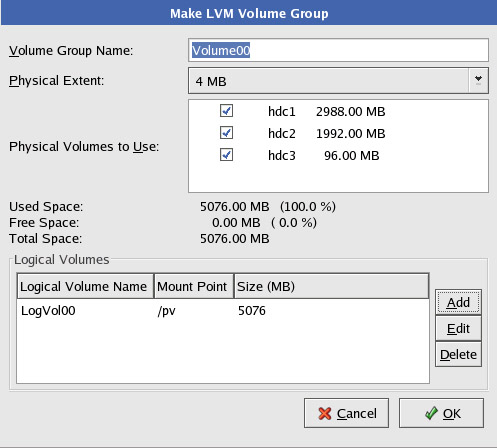
Click OK to create the logical volume. The information about the newly created logical volume appears in the Logical Volumes list box of the Make LVM Volume Group dialog box, as shown in Figure 4-20-26:
-
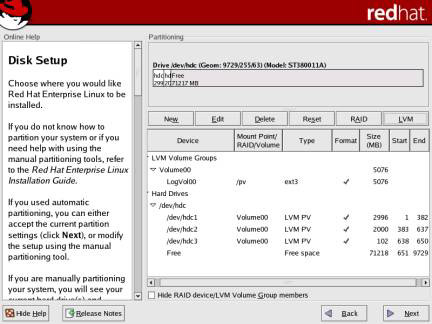
Click OK in the Make LVM Volume Group dialog box to create the LVM group. The newly created LVM group and the various physical volumes appear in the Partitions list of the Partitioning screen, as shown in Figure 4-20-27:
You can edit the LVM group to add more logical volumes by using the Edit option of the Partitioning screen. This helps in the resizing the LVM groups.

