A Linux computer can be configured to manage end-users and their passwords and various other tasks, such as network-related tasks, user-related tasks, and file system-related tasks. In addition, you can use Pluggable Authentication Module (PAM) to authenticate end-users on a range of services, such as telnet, File Transfer Protocol (FTP), and HyperText Transfer Protocol (HTTP).
This ReferencePoint discusses administering Linux using Linuxconf, installing new packages, and configuring server operations, such as starting and stopping services. It also explains how to apply patches to the kernel.
Linuxconf
Linuxconf is an administrative utility shipped with most distributions of Linux. It can be invoked from the shell or a graphical user interface (GUI), such as K Desktop Environment (KDE) or GNU-Network Object Model Environment (GNOME).
| Note | You need to log on as the root user to perform administrative tasks. |
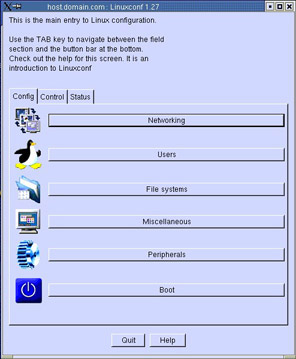
Linuxconf allows you to configure, control, and view the status of various services and devices in Linux, as shown in Figure 2-4-1:
Use Linuxconf to perform tasks related to networking, user management, file systems, associated peripherals, and booting as well as miscellaneous tasks.
Network Related Tasks
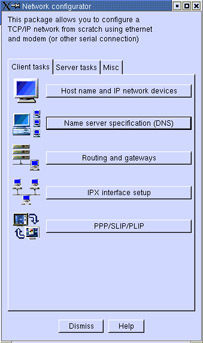
Linuxconf lets you change network parameters, such as host name, Domain Naming Service (DNS), routing, Internetwork Packet Exchange (IPX), and Point-to-Point Protocol (PPP). To change the network parameters, click the Networking button in the Linuxconf window. The Network configurator window of Linuxconf appears, as shown in Figure 2-4-2:
Host Name and IP Network Devices
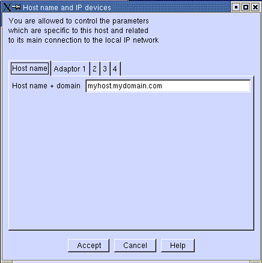
To modify the host name related settings for the server, click the Host name and IP network devices button in the Network configurator window. The Host name and IP devices window appears, as shown in Figure 2-4-3:
This window also lets you specify the Ethernet adaptor to be used. You can configure up to 4 adaptors for use with your computer. It also lets you specify how the host should be assigned an IP address. The host can be assigned an IP address either by specifying it in the window or by configuring the server to assign the address automatically.
Name Server Specification
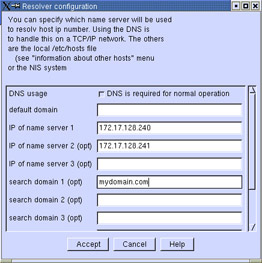
To change DNS related settings, click the Name server specification (DNS) button. The Resolver configuration window appears, as shown in Figure 2-4-4. This window lets you specify DNS related settings, such as the default domain, IP of name servers, and search domains:
The DNS related settings enable you to specify how the computer will look up addresses of other machines.
The default domain is the name of the domain that this machine belongs to. The IP of name server 1 option allows you to specify the name server for the network that will resolve all host names to IP addresses. IP of name server 2 is an optional specification, which allows you to specify other DNS server that can be used in case the primary name server is shutdown or has crashed. The search domain options are optional and must always be left empty, except in rare cases.
Routing and Gateways
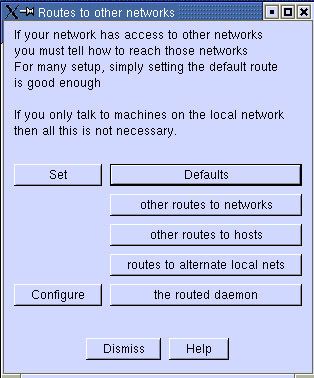
To change routing and gateway related settings, click the Routing and gateways button. The Routes to other networks window appears, as shown in Figure 2-4-5. This window lets you specify settings related to routing:
IPX Interface Setup
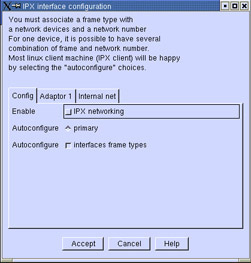
IPX needs to be set up if the network uses the IPX/Netware protocol. The IPX interface configuration window allows you to specify the IPX adaptor and its configuration. It also allows you to specify the internal net number and the internal node number required for Netware.
To modify the IPX interface related settings, click the IPX interface setup button. The IPX interface configuration window appears, as shown in Figure 2-4-6, which lets you specify IPX related configuration settings:
PPP/SLIP/PLIP Configurations
The PPP, SLIP, and PLIP interfaces help a computer establish connection with another computer through a modem or other communication devices. For example, a connection based on PPP interface using the /dev/ttys0 port allows the computer to establish a connection to an Internet service provider (ISP) using the modem. SLIP and PLIP are rarely used.
The PPP/Slip/Plip configurations window allows you to add connections to another computer via a modem or any other communication device. These devices can operate on PPP, SLIP, or PLIP interfaces. These interfaces help the computer establish a connection to another computer.
To modify the PPP/SLIP/PLIP related configurations, click the PPP/Slip/Plip button. The PPP/Slip/Plip configurations window appears, as shown in Figure 2-4-7:
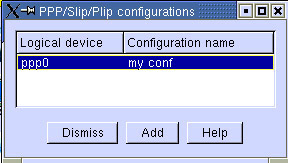
Figure 2-4-7: The PPP/Slip/Plip configurations Window
User Related Tasks
Use Linuxconf to perform user-related tasks, such as add, delete, and modify users. You can also use it to set policies for passwords, user accounts, and shells.
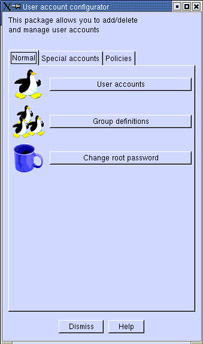
To perform user-related tasks, click the Users button in the Linuxconf window. The User account configurator window of Linuxconf appears, as shown in Figure 2-4-8:
Adding Users
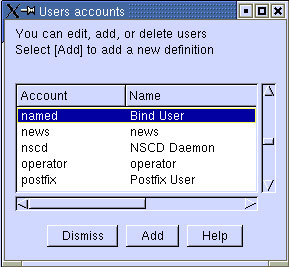
To add users or view user information, click the User accounts button. The User accounts window appears, as shown in Figure 2-4-9:
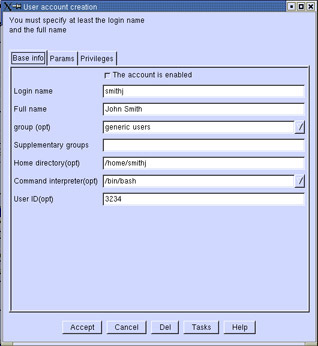
To add a user to the computer, click the Add button in the User accounts window. The User account creation window appears, as shown in Figure 2-4-10:
When adding new user accounts, specify:
-
Login name, which is used by the user to log on to the computer.
-
Full name of the user.
-
Group to which the user belongs.
-
Home directory of the user, where all files and personalization settings will be stored. The home directory is the default directory that is open when the user logs on to the computer.
-
Command interpreter for the shell the user will use. It can be any shell installed on the computer, such as bash, sh, ksh, and rsh.
-
User ID of the user assigned for specific tasks, such as quota management.
When adding users, also specify optional parameters for the account, such as account expiration, password expiration, and must keep days that make sure the user logs on regularly.
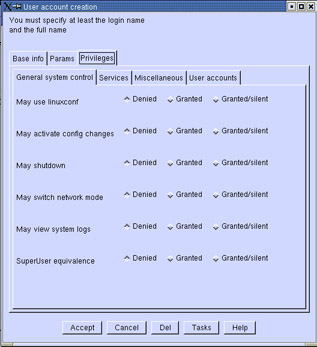
You can also set privileges for the account, such as: may use linuxconf, may activate config changes, and may shutdown. These options are required when assigning specific privileges to certain accounts. For example, John Smith, a Web server administrator, may require privileges for Apache administration to add, modify, and delete content on the Web site.
Figure 2-4-11 shows the Privileges Tab of the User account creation window:
Viewing and Modifying User Information
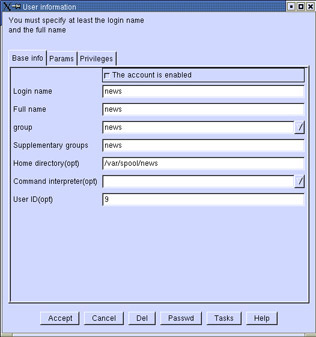
User information of the account, such as Login name, Full name, and group, can be modified. To view or modify the information of an account, click the account name. Figure 2-4-12 shows the User information window for the user, news:
Adding Groups
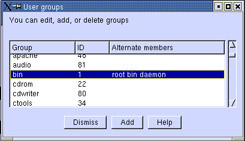
Users can be classified in groups, which enables you to collectively assign permissions to members of a group. To add groups, click the Group definitions button. The User groups window appears, as shown in Figure 2-4-13:
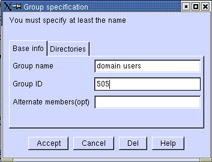
Click the Add button to add a group. The Group specification window appears, as shown in Figure 2-4-14:
When adding new groups, specify:
-
Group name for the new group. No two groups can have the same name.
-
Group ID for the new group. No two groups can have the same ID.
-
Alternate members for the group, such as root, bob, or Cathy.
You can also specify the directory for each group.
Viewing and Modifying Group Information
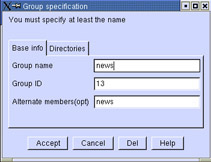
To view the information pertaining to a group, click the group name. You can modify the Group name, the Group ID, and alternate members for that group. Figure 2-4-15 shows the Group specification window for the user, news:
Changing Root Password
To change the root password for the system, click Change root password button. The Changing password window appears, as shown in Figure 2-4-16:
| Caution | Be sure not to lose the root password because you can't make any changes without it. |
Special Accounts
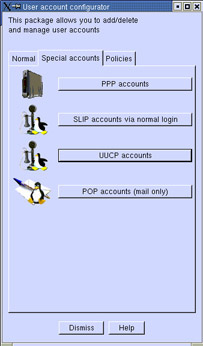
Linux supports special accounts that are used for specific services, such as PPP, Post Office Protocol (POP), and Unix-to-Unix Copy (UUCP).
To add, view, delete, or modify special accounts, click the Special accounts tab in the User account configurator window. Figure 2-4-17 shows the Special accounts tab of the User account configurator window:
| Note | The method to add, modify, view, or delete special user accounts is the same as that for normal accounts. |
Policies
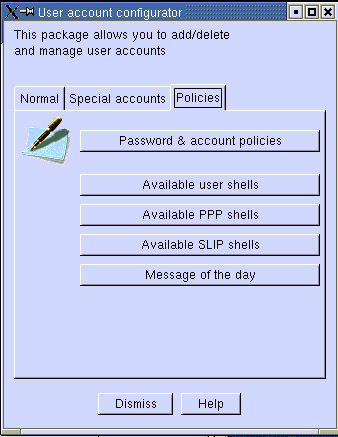
Linuxconf lets you specify policies for user accounts and passwords, such as minimum length for passwords, access permissions, and minimum number of non-alphabetic characters in passwords. Figure 2-4-18 shows the Policies tab of the User account configurator window:
The policies tab lets you set:
-
Password & account policies: For user accounts and passwords.
-
Available user shells: For users, shows the list of shells that are installed on the system and the default shell that must be used when a user logs on.
-
Available PPP shells: For special accounts. It shows the list of PPP scripts installed on the system and the default shell that must be used for a PPP account.
-
Available SLIP shells: For special accounts. It shows the list of SLIP scripts installed on the system and the default shell that must be used for a SLIP account.
-
Message of the day: Is shown every time a user logs on. It is a welcome message set by the root user.
File System Related Tasks
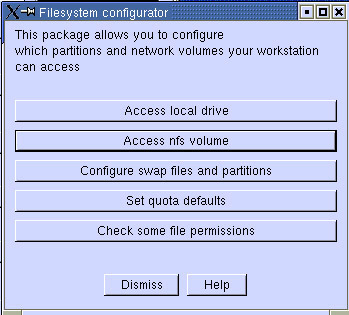
Linuxconf lets you perform file system related tasks. It can be used to configure settings, such as drives in the computer that can be accessed from the workstation and drives in the Network File System (NFS). To perform file system related tasks, click the File systems button in the Linuxconf window. The File system configurator window appears, as shown in Figure 2-4-19:
Accessing Local Drives
Linuxconf lets you specify which drives in the system can be accessed from the workstation. Drives are located in the /dev folder of Linux. To access a drive in Linux, you need to first mount it.
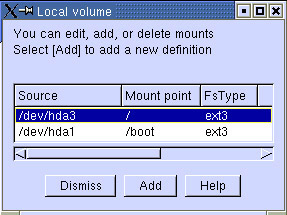
To add, view, or delete a local drive, click the Access local drive button. The Local volume window appears, as shown in Figure 2-4-20:
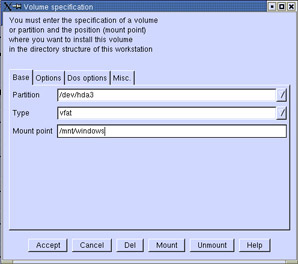
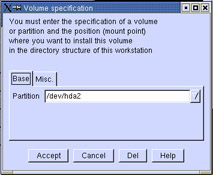
To add a new local drive definition, click the Add button in the Local volume window. The Volume specification window appears, as shown in Figure 2-4-21:
When you add new volumes, specify the:
-
Partition that needs to be mounted. All partitions and non-removable storage devices are listed in the /dev directory.
-
Type of the file system for the volume. A volume can be of any of the types supported by Linux, such as ext2, minix, and vfat.
-
Mount point for the volume. A volume can be mounted anywhere in the Linux file system, but it is generally mounted in the /mnt directory.
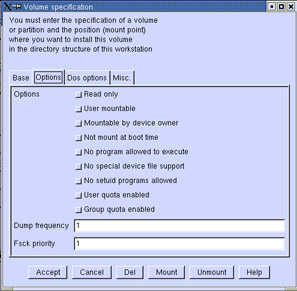
To view, modify, or delete volumes, click the volume entry in the Local volume window. This shows the Volume specification window. Click the Options tab and set options for the volume, such as Read only, User mountable, and Not mount at boot time, as shown in Figure 2-4-22:
Accessing NFS Drives
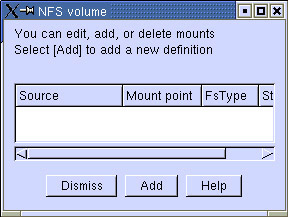
Linuxconf allows you to specify which NFS drives can be accessed from the workstation. NFS drives are located on the network. To access a NFS drive, click the Access nfs volume button. The NFS volume window appears, as shown in Figure 2-4-23:
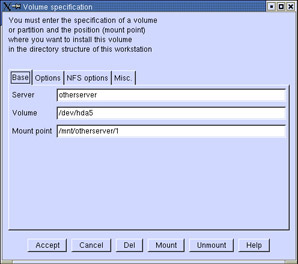
To add a new NFS volume definition, click the Add button in the NFS volume window. The Volume specification window appears, as shown in Figure 2-4-24:
When you add NFS volumes, specify the:
-
Volume in the server that needs to be mounted.
-
Mount point where the volume needs to be mounted on the system.
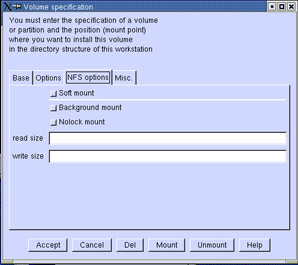
Set options for the NFS volume, such as, Soft mount, Background mount, and Nolock mount, as shown in Figure 2-4-25:
Configuring Swap Drives
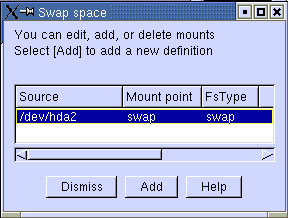
Swap drives are used by Linux as virtual memory. Linuxconf enables configuring swap drives and files. To add, view, or delete swap files and drives, click the Configure swap files and partitions button. The Swap space window appears, as shown in Figure 2-4-26:
To add a swap drive, click the Add button in the Swap space window. This shows the Volume specification window, as shown in Figure 2-4-27:
When adding swap drives to the system, specify the partition in which the swap partition needs to be created.
Miscellaneous Tasks
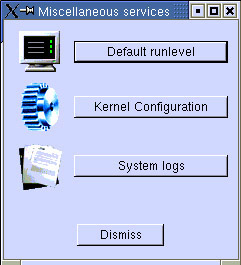
Linuxconf lets you perform miscellaneous tasks for Linux, such as setting the default run level, configuring the kernel and system logs. To do so, click the Miscellaneous button in the Linuxconf window. The Miscellaneous services window appears, as shown in Figure 2-4-28:
Setting Default Runlevel
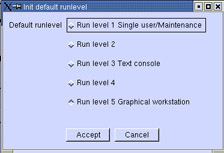
The run level in Linux specifies the default mode in which the system should boot. Set the run level for the system for maintenance, text console, or a graphical workstation. Setting the run level enables Linux allocate the resources more effectively. To select a run level for the system, click the Default runlevel button. The Init default runlevel window appears, as shown in Figure 2-4-29:
The default runlevels available in Linux are:
-
Run level 1 Single user/Maintenance: Is used when only a single user is using the system or if the system is down for maintenance.
-
Run level 2: Is left empty and can be customized to suit the requirements of a system.
-
Run level 3 Text Console: Provides only a shell console. It is used in situations such as development or acting as a server only, where GUI is not required.
-
Run level 4: Is left empty and can be customized to suit the requirements of a system.
-
Run level 5 Graphical workstation: Is used when all services and graphics of the system are used. This is the normal run level for the system.
Configuring the Kernel
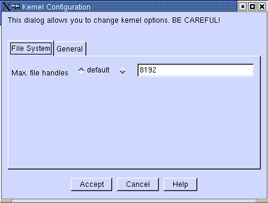
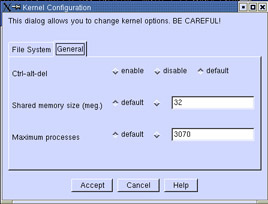
Using Linuxconf, set options for the kernel, such as maximum file handles, shared memory size, and maximum processes. To set kernel options, click the Kernel Configuration button. The Kernel Configuration window appears, as shown in Figure 2-4-30:
The File System tab enables specifying the maximum number of file handles that the kernel can handle. This number specifies to the kernel how many I/O operations it can perform at a point of time. This option is higher for systems being used for services such as Web servers.
The General tab, as shown in Figure 2-4-31, lets you set generic options for the kernel:
The options are:
-
Ctrl-alt-del: Specifies whether or not to enable rebooting by hitting the Ctrl-alt-del key combinations.
-
Shared memory size: Specifies the size of the shared memory that can be used.
-
Maximum processes: Specifies the maximum number of processes that can be executed.
| Caution | An invalid configuration can lead to a system crash. Make sure you do not change these settings unless you are absolutely sure of what you are doing. |
Configuring System Logs
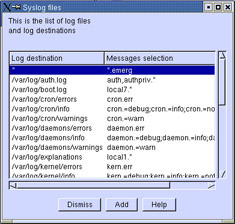
Linuxconf lets you specify the location of the log files for various services. You can also specify options to synchronize the file after every message. To configure system logs, click the System logs button. The Syslog files window appears, as shown in Figure 2-4-32:
When you add a new log file, specify:
-
Syslog file or destination: Indicates where the file contents will be stored. If it is the syslog file, entries will be appended. If it is a new destination, a new file is created and the content is stored.
-
Selections: Indicates what will be stored in the log file.
Boot Related Tasks
Linuxconf allows you to perform boot related tasks, such as whether or not the system should boot with graphics enabled.
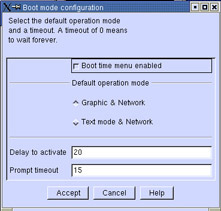
To set the boot mode, click the Boot button in the Linuxconf window. This shows the Boot configuration window. Click the Default boot mode button. The Boot mode configuration window appears, as shown in Figure 2-4-33:
-
Boot time menu enabled: Enables Linux to show a list while booting that displays the various operating systems, and boot modes for Linux.
-
Default operation mode: Specifies the default boot mode. The available modes are Graphic & Network, and Text mode & Network.
-
Delay to activate: Specifies the duration for which the boot menu should be shown before the system boots from the default mode.
-
Prompt timeout: Specifies the duration for which the prompt should be shown before the GUI boots.
Installing and Uninstalling Packages
Packages in Linux are shipped in the .rpm format. These are installable files that decompress and install the specified software in the system automatically.
Packages can be installed and uninstalled using the rpm command run in the shell. You can also install and uninstall software in GUI mode using the software manager package provided with the specific Linux distribution.
Installing Packages Using Shell
The rpm command provides a variety of options that can be used to perform package related tasks. To install a package on the system, execute the command:
rpm –Uvh
This command installs the specified package on the system. The –U parameter specifies rpm to install the package. The –v parameter shows the lists of files in the package in verbose mode. The –h parameter shows the hash marks as the package installs.
For example, executing the command:
rpm –Uvh qmail-1.03.rpm
installs the qmail program on the system, and shows list of files and hash marks while installing.
| Note | If you want to use automatic install, the package should be in .rpm format. |
Installing Packages Using Software Manager
To install packages using the Software Manager provided with Mandrake Linux:
-
Open Mandrake Control Center.
-
Select System from the left pane.
-
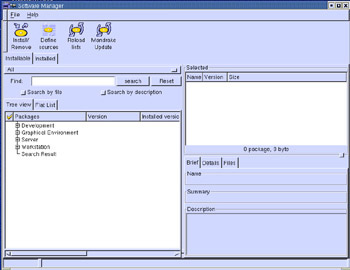
Click the Software Manager icon. The Software Manager window appears, as shown in Figure 2-4-34:
-
Click the Installable tab. It shows the list of packages that can be installed. You can add new sources of packages by clicking the Define sources button.
-
Select the package that needs to be installed. It will be shown in the Selected sub-window. Click the Install/Remove button. Software Manger installs the selected package.
Uninstalling Packages Using Shell
Uninstalling removes a package and all dependent files from the system. Use the rpm command to uninstall packages from the system. To uninstall a package from the system, execute the command:
rpm –e
This command uninstalls the package from the system. For example, executing the command:
rpm –e postgresql
removes the postgresql package from the system.
Uninstalling Packages Using Software Manager
Use the Software Manager provided with Mandrake Linux to uninstall packages from the system. To uninstall packages using Software Manager:
-
Open the Software Manager in the Control Center.
-
Click the Installed tab. It shows the list of software that is currently installed.
-
Select the package to uninstall. It will be shown in the Select sub-window. Click the Install/Remove button. Software Manager uninstalls the selected package.
Starting and Stopping Services
Various services such as FTP, HTTP, and telnet run in Linux. The Mandrake control center allows you to start, stop, and restart services at any point.
Starting Services
Services can be started using the Mandrake Control Center. To start a service:
-
Open Mandrake Control Center.
-
Select System from the left pane.
-
Click the Services icon. The Mandrake Control Center: Services and daemons window appears, as shown in Figure 2-4-35:
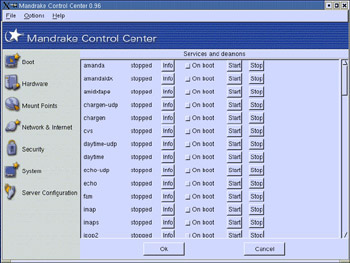
Figure 2-4-35: The Mandrake Control Center: Services and daemons WindowTo start a service:
-
Select a service and click the Start button. The services and daemons sub-window shows the list of services installed on the system along with their current status. The service starts successfully if no errors are encountered. You can also set a service to start at boot-time by selecting the On boot radio button.
-
Specify the command:
start at the shell prompt. For example, /etc/rc.d/init.d/sendmail start
-
Stopping Services
Services can be stopped using Mandrake control center. To stop a service:
-
Open the Mandrake Control Center.
-
Select System from the left pane.
-
Click the Services icon. This shows Services and daemons sub-window.
-
Select a service and click the Stop button. The service stops and unloads from memory.
To stop services from the shell, use the command
/etc/rc.d/init.d/sendmail stop
Linux Kernel Patches
The kernel is the core software that runs an operating system. It is accountable for flexibility, security, and generic features of the operating system. The Linux kernel, by default, has been designed to be secure. It can be customized to suit particular needs of a system.
For more information on Linux Kernel, see the Understanding Linux Kernel ReferencePoint.
Downloading the Kernel Patch
There are several patches available for Linux kernels. Kernels are classified as experimental and stable versions. Stable kernels have an even number in the second place in their version numbers. For example, 2.4.2 is a stable kernel because it is denoted by 4 in the second place. Experimental kernels have an odd number in the second place in their version numbers. For example, 2.3.2 is an experimental kernel because it is denoted by 3 in the second place.
The latest stable version of kernel at this point is Linux kernel version 2.4.19. Download the patch-2.4.19.gz file. You can download it at http://www.kernel.org.
Unpacking and Configuring the Kernel Patch
The kernel patch is in the gunzip format. It needs to be unpacked before it can be installed.
To unpack the downloaded patch:
-
Copy the downloaded file into the /usr/src directory using the command:
cp patch-2.4.19.gz /usr/src
These commands copy the downloaded file into the /usr/src directory and extract the contents of the archive there.
To configure the new kernel patch, execute the make command using the command:
make config
This command allows you to specify which portions of the kernel are to be enabled or disabled. Typing yes or no for individual options of the kernel does this.
You could also use a menu-based text interface or an X-windows based GUI interface for making the configuration. To use a menu-based text interface, execute the command:
make menuconfig
This command allows you to specify kernel configuration options in a menu- based text interface.
To use an X-windows based GUI interface, execute the command:
make xconfig
This command lets you specify kernel configuration options in an X-windows based GUI interface.
For more information on configuring the kernel, see the Configuring and Compiling the Linux Kernel ReferencePoint.
Compiling and Installing the Kernel Patch
Compile the kernel after configuring it. The new kernel may have dependencies, which need to be installed to ensure proper functioning. The old kernel files present in the system need to be removed before the new kernel can be installed. Therefore, a compiled binary image of the new kernel needs to be generated to enable the system to boot the new kernel. If you enable any modules while configuring the patch, they need to be compiled and installed. To compile and install the kernel:
-
Generate the list of dependencies using the command:
make dep
-
Clean the old kernel files in the system using the command:
make clean
This command removes the compiled files of the old kernel present in the system.
-
Create the binary kernel image using the command:
make bzImage
This command creates the compiled binary image of the new kernel. This binary kernel image is used while booting.
-
Compile and install modules using:
make modules_install
This command compiles the modules and installs them on the system.
Configuring LILO
Linux Loader (LILO ) is a boot loader that loads Linux and other operating systems present on the system. You need to configure LILO to boot the newly patched kernel that has been installed. To configure LILO:
-
Copy the compiled binary kernel image to a file called vmlinuz-new in the root directory using the command:
cp bzImage /vmlinuz-new
This command copies the compiled binary image of the new kernel to the root directory.
-
Insert the lines into the /etc/lilo.conf file.
image=/vmlinuz-new
label=linux-new
root=/dev/hda3
vga=normal
read-only
These lines in the lilo.conf file specify options for LILO. The image=/vmlinuz-new option allows LILO to boot the new kernel. The label=linux-new is shown when the system boots and the LILO menu is shown. This is necessary if there is more than one kernel that can be booted. The root option specifies where the Linux file system is located. The vga=normal option specifies to LILO to boot in normal graphics mode. The read-only parameter specifies that the kernel is read-only.

